What size tile spacers and how to use
Tile spacers are small but critical tools in any tiling project, ensuring uniform grout lines, proper tile alignment, and a professional finish. While they may seem insignificant, choosing the right size and type of tile spacer can significantly impact both the aesthetic appeal and structural integrity of your tiled surface. This comprehensive guide explores tile spacer types, how to select the appropriate size based on tile type and installation environment, and step-by-step instructions for their effective use. Whether you’re a DIY enthusiast or a professional tiler, this article will equip you with the knowledge to achieve flawless results.
Why Tile Spacers Matter
Tile spacers serve multiple purposes that go beyond simply creating gaps between tiles. They ensure:
- Uniform Grout Lines: Spacers maintain consistent spacing, resulting in a polished and symmetrical appearance.
- Structural Integrity: Grout joints allow for slight tile movement due to temperature changes, humidity, or weight, preventing cracks or buckling.
- Ease of Grouting: Properly spaced joints facilitate the application and compaction of grout, ensuring durability.
- Aesthetic Appeal: The width of grout lines influences the overall design, with narrower lines offering a sleek, modern look and wider lines emphasizing tile patterns.
Neglecting spacers or using the wrong size can lead to uneven gaps, misaligned tiles, or even structural issues over time. Understanding the nuances of tile spacers is key to a successful installation.
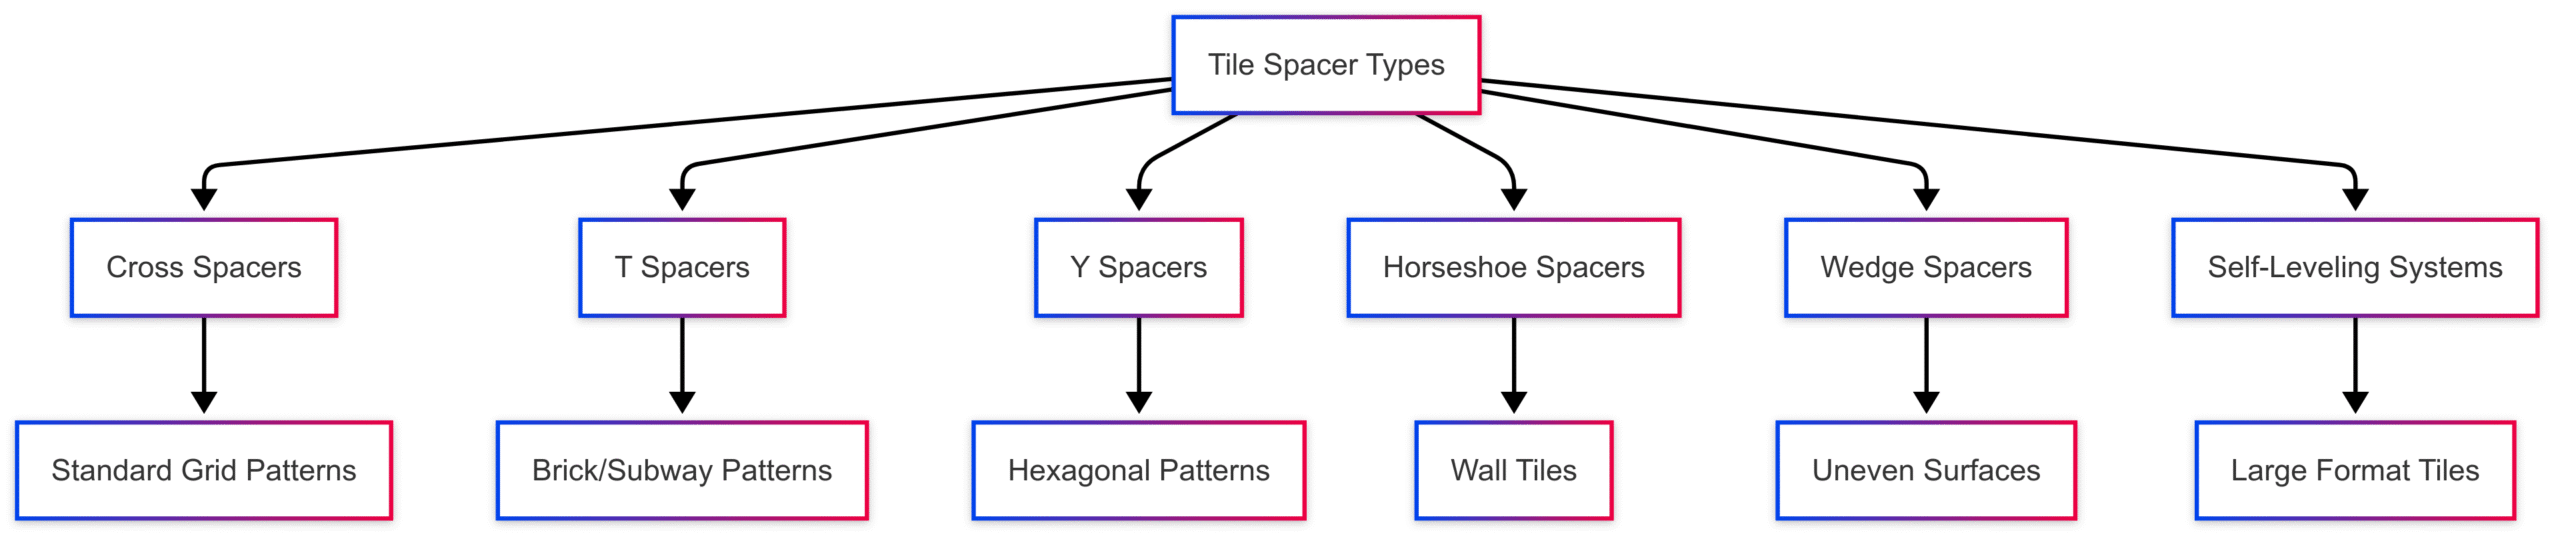
Types of Tile Spacers
Tile spacers come in various shapes and sizes, each designed for specific tiling needs. Below is a detailed overview of the most common types, along with their applications and typical sizes.
| Spacer Type | Shape | Best Use | Common Sizes |
|---|---|---|---|
| Cross Spacers | Cross (X-shaped) | Standard installations for square/rectangular tiles, wall or floor | 1mm, 1.5mm, 2mm, 3mm, 5mm |
| T Spacers | T-shaped | Brick, subway, or herringbone patterns; edges against walls or trim | 1mm, 2mm, 3mm, 5mm |
| Y Spacers | Y-shaped | Patterns with three-tile intersections, such as hexagonal tiles | 1mm, 2mm, 3mm |
| Horseshoe Spacers | U-shaped | Wall tiles, subway patterns, or perimeter details | 1/16″, 1/8″, 1/4″ |
| Wedge Spacers | Wedge-shaped | Uneven surfaces or wall tiling to adjust tile height | Varies (adjustable) |
| Self-Leveling Systems | Clips and Wedges | Large format tiles to prevent lippage and ensure a level surface | 1mm, 2mm, 3mm, 5mm |
Cross Spacers
The most versatile and widely used, cross spacers are ideal for standard grid or offset patterns. They fit at the intersection of four tiles, ensuring even spacing in all directions. Available in sizes from 1mm to 10mm, they are suitable for both wall and floor installations.
T Spacers
T spacers are used when tiles don’t meet at a four-way intersection, such as in brick or subway patterns. They can also be created by snapping off one leg of a cross spacer, making them a cost-effective option for specific layouts.
Y Spacers
Y spacers are designed for patterns where three tiles converge, such as hexagonal or triangular tiles. They ensure consistent spacing at complex junctions, maintaining design integrity.
Horseshoe Spacers
Horseshoe spacers are U-shaped and primarily used for wall tiles or patterns where full cross spacers aren’t practical. Their design allows for easy removal, making them popular for subway or metro tile installations.
Wedge Spacers
Wedge spacers are adjustable and used to level tiles on uneven surfaces or to align the first row of wall tiles. They are particularly useful for ensuring a plumb and level installation.
Self-Leveling Systems
Self-leveling systems combine spacers with clips and wedges to prevent lippage (uneven tile edges) in large format tiles. The system applies pressure to keep tiles level while the adhesive cures, ensuring a smooth, professional finish.
Choosing the Right Tile Spacer Size
Selecting the appropriate spacer size depends on several factors, including tile type, size, installation location, and design preferences. Below are key considerations and recommendations.
Factors Influencing Spacer Size
- Tile Type and Material:
- Ceramic Wall Tiles: Typically use 2-3mm spacers for a balanced look and sufficient grout depth.
- Ceramic Floor Tiles: Require 3-5mm spacers to accommodate movement and weight.
- Porcelain, Granite, or Marble: Often use 3mm spacers for a tight, elegant grout line.
- Handmade or Non-Rectified Tiles: Need larger spacers (3/16″ to 3/8″) due to size variations.
- Tile Size:
- Small Tiles (e.g., Mosaics, 6×6 inches): Use 1-2mm spacers for a delicate, seamless appearance.
- Standard Tiles (e.g., 12×12 inches): Use 2-3mm spacers for a balanced look.
- Large Format Tiles (e.g., 24×24 inches or larger): Use 3-5mm spacers to ensure stability and reduce lippage.
- Installation Location:
- Walls: Smaller spacers (1-2mm) are sufficient due to lower stress.
- Floors: Larger spacers (3-5mm) enhance durability and accommodate foot traffic.
- Wet Areas (e.g., Bathrooms, Kitchens): Slightly wider spacers (3mm+) improve waterproofing by allowing more grout.
- Design Preferences:
- Minimalist/Modern: Narrow grout lines (1-2mm) create a sleek, seamless look.
- Traditional/Rustic: Wider grout lines (3-5mm) emphasize tile patterns and add character.
- Room Shape and Size:
- In small or irregularly shaped rooms, larger spacers can minimize the visual impact of uneven walls or floors.
- In large spaces, wider spacers can enhance the perception of scale and grandeur.
Recommended Spacer Sizes by Tile Type
| Tile Type | Recommended Spacer Size | Notes |
|---|---|---|
| Small Ceramic/Porcelain | 1-2mm | Ideal for mosaics or subway tiles, creates a delicate look |
| Standard Ceramic/Porcelain | 2-3mm | Balances aesthetics and functionality for 12×12 inch tiles |
| Large Format Porcelain | 3-5mm | Prevents lippage and accommodates weight |
| Handmade/Non-Rectified | 3/16″ – 3/8″ | Accounts for size variations, suits terracotta or clay tiles |
| Marble/Granite | 3mm | Tight grout lines enhance elegance |
| Floor Tiles (General) | 3-5mm | Ensures durability and accommodates movement |
Special Considerations
- Rectified vs. Non-Rectified Tiles: Rectified tiles (precisely cut) allow for thinner grout lines (1-2mm), while non-rectified tiles require wider spacers (3mm+) to account for slight size discrepancies.
- Movement Joints: Perimeter and panel movement joints should be at least 5mm wide to allow for anticipated movement. These joints must extend through the tile and adhesive layers to the substrate and be filled with flexible sealant (e.g., polyurethane joint sealant).
- Large Format Tiles: Use self-leveling systems to minimize lippage, especially if tiles have slight surface irregularities (e.g., curvature or bowing).
- Cut Tiles: Wider spacers (3-5mm) can reduce the need for cut tiles, saving time and materials.
How to Use Tile Spacers Effectively
Proper use of tile spacers is crucial for achieving a professional finish. Follow these steps to ensure consistent spacing and alignment.
Materials and Tools
- Tiles
- Tile adhesive or mortar
- Notched trowel
- Tile spacers (appropriate size and type)
- Level or laser level
- Chalk line
- Rubber mallet
- Grout
- Sponge and pliers (for spacer removal)
Step-by-Step Guide
- Prepare the Surface:
- Ensure the surface is clean, dry, and level. Remove any debris or old adhesive.
- Apply a primer if recommended by the adhesive manufacturer.
- Plan the Layout:
- Dry-lay tiles in the center of the room to visualize the design and determine the best starting point.
- Use a chalk line or laser level to mark a grid, ensuring straight lines and a centered layout.
- Account for unusual contours (e.g., around showers or sinks) and adjust the layout accordingly.
- Apply Adhesive:
- Spread adhesive evenly over a small section using a notched trowel, following the manufacturer’s instructions.
- Work in manageable areas to prevent the adhesive from drying before tiles are placed.
- Place the First Tile:
- Press the first tile into the adhesive, aligning it with the marked gridlines.
- Use a slight twisting motion to ensure a strong bond.
- Insert Spacers:
- Place spacers at each corner of the tile, ensuring they are flush with the tile edges.
- For floor tiles, consider using additional “square” spacers (created by turning cross spacers on their side) along each tile edge for extra accuracy.
- For non-standard patterns (e.g., subway or herringbone), use T or horseshoe spacers as needed.
- Continue Tiling:
- Place subsequent tiles, pressing them firmly against the spacers to maintain consistent gaps.
- Check alignment with a level regularly and adjust tiles with a rubber mallet if necessary.
- Wipe away excess adhesive from joints with a damp sponge to ensure clean grout lines.
- Handle Edges and Corners:
- Use T or horseshoe spacers at walls, trim, or other obstacles where full cross spacers won’t fit.
- Trim tiles as needed to fit perimeter areas, maintaining consistent spacer sizes for symmetry.
- Allow Adhesive to Set:
- Let the adhesive cure for 20-30 minutes (or per manufacturer’s instructions) before removing spacers.
- Avoid disturbing tiles during this time to prevent misalignment.
- Remove Spacers:
- Carefully remove spacers using fingers, a chisel, or needle-nose pliers, pulling along the joint to avoid disturbing tiles.
- For stubborn spacers, gently slide a utility knife or chisel under the spacer to pop it out.
- Clean and store reusable spacers for future projects.
- Grout the Tiles:
- Once the adhesive is fully cured (typically 24 hours), mix and apply grout using a rubber float, pressing it into the joints diagonally.
- Remove excess grout with a damp sponge, being careful not to remove grout from the joints.
- Apply a grout sealer after curing to protect against stains and moisture.
Tips for Success
- Test Different Layouts: Conduct a dry run to compare spacer sizes and patterns, especially in rooms with irregular shapes or obstacles.
- Maintain Straight Lines: Use a laser level or chalk line to ensure tiles and spacers remain aligned.
- Avoid Grouting Over Spacers: Never grout over spacers, as this can lead to cracks or visible plastic in the grout lines.
- Time Spacer Removal Carefully: Remove spacers before the adhesive fully sets but after it’s firm enough to hold tiles in place (typically 20-30 minutes for fast-setting adhesives).
- Use Self-Leveling Systems for Large Tiles: These systems reduce lippage and ensure a level surface, especially for tiles larger than 12×12 inches.
Calculating How Many Spacers You Need
To estimate the number of spacers required, multiply the number of tiles by the number of corners per tile (typically four for square/rectangular tiles). For example:
- 105 tiles x 4 corners = 420 spacers
For patterns like subway or herringbone, you may need additional spacers (e.g., T or horseshoe) for edges or non-standard intersections. Always purchase extra spacers to account for breakage or loss.
Tile Spacer Alternatives (Not Recommended)
While tile spacers are the industry standard, some alternatives are occasionally used in a pinch. These are generally not recommended due to inconsistency and potential for poor results:
- Matchsticks: Provide a very small gap (about 1mm) but are inconsistent and difficult to remove.
- Chalk Lines: Used to mark a grid for manual alignment, but they don’t ensure consistent spacing and are prone to human error.
- Eyeballing: Relying on visual judgment leads to uneven gaps and an unprofessional finish.
For best results, always use purpose-made tile spacers designed for your specific tile type and pattern.
Where to Buy Tile Spacers and Pricing
Tile spacers are widely available at home improvement stores, online retailers, and specialty tile shops. Here are some options and approximate prices (based on common market rates):
| Retailer | Spacer Type | Size | Price (Approx.) |
|---|---|---|---|
| Home Depot | Cross Spacers | 2mm (100-pack) | $5-$10 |
| Amazon | T Spacers | 3mm (200-pack) | $8-$15 |
| Tile Giant (UK) | Horseshoe Spacers | 1/8″ (100-pack) | $6-$12 |
| Specialty Tile Stores | Self-Leveling System | 3mm (50 clips) | $20-$40 (clips + wedges) |
| AliExpress | Cross Spacers | 1-5mm (500-pack) | $10-$20 (bulk) |
- Online Retailers: Amazon and AliExpress offer competitive prices, especially for bulk purchases, but shipping times may vary.
- Home Improvement Stores: Home Depot, Lowe’s, and B&Q (UK) stock a range of sizes and types, ideal for immediate needs.
- Specialty Tile Stores: Offer a wider selection and larger quantities, perfect for professional projects.
When purchasing, prioritize quality over price. Cheap spacers may break or deform, leading to inconsistent spacing. Look for spacers made from durable plastic with precise dimensions.
Maintenance and Reuse of Tile Spacers
Most plastic tile spacers are reusable if handled carefully. To maintain them:
- Clean After Use: Rinse spacers with water to remove adhesive or grout residue, then dry thoroughly.
- Store Properly: Keep spacers in a dry, organized container to prevent damage.
- Inspect Before Reuse: Discard any spacers that are cracked, deformed, or worn to ensure consistent performance.
Self-leveling system clips are typically single-use, but wedges can be reused multiple times.
FAQs
Yes, plastic spacers can be reused if they are undamaged. Clean them thoroughly after use and inspect for wear before reusing to ensure consistent spacing.
Non-specialized items like matchsticks or chalk lines are not recommended, as they lead to inconsistent gaps and an unprofessional finish. Always use purpose-made spacers for best results.
Select spacer size based on tile size and pattern. Small tiles (e.g., mosaics) use 1-2mm spacers, standard tiles use 2-3mm, and large tiles use 3-5mm. Narrower spacers suit minimalist designs, while wider spacers enhance traditional patterns.
Spacer color doesn’t affect functionality, as they are removed before grouting. However, choosing a color similar to the tiles can help visualize the final look during installation.
Use T or horseshoe spacers at corners and edges where full cross spacers won’t fit. Trim tiles as needed and adjust spacer positions to maintain consistent gaps and symmetry.
Conclusion
Tile spacers are indispensable for achieving a professional, durable, and visually appealing tile installation. By selecting the right size and type based on tile material, size, and installation environment, you can ensure uniform grout lines and a flawless finish. Whether you opt for traditional cross spacers, versatile T spacers, or advanced self-leveling systems, proper planning and execution are key. Follow the step-by-step guide, test your layout, and use tools like laser levels to maintain precision. With the right spacers and techniques, your tiling project will transform any space into a masterpiece of design and functionality.
For bulk purchases or custom spacer designs, consider contacting reputable manufacturers with a proven track record. Start your tiling journey today with confidence, knowing that every detail—down to the humble tile spacer—has been carefully considered.
Please share this What size tile spacers and how to use your friends and do a comment below about your feedback.
We will meet you on next article.
Until you can read, Sink Faucet Hole Sizes Explained – #1 Best Guide