How To Make Gorilla Glue Cure Faster
Discover how to make Gorilla Glue cure faster with expert tips, step-by-step guides, and optimal conditions for a strong, quick bond.
Gorilla Glue is renowned for its exceptional bonding strength, making it a go-to adhesive for projects ranging from household repairs to intricate crafts. Whether you’re fixing a broken mug, assembling furniture, or fletching arrows, waiting for the glue to cure can be a test of patience. Fortunately, there are proven methods to accelerate the curing process without compromising the bond’s integrity. This comprehensive guide explores the science behind Gorilla Glue, practical steps to speed up curing, alternative adhesives, and expert tips to ensure a strong, lasting bond. With a focus on efficiency and effectiveness, we’ll dive into actionable techniques, supported by practical examples, to help you get your projects done faster.
Understanding Gorilla Glue and Its Curing Process
Gorilla Glue is a polyurethane-based adhesive known for its versatility and ability to bond a wide range of materials, including wood, metal, ceramic, plastic, and more. Unlike other adhesives, Gorilla Glue is moisture-activated, meaning it requires a small amount of water to initiate the chemical reaction that leads to curing. This reaction causes the glue to expand slightly as it hardens, creating a robust bond.
There are several types of Gorilla Glue, each with distinct drying and curing times:
- Original Gorilla Glue: Requires 1–2 hours of clamp time to set, reaching 80% cure during this period, with full curing in 24 hours.
- Gorilla Super Glue: Dries in 10–45 seconds, with full curing in 24 hours.
- Gorilla Wood Glue: Sets in 20–30 minutes with clamping, fully curing in 24 hours.
- Gorilla Super Glue Gel: Similar to super glue but with a thicker consistency, setting in 10–45 seconds.
The curing time depends on factors like temperature, humidity, surface type, and the amount of glue applied. By optimizing these variables, you can significantly reduce curing time while maintaining bond strength.
| Glue Type | Set Time (Clamping) | Full Cure Time | Best Use Case |
|---|---|---|---|
| Original Gorilla Glue | 1–2 hours | 24 hours | Wood, metal, ceramic, stone |
| Gorilla Super Glue | 10–45 seconds | 24 hours | Small repairs, plastics, metals |
| Gorilla Super Glue Gel | 10–45 seconds | 24 hours | Vertical surfaces, uneven bonds |
| Gorilla Wood Glue | 20–30 minutes | 24 hours | Woodworking projects |
Why Speeding Up Curing Matters
Waiting for glue to cure can delay projects, especially for time-sensitive tasks like emergency repairs or high-volume crafting. For instance, a user on a social platform shared their frustration with Gorilla Glue taking hours to dry when fletching arrows, requiring three days to complete a single arrow due to slow curing. Speeding up the process can save time, improve efficiency, and ensure projects are completed without compromising quality. The key is to create optimal conditions and use the right techniques to accelerate curing while avoiding common pitfalls.
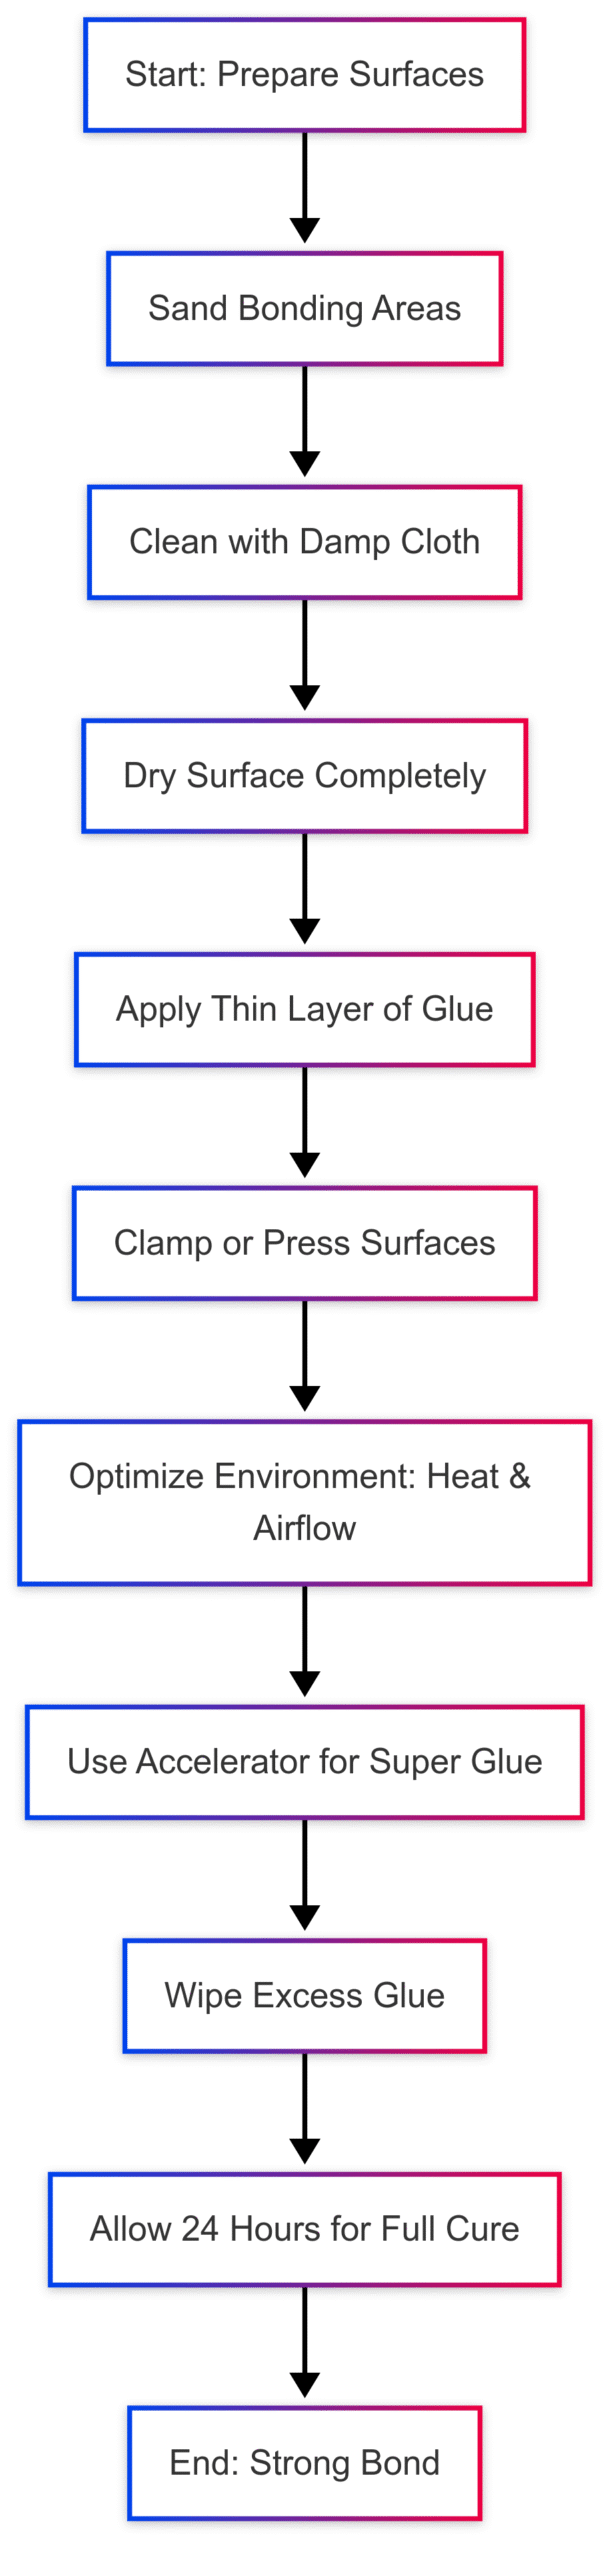
Step-by-Step Guide to Make Gorilla Glue Cure Faster
To achieve a faster cure, follow these detailed steps, tailored to maximize efficiency and bond strength. These methods are applicable to Original Gorilla Glue, Gorilla Super Glue, and other variants, with slight adjustments based on the glue type.
Step 1: Prepare the Surfaces
Proper surface preparation is critical for quick curing and a strong bond. Follow these steps:
- Identify Bonding Areas: Determine where the glue will be applied on both surfaces.
- Sand the Surfaces: Lightly sand the bonding areas with fine-grit sandpaper (120–220 grit) to remove dirt, grease, or coatings that could interfere with adhesion. This step is especially important for smooth surfaces like metal or plastic.
- Clean and Dry: Wipe the surfaces with a damp cloth to remove dust, then dry thoroughly with a clean, dry cloth. For Original Gorilla Glue, leave one surface slightly damp to activate the adhesive, but ensure the other is dry.
Why It Works: Sanding creates a rough surface for better adhesion, while cleaning removes contaminants that slow curing. A slightly damp surface activates Original Gorilla Glue’s polyurethane formula, speeding up the chemical reaction.
Step 2: Apply the Right Amount of Glue
Using the correct amount of glue is crucial for fast curing:
- Original Gorilla Glue: Apply a thin layer (approximately ½ ounce per square foot) to one surface only. Too much glue leads to excess squeeze-out, which prolongs curing.
- Gorilla Super Glue: Use one drop per square inch (6.5 cm²). Spread it thinly with a toothpick or plastic spreader if needed.
- Gorilla Wood Glue: Apply a thin, even layer to one surface, avoiding over-application.
Why It Works: Excess glue increases curing time as it takes longer for moisture to penetrate and initiate the reaction. A thin layer cures faster and reduces mess.
Step 3: Clamp or Press Firmly
Gorilla Glue expands as it cures, so applying pressure ensures a tight bond:
- Use Clamps: For Original Gorilla Glue, clamp the surfaces for 1–2 hours with professional clamps or heavy objects like books or bricks. Ensure even pressure to avoid gaps.
- Gorilla Super Glue: Press the surfaces together for 10–45 seconds. No clamping is needed due to its fast set time.
- Gorilla Tape Alternative: If clamps are unavailable, use Gorilla Tape to hold surfaces tightly.
Why It Works: Clamping prevents the glue from expanding excessively, ensuring a dense bond that cures faster.
Step 4: Optimize Environmental Conditions
Temperature and humidity significantly affect curing time:
- Warm, Low-Humidity Environment: Work in a warm area (ideally 68–75°F or 20–24°C) with low humidity. High humidity can slow curing for super glue but is less impactful for Original Gorilla Glue due to its moisture-activated nature.
- Apply Heat: Place the project near a portable heater, keeping it at a safe distance to avoid overheating (maintain 70–80°F). Alternatively, leave the project in a sunny spot or use an electric blanket set to low for gentle heat.
- Increase Airflow: Use a fan to circulate air around the project, especially for super glue, which cures faster with air exposure.
Why It Works: Heat accelerates the chemical reaction, while airflow reduces moisture in the air, aiding super glue curing. For Original Gorilla Glue, the slight moisture on the surface is sufficient, so avoid overly humid conditions.
Step 5: Use Accelerator Products (For Super Glue)
For Gorilla Super Glue, apply a super glue accelerator (available at hardware stores for $5–$10) to speed up curing:
- Application: Hold the accelerator spray bottle 12 inches (30 cm) from the glued surface and apply a light, even coat. Avoid overuse to prevent blooming (a white, powdery residue).
- Cost: Accelerators like Insta-Cure or Zip Kicker cost $6–$12 for a 2-ounce bottle.
Why It Works: Accelerators trigger an instant chemical reaction, reducing set time to a few seconds.
Step 6: Wipe Excess Glue Immediately
Excess glue prolongs curing and creates mess:
- Use a Dry Cloth or Paper Towel: Gently swipe away squeeze-out without spreading it. For stubborn residue, use standard paint thinner in a well-ventilated area, wearing gloves.
- For Cured Glue: Remove with a chisel, scraper, or sandpaper.
Why It Works: Removing excess glue prevents thick layers that take longer to cure.
Step 7: Allow Full Curing
Even with accelerated methods, allow 24 hours for full curing to achieve maximum strength. Avoid stressing the bond during this period.
Why It Works: Full curing ensures the glue reaches its maximum tensile strength, making the bond durable and resistant to impact or moisture.
Common Mistakes to Avoid
To ensure fast curing and a strong bond, avoid these pitfalls:
- Using Too Much Glue: Excess glue slows curing and weakens the bond. Stick to recommended amounts.
- Skipping Surface Preparation: Dirty or smooth surfaces hinder adhesion and prolong curing.
- Applying to Wet Surfaces (Except Original Gorilla Glue): For super glue, a wet surface prevents proper curing.
- Inadequate Clamping: Insufficient pressure allows the glue to expand too much, weakening the bond.
- Overheating: Excessive heat can damage surfaces or degrade the glue’s effectiveness.
Alternative Adhesives for Faster Curing
If Gorilla Glue’s curing time is too slow for your needs, consider these alternatives, as suggested by users in online forums:
- Loctite Ultra Control Gel: Sets in 10–30 seconds, ideal for fletching or small repairs. Price: $5–$8 for 0.14 oz.
- Goat Tuff Fletching Glue: Sets in 15–30 seconds, designed for archery. Price: $10–$15 for 0.5 oz.
- Saunders NPV: Sets in 1–2 minutes, strong for fletching but slower than super glue. Price: $8–$12 for 1 oz.
- Blue Cap Gorilla Super Glue: Sets in 10–45 seconds, faster than Original Gorilla Glue. Price: $4–$7 for 0.53 oz.
Comparison Table:
| Adhesive | Set Time | Full Cure Time | Price Range | Best Use Case |
|---|---|---|---|---|
| Loctite Ultra Control Gel | 10–30 seconds | 24 hours | $5–$8 | Fletching, small repairs |
| Goat Tuff Fletching Glue | 15–30 seconds | 24 hours | $10–$15 | Archery fletching |
| Saunders NPV | 1–2 minutes | 24 hours | $8–$12 | Archery fletching |
| Gorilla Super Glue (Blue Cap) | 10–45 seconds | 24 hours | $4–$7 | General repairs |
Real-World Applications and User Insights
Users across platforms like Reddit have shared practical experiences with Gorilla Glue and faster-curing alternatives:
- Toy Repair Example: A user repaired a leaking squishy ball by applying Gorilla Super Glue and running cold water over it for a few seconds, achieving a quick seal. This method works because cold water can chill super glue, accelerating its set time, though it’s not recommended for Original Gorilla Glue.
- Fletching Arrows: Archery enthusiasts reported slow curing with Original Gorilla Glue, taking hours per vane. Switching to Gorilla Super Glue (blue cap) or Loctite Ultra Control Gel reduced set times to 20–30 seconds per vane, allowing faster project completion.
These examples highlight the importance of choosing the right Gorilla Glue variant and applying it correctly to minimize curing time.
Troubleshooting Slow Curing
If Gorilla Glue is taking too long to cure, consider these factors:
- Old Glue: As noted by a user, older glue (even if newly purchased) may cure slower. Check the bottle for a dry layer on top; if present, poke through it to access usable liquid glue.
- Surface Contamination: Ensure shafts or surfaces are clean. Use a cleaner like isopropyl alcohol (90% or higher) to remove oils or residues.
- Excess Glue: Apply only a thin layer, as thick applications significantly increase curing time.
- Environmental Conditions: Work in a warm, low-humidity environment to optimize curing.
Pricing and Availability
Gorilla Glue products are widely available at hardware stores, online retailers, and craft stores. Here are approximate prices (based on common retail listings):
- Original Gorilla Glue (4 oz): $6–$9
- Gorilla Super Glue (0.53 oz): $4–$7
- Gorilla Super Glue Gel (0.53 oz): $5–$8
- Gorilla Wood Glue (8 oz): $4–$6
Always check for deals on bulk purchases or multi-packs for cost savings, especially for frequent users like crafters or DIY enthusiasts.
Expert Tips for Optimal Results
- Store Properly: To extend shelf life, wipe the nozzle and cap with a dry cloth after use and store in a cool, dry place. This prevents premature hardening.
- Test First: Apply a small amount to a test surface to ensure compatibility and check curing time.
- Safety First: Always wear disposable gloves to avoid skin contact, as Gorilla Glue is highly adhesive and difficult to remove.
- Ventilation: Work in a well-ventilated area, especially when using accelerators or paint thinner for cleanup.
Conclusion
Making Gorilla Glue cure faster is achievable by optimizing surface preparation, applying the right amount of glue, clamping effectively, and controlling environmental conditions. Whether you’re using Original Gorilla Glue for heavy-duty projects or Gorilla Super Glue for quick fixes, these techniques ensure a strong bond in less time. For applications requiring even faster set times, consider alternatives like Loctite Ultra Control Gel or Goat Tuff Fletching Glue. By following the steps outlined and avoiding common mistakes, you can streamline your projects and achieve professional-quality results. Trust the process, and your Gorilla Glue bonds will stand the test of time.
Please share this How To Make Gorilla Glue Cure Faster your friends and do a comment below about your feedback.
We will meet you on next article.
Until you can read, How To Remove Permanent Marker From Rubber