How to Fix an Electric Blanket: Ensuring Warmth and Safety
Electric blankets are a cherished addition to many homes, delivering cozy warmth during chilly nights. However, like any electrical device, they can develop faults over time, from wiring issues to malfunctioning control units. Knowing how to diagnose and repair an electric blanket can extend its lifespan, save money, and ensure safe operation. This comprehensive guide provides detailed steps to troubleshoot and fix common electric blanket problems, emphasizes safety, and offers preventative maintenance tips. Whether you’re dealing with uneven heating, a non-responsive control unit, or a complete failure, this article will equip you with the knowledge to restore your blanket’s functionality.
Understanding Electric Blanket Issues
Electric blankets operate by passing low-voltage current through insulated heating elements woven into the fabric, controlled by a unit that adjusts temperature settings. Common issues include broken wires, faulty connectors, thermal fuse failures, or control unit malfunctions. These problems can arise from wear and tear, improper use, or manufacturing defects. Before attempting repairs, it’s critical to assess whether the issue is fixable and to prioritize safety to avoid electrical hazards.
Can You Fix an Electric Blanket?
Repairing an electric blanket is often feasible, but the complexity depends on the fault:
- Wiring and Heating Elements: Damaged wires or heating elements are challenging to repair due to their integration into the blanket’s fabric. Accessing and fixing these requires technical skill and precision.
- Control Units and Connectors: Issues like loose connections or faulty switches in the control unit are generally easier to address, often involving simple reconnection or part replacement.
- Thermal Fuses: A blown thermal fuse, designed to prevent overheating, can be replaced, but the root cause of the overheating must be resolved.
Safety is paramount. Electric blankets operate on mains voltage (120V in the US, 230V in the UK), posing risks of electric shock or fire if mishandled. Always unplug the blanket before inspection or repair, and work in a dry environment. If the damage is extensive or you lack electrical expertise, professional repair or replacement may be the safer option.
Common Causes of Electric Blanket Failure
Understanding why an electric blanket stops working is the first step in fixing it. Here are the primary culprits:
- Wiring Issues: Frequent folding, twisting, or heavy use can fray or break the internal heating wires, disrupting the electrical circuit and causing cold spots or complete failure.
- Control Unit Malfunctions: The control unit, which regulates heat settings, can fail due to internal circuitry issues, loose connections, or external damage like power surges.
- Connector Problems: Loose or worn connectors between the blanket, control unit, or power cord can interrupt power flow, leading to intermittent or no heating.
- Thermal Fuse Failure: Thermal fuses cut power if the blanket overheats. A blown fuse halts operation, often indicating an underlying issue like a short circuit.
- User Error: Improper use, such as washing the blanket against manufacturer guidelines or storing it in damp conditions, can damage internal components.
- Mechanical Wear: Over time, components like switches or heating elements degrade, increasing resistance and reducing performance.
Troubleshooting Flowchart
To visualize the troubleshooting process, the following flowchart outlines the steps to diagnose an electric blanket issue:
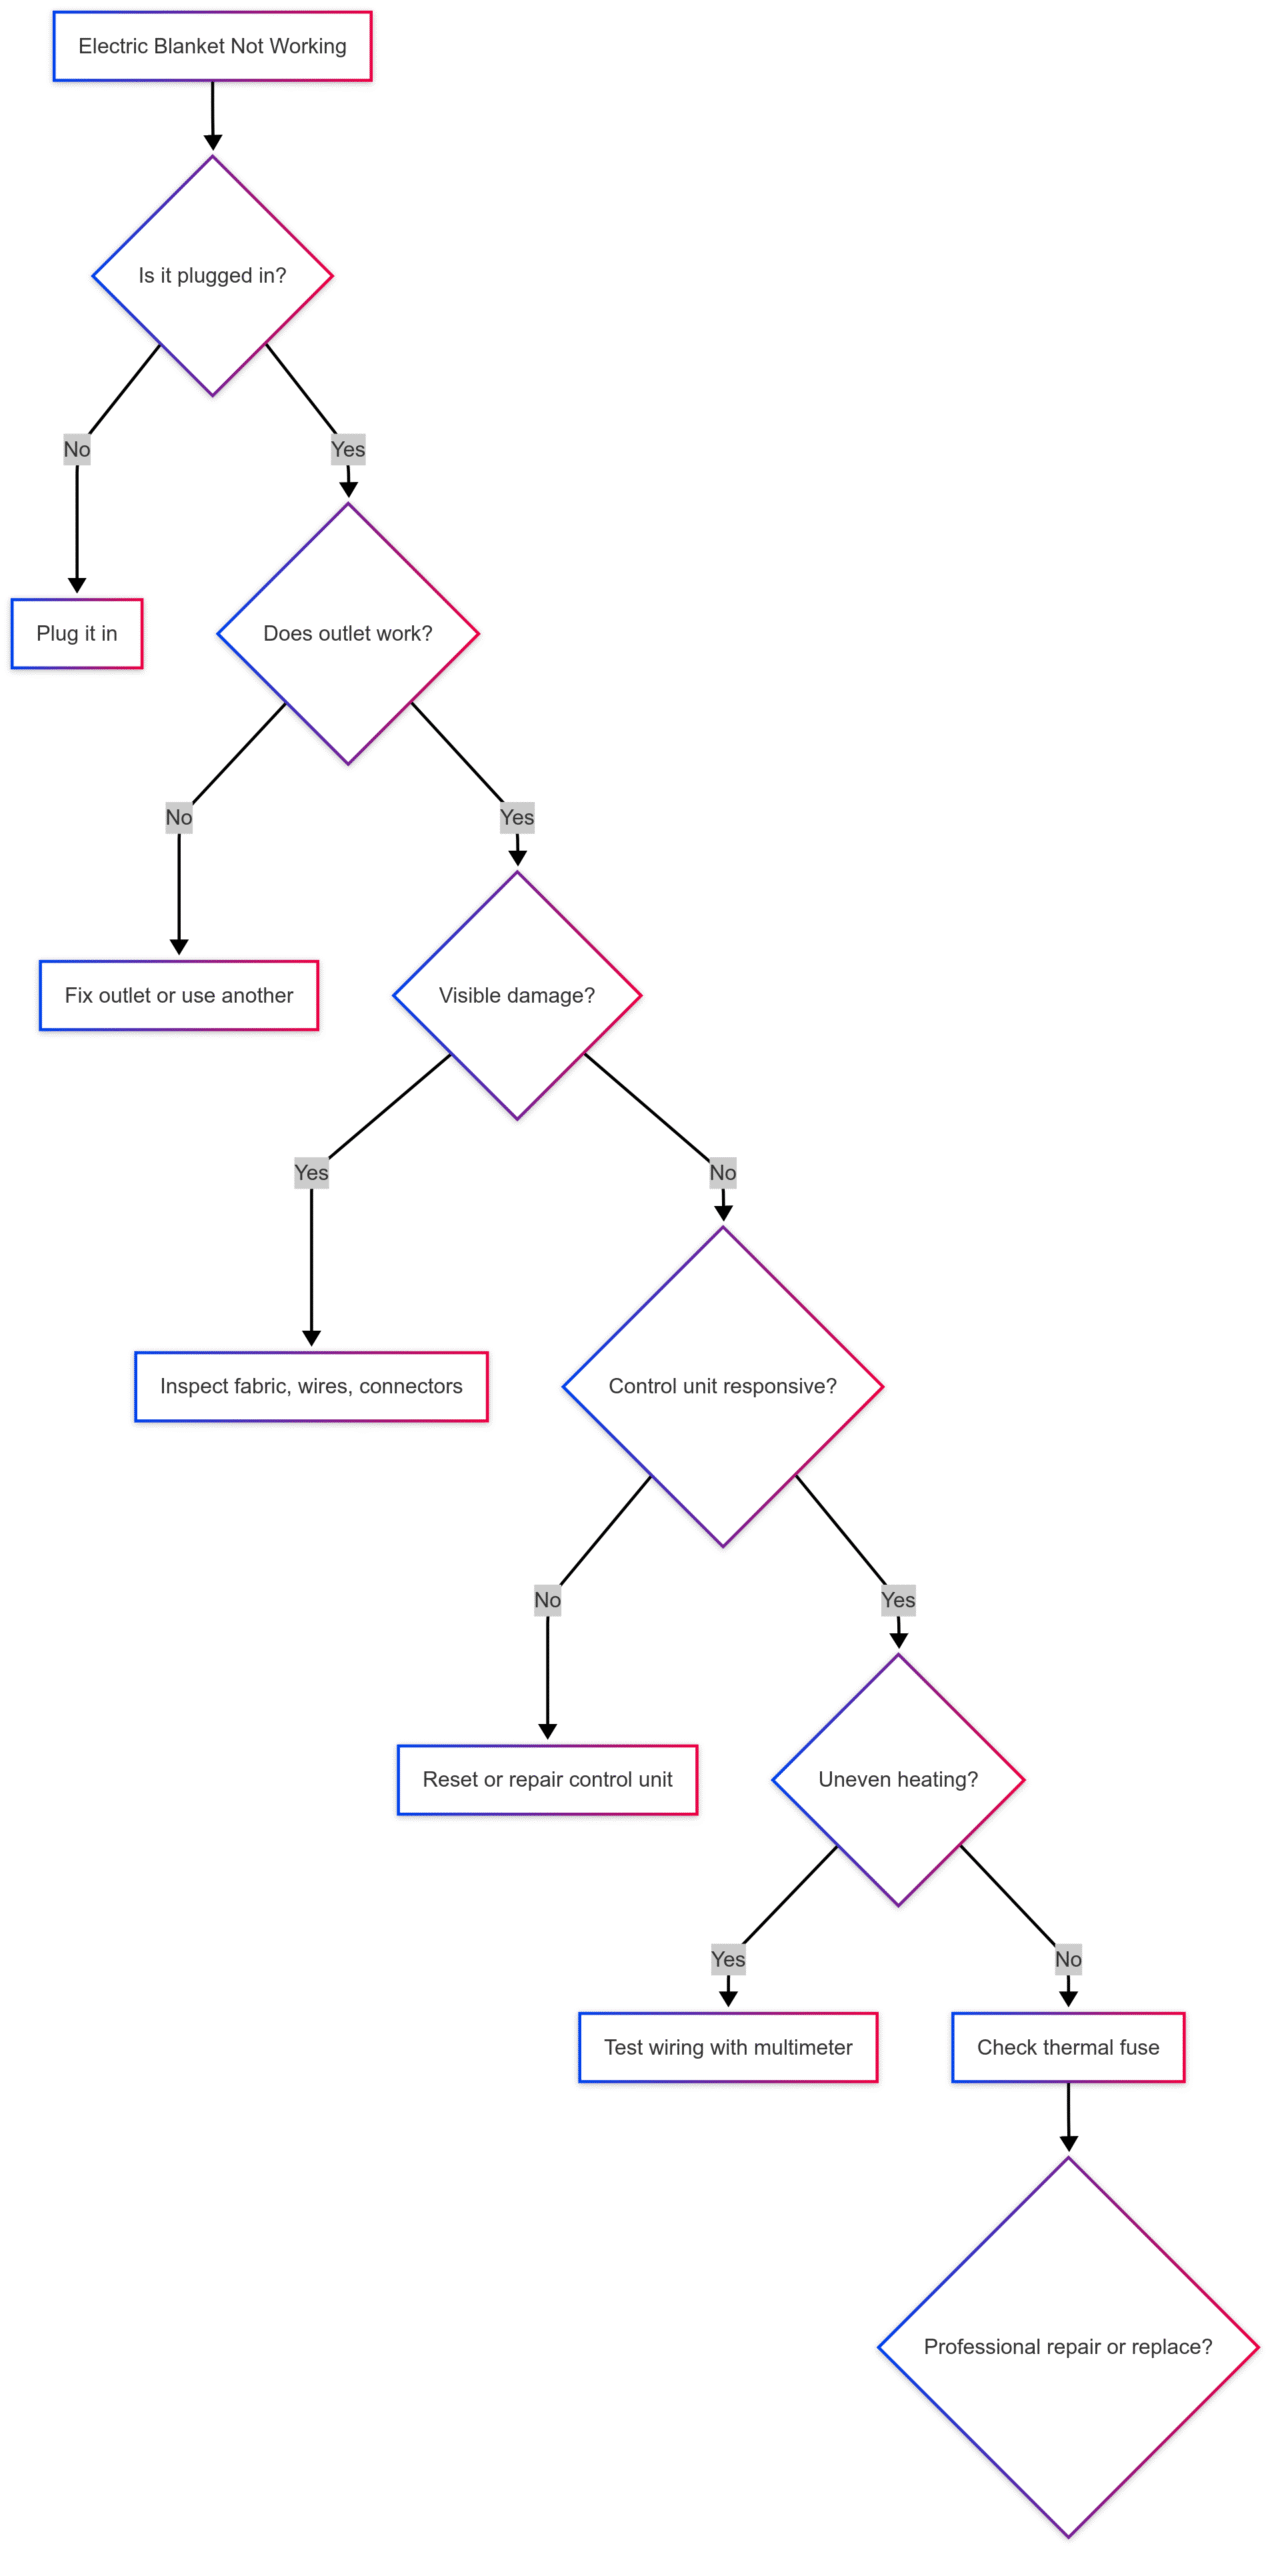
steps to diagnose an electric blanket issue:
This flowchart helps systematically identify the issue, starting with basic checks and progressing to detailed diagnostics.
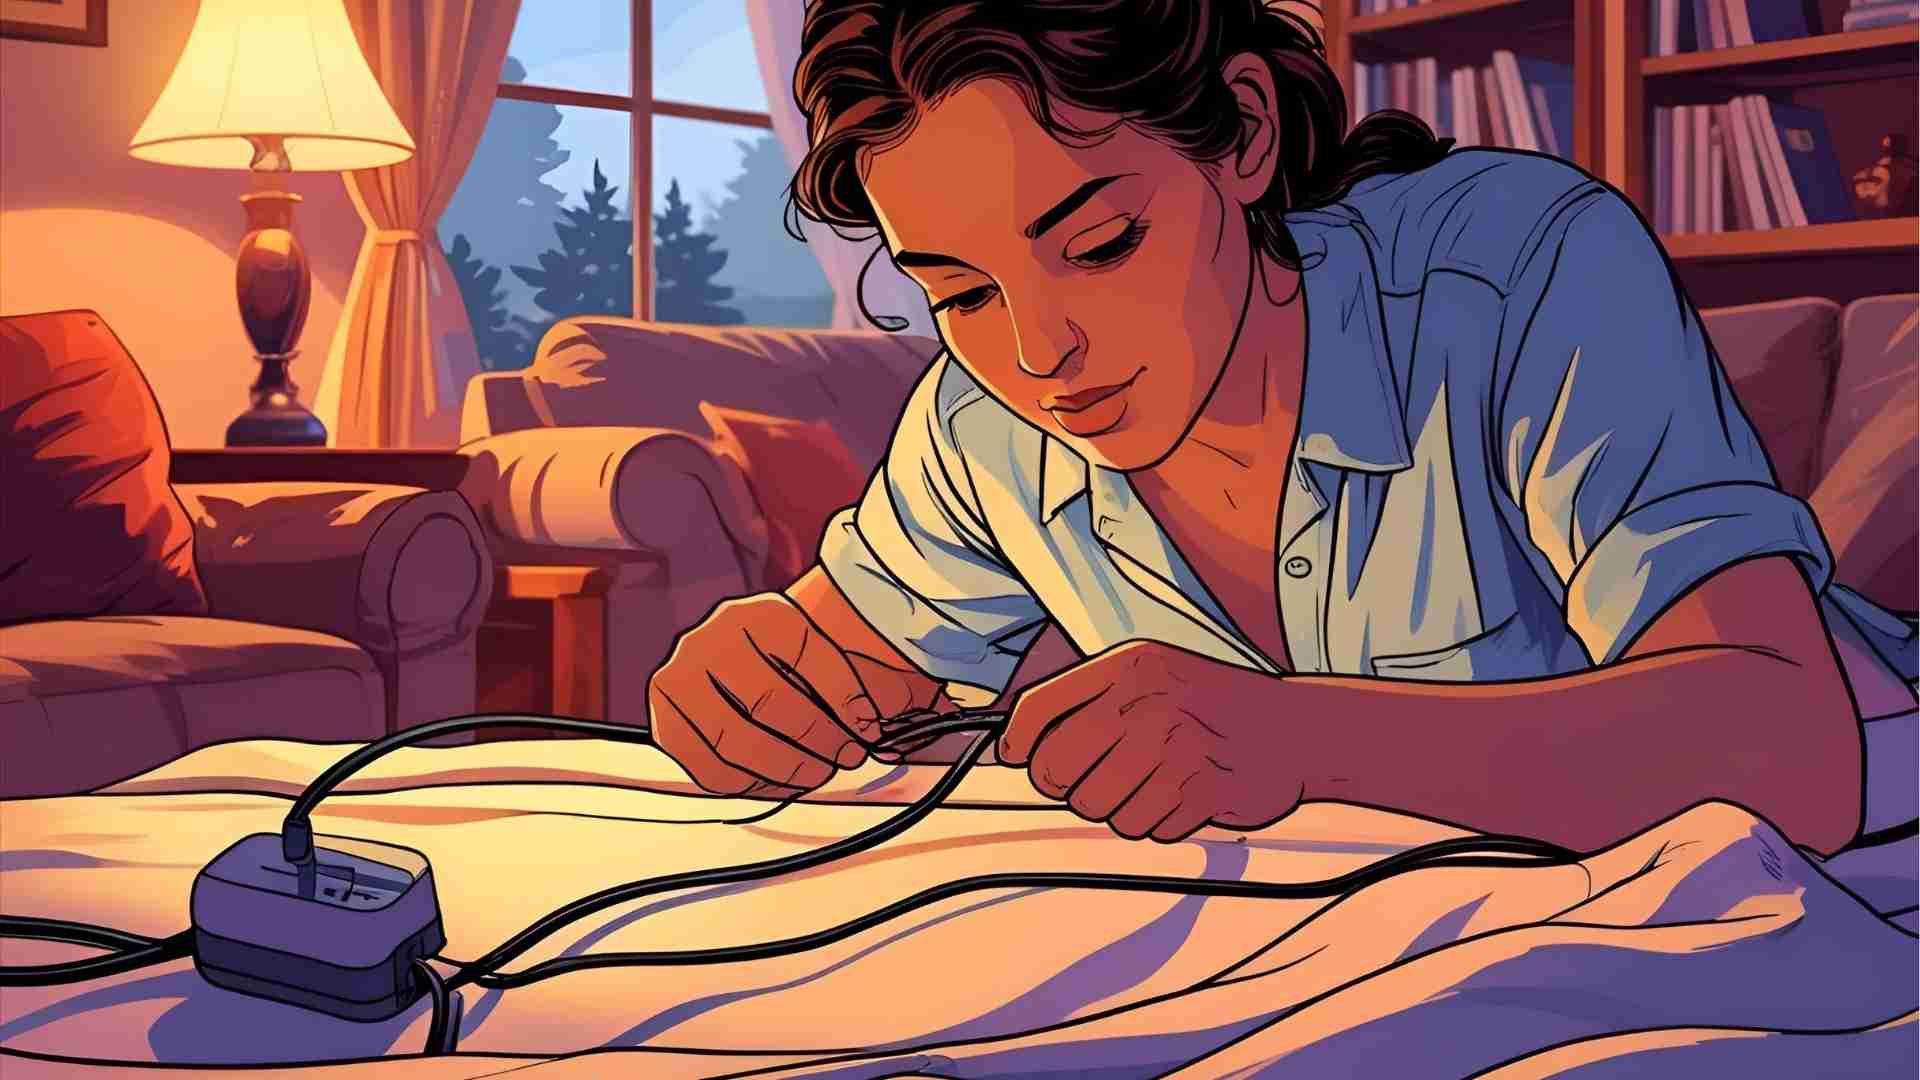
Step-by-Step Guide to Fixing an Electric Blanket
Repairing an electric blanket requires a methodical approach to ensure safety and effectiveness. Follow these steps to address common issues:
Step 1: Safety Precautions
- Unplug the Blanket: Disconnect the blanket from the power source to eliminate the risk of electric shock.
- Work in a Dry Environment: Perform repairs in a dry, well-lit area to avoid accidental electrical conduction.
- Wear Protective Gear: Use insulated gloves and tools to minimize risks when handling electrical components.
Step 2: Visual Inspection
- Examine the Fabric: Check for tears, burns, or fraying near the wiring. Damaged fabric can expose wires, creating safety hazards.
- Inspect Wiring and Connectors: Look for frayed wires, scorch marks, or loose connections in the blanket and its power cord.
- Check the Control Unit: Look for visible damage, such as cracked casing or burnt components.
Step 3: Testing the Wiring
- Use a Multimeter: Set a multimeter to continuity mode to test the heating wires. A lack of continuity indicates a break in the circuit.
- Locate the Fault: Trace the wiring to pinpoint the break, which may require opening the fabric casing carefully.
- Test Connectors: Ensure connectors are secure and test for continuity between the blanket and control unit.
Step 4: Repairing the Wiring
- Soldering a Break: If a wire is broken, strip the insulation, solder the ends together, and ensure a strong joint. Use a soldering iron with appropriate wattage (25-40W) for precision.
- Insulating the Repair: Cover the soldered joint with heat-shrink tubing or high-quality electrical tape to prevent short circuits.
- Secure the Wiring: Reintegrate the repaired wire into the blanket, ensuring it’s not pinched or exposed.
Step 5: Final Testing and Reassembly
- Recheck Continuity: Use the multimeter to confirm the repair restored the circuit.
- Test the Blanket: Plug in the blanket and test all heat settings to ensure uniform heating. Monitor for unusual smells or sparks.
- Reassemble: Secure all components, ensuring no loose wires or exposed connections remain.
Fixing the Electric Blanket Control Unit
The control unit is often the source of issues, particularly with switches, dials, or internal circuitry. Here’s how to repair it:
Step 1: Access the Control Unit
- Open the Casing: Use a screwdriver (typically Phillips) to remove screws and access the internal components. Handle delicate parts carefully.
- Document the Setup: Take photos of the wiring and component layout for reference during reassembly.
Step 2: Inspect Components
- Check for Damage: Look for burnt components, loose wires, or corroded contacts.
- Test Switches and Dials: Use a multimeter to test the continuity of switches and dials. Erratic readings suggest a faulty component.
- Examine the Circuit Board: Look for signs of overheating or cracked solder joints.
Step 3: Repair or Replace Components
- Tighten Connections: Secure any loose wires or terminals with a small screwdriver.
- Resolder Joints: If wires or components have detached, resolder them using a low-wattage soldering iron.
- Replace Faulty Parts: Source replacement switches, dials, or thermal fuses that match the original specifications. For example, a thermal fuse must have the same temperature rating (e.g., 85°C) and current rating (e.g., 2A).
Step 4: Reassembly and Testing
- Reassemble the Unit: Carefully reassemble the control unit, ensuring all components are secure.
- Functional Test: Plug in the blanket and test all settings. Verify that the control unit responds correctly and the blanket heats evenly.
Example: Silent Night Electric Blanket Controller
A user on an electronics forum attempted to repair a 230V Silent Night electric blanket controller, encountering arcing in the switch and a blown thermal fuse. The schematic revealed a circuit using 1N4007 diodes for heat control and 1.8kΩ resistors for fault detection. The issue stemmed from a sliding switch with blackened contacts, causing arcing and overheating. Attempting to add a capacitor across the terminals exacerbated the problem, burning out the thermal fuse. This case highlights the importance of using exact replacement parts and avoiding makeshift fixes.
Preventative Maintenance for Electric Blankets
Preventing issues is often easier than repairing them. Implement these measures to prolong your electric blanket’s life:
- Regular Inspections: Check the blanket, cord, and control unit for wear, fraying, or damage before each season.
- Proper Storage: Roll, don’t fold, the blanket to avoid stressing the wires. Store in a dry, cool place to prevent corrosion.
- Follow Manufacturer Guidelines: Adhere to washing and usage instructions. Most blankets are machine-washable on a gentle cycle, but always detach the control unit and cords.
- Avoid Overheating: Use moderate heat settings and avoid leaving the blanket on high for extended periods.
- Use a Timer: Modern blankets often include auto-shutoff timers. If yours lacks this feature, consider using a plug-in timer for safety.
Maintenance Checklist
| Task | Frequency | Notes |
|---|---|---|
| Inspect fabric and wires | Monthly | Look for tears, burns, or fraying |
| Test control unit | Seasonally | Ensure all settings work properly |
| Clean connectors | Annually | Use a dry cloth to remove dust |
| Check storage conditions | Before storage | Ensure dry, cool environment |
| Verify thermal fuse | If issues arise | Use multimeter to test continuity |
When to Replace an Electric Blanket
Some issues are too complex or hazardous to fix, indicating the need for replacement:
- Extensive Wiring Damage: Multiple breaks or widespread fraying make repairs impractical.
- Recurring Thermal Fuse Failures: Repeated fuse blowouts suggest a deeper fault, such as a failing heating element.
- Obsolete Models: Older blankets lacking modern safety features (e.g., auto-shutoff, temperature sensors) pose higher risks.
- Manufacturer Advice: If the manufacturer deems the blanket unrepairable, they may offer a discount on a new model.
Popular Electric Blanket Models and Specifications
When replacing a blanket, consider these top models, known for reliability and safety features:
| Brand/Model | Size | Power | Safety Features | Price (USD) |
|---|---|---|---|---|
| Sunbeam Heated Blanket | Queen | 180W | Auto-shutoff, 10 heat settings | $69.99 |
| Biddeford Microplush | King | 200W | Auto-shutoff, dual controllers | $89.99 |
| Silent Night Electric Blanket | Double (UK) | 60W | Overheat protection, 3 settings | $45.00 |
| Serta Electric Blanket | Twin | 100W | Auto-shutoff, machine-washable | $49.99 |
Note: Prices are approximate and may vary by retailer. Always check for warranty details (typically 1-3 years).
Recycling and Disposal
If repair isn’t viable, dispose of the blanket responsibly:
- Electronic Waste Facilities: Many municipalities accept electric blankets as e-waste. Check local recycling programs.
- Manufacturer Take-Back Programs: Some brands, like Sunbeam, offer recycling options.
- Repurposing: If the fabric is intact, use it for non-electrical purposes, such as pet bedding or craft projects.
Safety Considerations and Risks
Electric blankets, especially older models, carry inherent risks:
- Fire Hazard: Faulty wiring or overheating can ignite bedding. Always replace blankets showing signs of scorching.
- Electric Shock: Exposed wires or improper repairs increase shock risks. Never use a damaged blanket.
- Health Concerns: Prolonged use on high settings can cause burns, particularly for individuals with reduced sensitivity (e.g., the elderly).
Modern blankets mitigate these risks with features like low-voltage operation, auto-shutoff timers, and temperature sensors. If your blanket lacks these, consider upgrading.
Safety Comparison: Old vs. Modern Blankets
| Feature | Older Blankets | Modern Blankets |
|---|---|---|
| Voltage | Mains (120V/230V) | Low-voltage (24V) |
| Auto-Shutoff | Rare | Standard |
| Temperature Sensors | None | Common |
| Overheat Protection | Basic thermal fuse | Advanced circuitry |
Real-World Example: A Cautionary Tale
A UK user attempted to repair a Silent Night electric blanket controller, noticing arcing when switching between settings. Dismantling the unit revealed blackened switch contacts and a complex circuit with diodes and resistors. An ill-advised capacitor addition caused a thermal fuse blowout, rendering the blanket unusable. The user replaced it with a Warmer blanket featuring dual controllers and spare parts availability, highlighting the value of manufacturer support and the risks of DIY repairs without proper expertise.
Enhancing Comfort with Complementary Products
Pairing an electric blanket with a high-quality mattress can enhance sleep comfort. For example, the Puffy Lux Mattress offers excellent thermal regulation, reducing reliance on high blanket settings. Its plush layers complement the blanket’s warmth, creating an ideal sleep environment.
Conclusion
Fixing an electric blanket is a practical way to restore warmth and comfort, but it demands careful attention to safety and technical detail. By systematically troubleshooting issues—whether wiring faults, control unit failures, or blown fuses—you can often revive a malfunctioning blanket. Regular maintenance, proper usage, and timely replacement of outdated models ensure long-term safety and performance. If repairs prove too complex or risky, modern electric blankets with advanced safety features offer a reliable alternative. With the right approach, your electric blanket can remain a cozy companion for many winters.
Please share this How to Fix an Electric Blanket: Ensuring Warmth and Safety your friends and do a comment below about your feedback.
We will meet you on next article.
Until you can read, 2 Level Garden Ideas 4K HD Wallpapers