
How To Change The Time On An Equity Insta Set Clock
Learn how to change the time on an Equity Insta-Set Clock with step-by-step instructions, including time zone, DST, alarm, and battery tips.
The Equity Insta-Set Clock is a reliable and user-friendly device designed to simplify timekeeping with its automatic time-setting feature. Available in multiple models, such as 31022, 40001, 40009, 40018, 44100, and 44200, this clock combines functionality with convenience, making it a popular choice for home or office use. While the clock typically sets the time and date automatically upon powering, occasional manual adjustments may be necessary due to power outages, battery replacements, or time zone changes. This guide provides detailed, step-by-step instructions for setting the time, date, time zone, daylight saving time (DST), and alarm on an Equity Insta-Set Clock, ensuring you can keep your clock accurate and operational. Additionally, we cover battery installation, troubleshooting, and maintenance tips to maximize the clock’s performance.
Overview of the Equity Insta-Set Clock
The Equity Insta-Set Clock is designed to automatically display Accurate time, date, and year upon power activation, thanks to its built-in Insta-Set technology. Powered by two AAA batteries or an AC connection with a 9V battery backup for the alarm, the clock features an LCD display with indicators for AM/PM, alarm, DST, and snooze functions. Some models also include a 3V CR2032 button cell battery to maintain the Insta-Set memory. The clock supports four U.S. time zones (Pacific, Mountain, Central, and Eastern) and includes a DST switch for areas observing daylight saving time.
Key features include:
- Automatic Time Setting: Sets time and date upon power-up.
- Alarm with Snooze: Programmable alarm with a 5- or 9-minute snooze, depending on the model.
- DST Support: Adjustable for areas with or without DST.
- Backlight: Illuminates the display for 5 seconds when the snooze button is pressed.
- Battery Backup: Ensures alarm functionality during power outages.
This guide focuses on the Equity Insta-Set Clock Model 31022 and similar models (40001, 40009, 40018, 44100, 44200), covering their shared functionalities and slight variations in button labels or operations.
Battery Installation: Setting Up Your Clock
Proper battery installation is the first step to ensuring your Equity Insta-Set Clock functions correctly. The clock requires specific batteries for operation and backup, and incorrect installation can lead to display issues or loss of Insta-Set memory.
Steps for Battery Installation
- Locate the Battery Compartment: The battery compartment is on the bottom of the clock. Remove the cover to access it.
- Insert AAA Batteries: Install two AAA batteries, aligning them with the polarity (+ and -) markings inside the compartment. These batteries power the clock’s main functions.
- Optional 9V Battery for Alarm Backup: For models with alarm backup, install a 9V alkaline battery in the designated compartment. This ensures the alarm operates during power outages, though the display may not function.
- CR2032 Button Cell for Insta-Set Memory: Some models use a 3V CR2032 battery to maintain the Insta-Set time memory. Replace this every 2-3 years to ensure continuous operation. Ensure the AC power or 9V battery is connected during replacement to avoid losing settings.
- Replace the Cover: Securely close the battery compartment after installation.
Battery Specifications and Recommendations
| Battery Type | Purpose | Replacement Frequency | Recommended Brands |
|---|---|---|---|
| AAA (x2) | Main power | As needed (typically 6-12 months) | Duracell, Energizer |
| 9V Alkaline | Alarm backup | 12 months or after 12 hours of use | Duracell, Energizer |
| CR2032 (3V) | Insta-Set memory | Every 2-3 years | Maxell, Sony, Panasonic |
Note: Always clean battery contacts before installation to ensure proper connection. Remove batteries if the clock will be unused for an extended period to prevent leakage.
Upon inserting the AAA batteries, the clock should automatically display the time, date, and year, defaulting to Pacific Standard Time (PST). If the display is blank or incorrect, refer to the troubleshooting section below.
Setting the Time Zone
The Equity Insta-Set Clock supports four U.S. time zones: Pacific (PST), Mountain (MST), Central (CST), and Eastern (EST). Setting the correct time zone is essential for accurate time display.
Steps to Set the Time Zone
- Activate Time Zone Setting: Press and hold the Time Zone button for one second. The time zone digits will flash, indicating the clock is ready for adjustment.
- Select the Time Zone: Press the Time Zone button repeatedly to cycle through the available options (PST, MST, CST, EST).
- Save the Setting: Press and hold the Time Zone button for one second to return to normal display mode, or wait 10 seconds for the clock to automatically save and exit.
Tip: If you live in a region that does not observe DST, such as Arizona or parts of Indiana, ensure the DST switch is set to OFF (see below).
Setting the Time
If the automatic time-setting feature fails or you need to adjust the time manually, follow these steps:
Steps to Set the Time
- Enter Time Setting Mode: Press and hold the MODE button for one second. The hour digits will flash.
- Set the Hour: Press the HOUR/MONTH/YEAR button to adjust the hour. The PM indicator will light up when the time advances to PM.
- Set the Minute: Press the MIN/DATE button to set the minutes.
- Save the Time: Press and hold the MODE button for one second to save, or wait 10 seconds for the clock to automatically return to normal display mode.
For models like 40001, 44100, or 44200, use the Alarm Set button instead of MODE, and for models 40009 or 40018, use the DST button. The process remains similar, with the Up, +, or right-arrow button used to adjust values.
Setting the Calendar
The calendar function allows you to set the year, month, and date, ensuring accurate date display.
Steps to Set the Calendar
- Enter Calendar Setting Mode: After setting the time, press the MODE button once. The year digits will flash (e.g., “16” for 2016).
- Set the Year: Press the HOUR/MONTH/YEAR button to adjust the year.
- Set the Month and Date: Press the MODE button again to flash the month and date digits. Use the HOUR/MONTH/YEAR button to set the month and the MIN/DATE button to set the date.
- Save the Settings: Press the MODE button to save, or wait 10 seconds for automatic saving.
For alternative models, use the Alarm Set or DST button to cycle through fields, as described in the time-setting section.
Configuring Daylight Saving Time (DST)
The Equity Insta-Set Clock is set to observe DST by default, which is suitable for most U.S. regions. DST typically starts on the second Sunday in March (2 AM to 3 AM, +1 hour) and ends on the first Sunday in November (2 AM to 1 AM, -1 hour).
Steps to Configure DST
- Enable DST: Slide the ON/OFF DST switch to ON. The DST indicator will appear on the display.
- Disable DST: If you live in an area that does not observe DST (e.g., Arizona or parts of Indiana), slide the switch to OFF. The DST indicator will disappear.
- Manual DST Adjustment: For models with a DST/SET button, press and hold it for 5-7 seconds until “doN” (DST ON) appears. Press the + or – button to toggle to “doF” (DST OFF).
Note: Incorrect DST settings can cause the clock to display the time one hour off during DST periods. Always verify the DST setting for your region.
Setting and Operating the Alarm
The Equity Insta-Set Clock features a programmable alarm with a crescendo function that starts softly and increases in volume. The snooze function provides additional sleep time (5 or 9 minutes, depending on the model).
Steps to Set the Alarm
- Enter Alarm Setting Mode: Hold down the ALARM button.
- Set the Hour: Press the HOUR/MONTH/YEAR button to adjust the hour. Ensure the AM/PM indicator is correct.
- Set the Minute: Press the MIN/DATE button to set the minutes.
- Save the Alarm: Release the ALARM button to store the settings.
For models using + and – buttons, press the ALARM button to cycle through hour and minute settings, then use + or – to adjust.
Operating the Alarm
- Activate the Alarm: Slide the ON/OFF ALARM switch to ON. The alarm indicator will light up.
- Deactivate the Alarm: Slide the switch to OFF to turn off the alarm.
- Use Snooze: When the alarm sounds, press the SNOOZE button to delay the alarm by 5 or 9 minutes. This can be repeated multiple times.
Displaying the Alarm Time
To check the set alarm time, press the SNOOZE button once. The alarm time will display briefly before reverting to the current time.
Using the Backlight
The backlight enhances visibility in low-light conditions. Press the SNOOZE button to activate the backlight, which remains on for 5 seconds. This feature is useful for checking the time or alarm settings at night without disturbing sleep.
Troubleshooting Common Issues
Occasionally, the Equity Insta-Set Clock may encounter issues such as incorrect time, blank display, or failure to set automatically. Below are common problems and solutions.
Issue: Incorrect Auto-Set Time
If the Insta-Set time is incorrect:
- Press and hold the DST/SET or Alarm Set button for 5-7 seconds until the year or hour digits flash.
- Use the +, –, or arrow buttons to set the year, month, date, hour, and minute, pressing the DST/SET or Alarm Set button to cycle through each field.
- Press the DST/SET or Alarm Set button again to save.
Issue: No Display When Plugged In
If the display is blank when connected to AC power:
- Unplug the clock and remove the CR2032 button cell battery.
- Plug the clock back into AC power. The display should show 12:00.
- Manually set the time and date as described above.
- Reinsert the CR2032 battery while the AC power or 9V battery is connected to preserve settings.
Issue: Alarm Not Functioning
- Ensure the ON/OFF ALARM switch is set to ON.
- Verify the 9V battery is installed and functional for backup during power outages.
- Check the alarm time settings to confirm AM/PM accuracy.
Battery Warning
- Always follow polarity markings when installing batteries.
- Use high-quality, name-brand batteries (e.g., Duracell, Energizer, Sony) to avoid leakage or poor performance.
- Replace the CR2032 battery every 2-3 years to maintain Insta-Set memory.
Maintenance and Care
To ensure long-term reliability:
- Clean Battery Contacts: Use a dry cloth to clean contacts before installing new batteries.
- Store Properly: Remove batteries if the clock will be unused for an extended period to prevent corrosion.
- Handle with Care: Avoid dropping the clock, as this may damage the LCD or internal components.
- Follow FCC Guidelines: If you experience radio interference, reorient the clock, increase separation from other devices, or consult a technician.
Warranty Information
Equity Insta-Set Clocks come with a two-year limited warranty covering defects in material and workmanship. To claim warranty service, send the product, a letter explaining the issue, and $5 for postage to:
- Equity Warranty Department, 2830 26th St. S, La Crosse, WI 54601 (for some models) or 2817 Losey Blvd. S, La Crosse, WI 54601 (for others).
The warranty does not cover damage due to misuse or negligence. Check www.equitybylacrosse.com/support for additional details.
Pricing and Availability
Equity Insta-Set Clocks are available at various retailers, including Amazon, Walmart, and specialty clock stores. Prices typically range from $15 to $30, depending on the model and features. For the most accurate pricing, check retailer websites or contact Equity by La Crosse directly.
Chart: Clock Operation Workflow
Below is a flowchart illustrating the process of setting up and adjusting the Equity Insta-Set Clock.
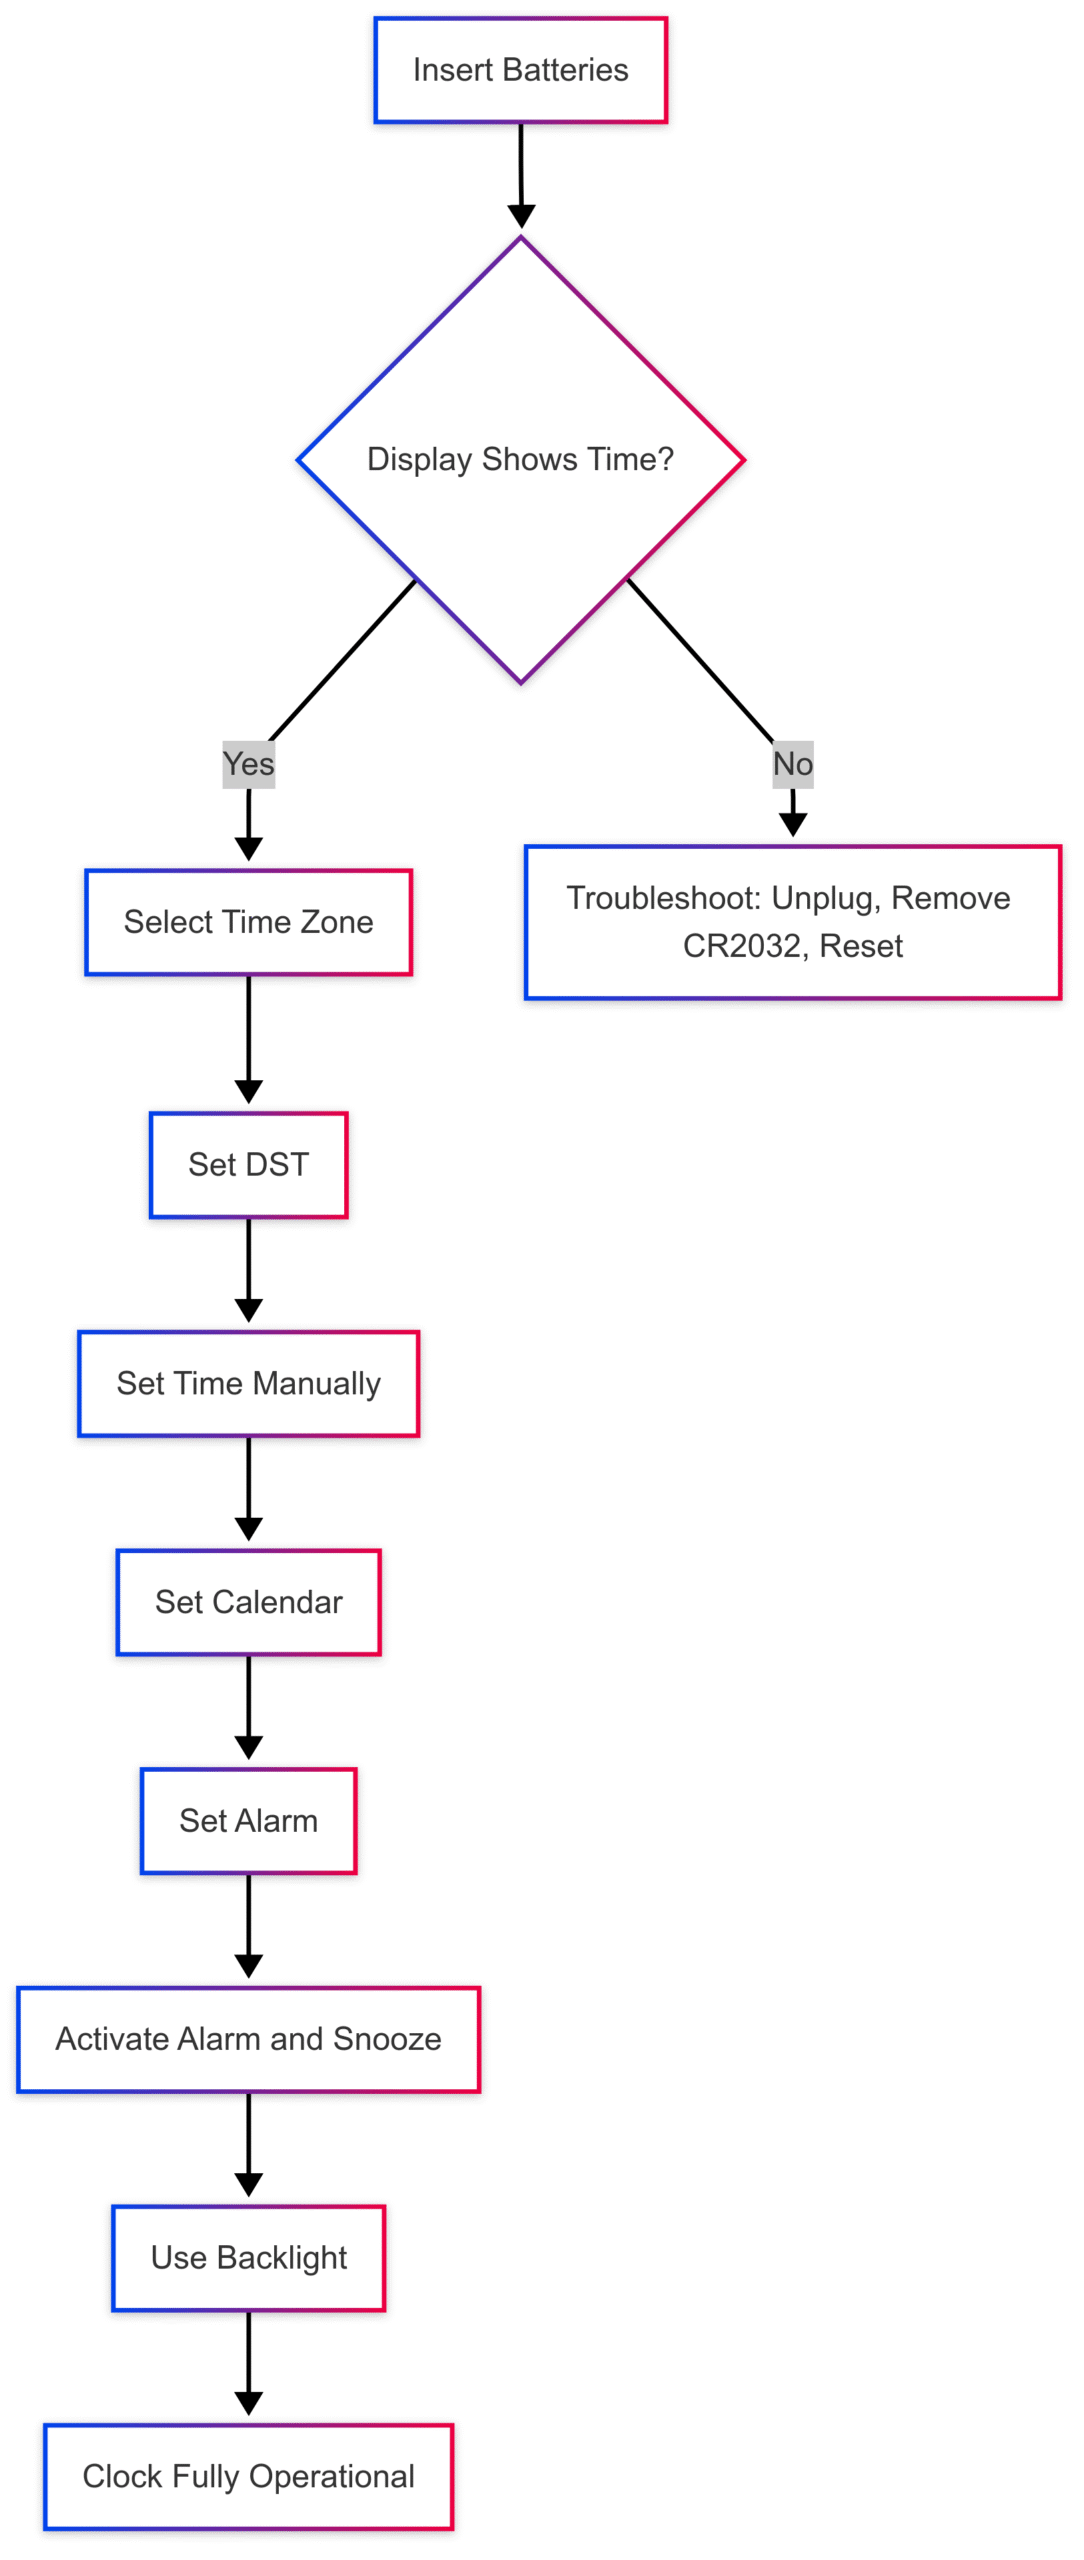
This chart outlines the sequential steps from battery installation to full operation, including troubleshooting for display issues.
Conclusion
The Equity Insta-Set Clock is a practical and efficient timekeeping device that simplifies setup with its automatic features. By following the steps outlined in this guide, you can easily set the time, date, time zone, DST, and alarm, even if the automatic settings fail. Regular maintenance, such as timely battery replacements and proper storage, ensures the clock remains reliable. Whether you’re using Model 31022 or another variant, this comprehensive guide equips you with the knowledge to keep your clock accurate and functional.
For further assistance, visit www.equitybylacrosse.com/support or contact the Equity Warranty Department. With proper care, your Equity Insta-Set Clock will provide dependable timekeeping for years to come.
Please share this How To Change The Time On An Equity Insta Set Clock your friends and do a comment below about your feedback.
We will meet you on next article.
Until you can read, 6 Paint Colors You Should Never Use in Your Bedroom