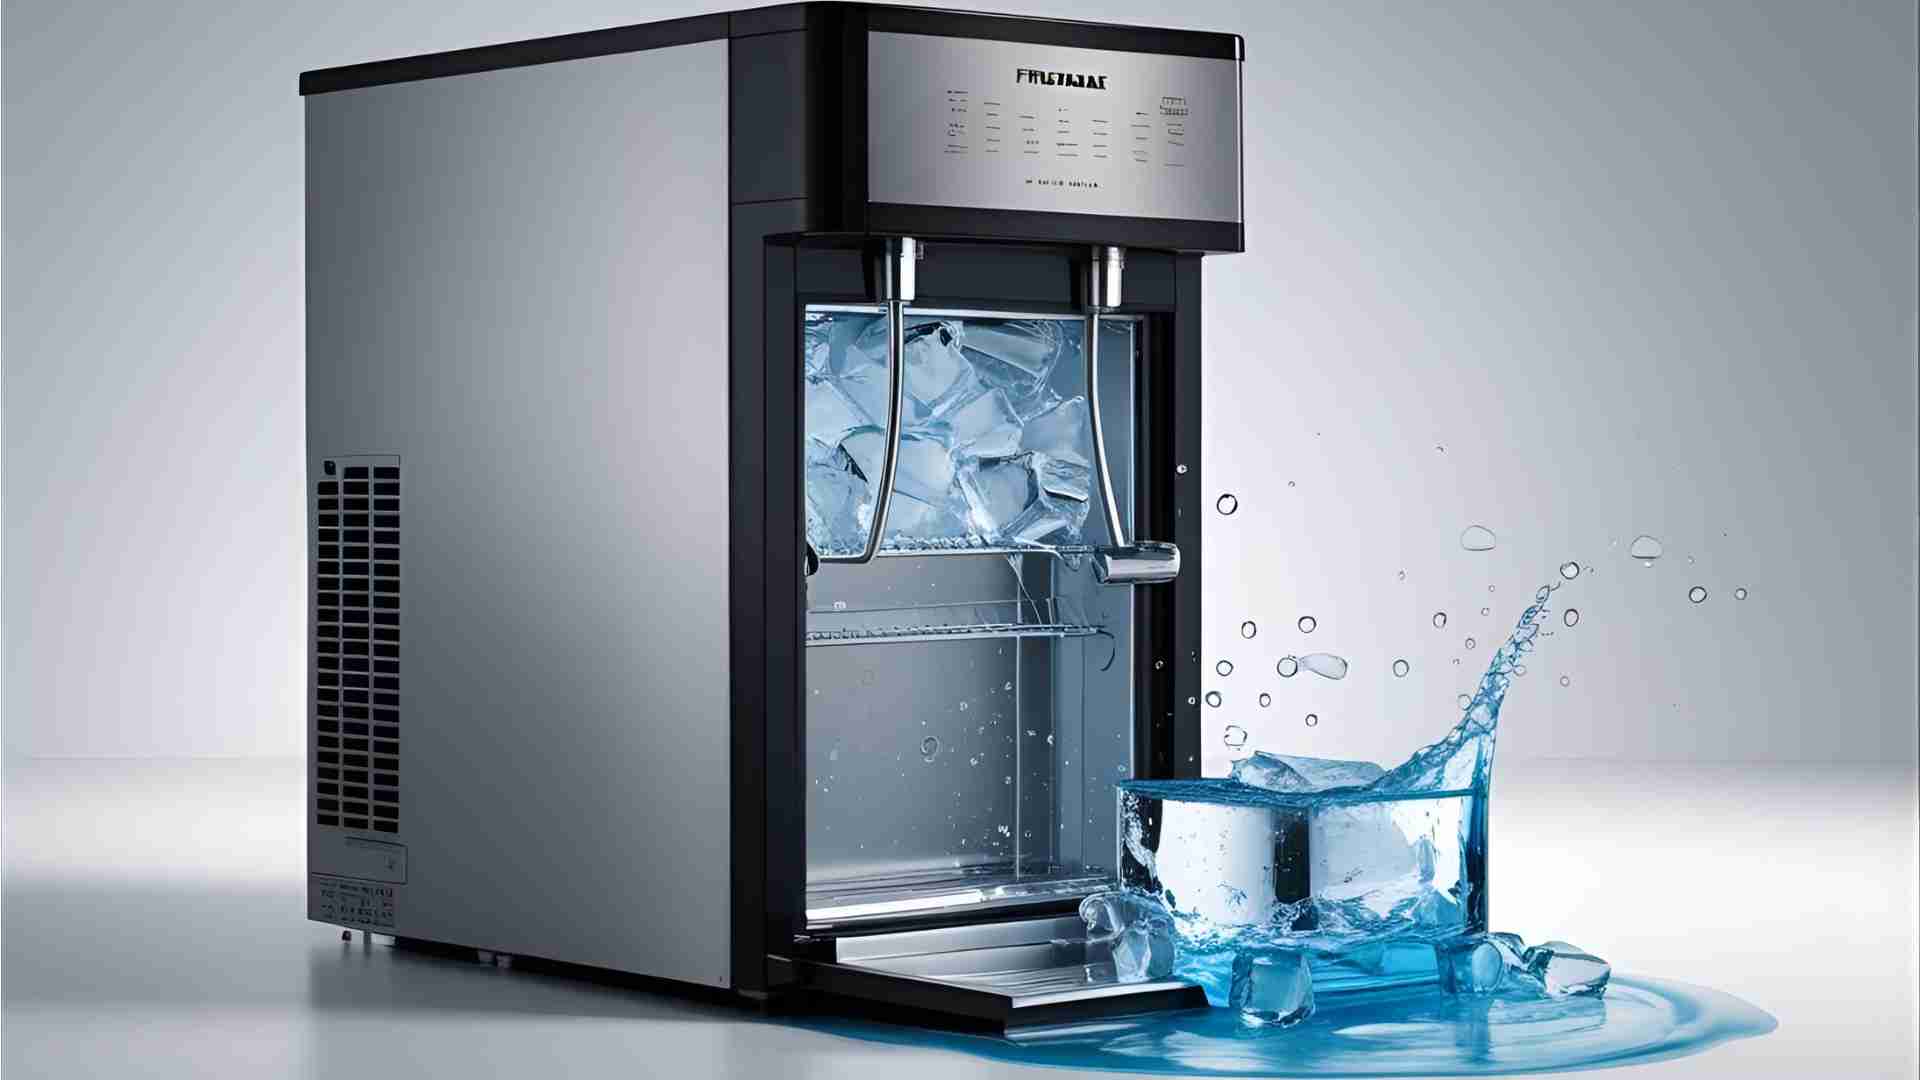
Frigidaire Ice Maker Leaking – Troubleshooting
Troubleshoot a leaking Frigidaire ice maker with our detailed guide. Learn common causes like clogs, faulty valves, and solutions to fix leaks fast.
A leaking ice maker in your Frigidaire refrigerator can be a frustrating issue, turning your kitchen into a watery mess instead of delivering neat ice cubes. Water pooling on the floor, ice buildup in the freezer, or dripping inside the compartment are all signs that something’s gone wrong. The good news? Most leaks stem from a handful of common problems that you can often diagnose and fix yourself. This guide dives deep into the causes of a leaking Frigidaire ice maker, provides step-by-step troubleshooting solutions, and offers practical tips to prevent future issues. Whether it’s a clogged defrost drain, a misaligned fill tube, or a faulty water valve, we’ve got you covered with detailed explanations and actionable advice.
Why Is Your Frigidaire Ice Maker Leaking?
A Frigidaire ice maker can leak due to several issues, ranging from simple clogs to more complex component failures. Below, we outline the most common causes, their symptoms, and how to address them. Each issue is accompanied by practical solutions, and where applicable, we include specifications, replacement part details, and estimated costs based on industry standards.
Common Causes of a Leaking Frigidaire Ice Maker
Based on repair data, the most frequent culprits behind a leaking Frigidaire ice maker are:
- Icemaker Assembly Issues: 39% of leaks are due to a damaged or malfunctioning icemaker assembly.
- Water Fill Tube Problems: 13% of leaks stem from a cracked or misaligned fill tube.
- Water Inlet Valve Failure: 8% of leaks are caused by a faulty water valve.
- Other Issues: 40% of leaks arise from clogs, low water pressure, or other miscellaneous problems.
Here’s a visual breakdown of these causes:
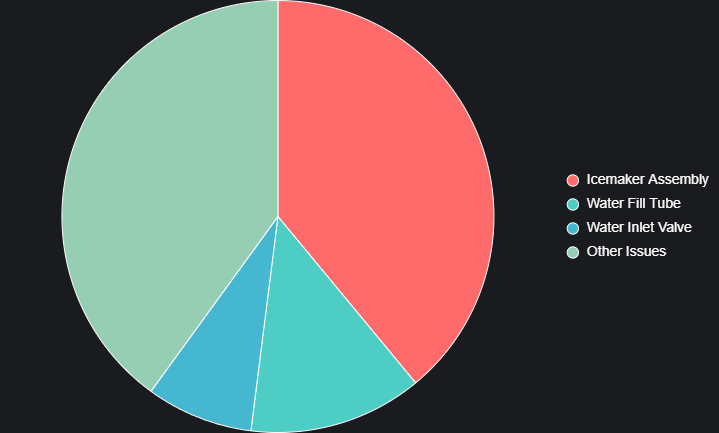
This chart highlights that nearly 40% of leaks are tied to the icemaker assembly, making it a critical component to inspect first.
Step-by-Step Troubleshooting Guide
Let’s walk through the most common causes of a leaking Frigidaire ice maker and how to troubleshoot them. Each section includes symptoms, diagnostic steps, and solutions, with estimated costs for replacement parts where applicable.
1. Clogged Ice Chute
Symptoms: Water overflows from the ice chute, pooling on the floor or inside the freezer.
Cause: Ice or debris can block the chute, preventing proper dispensing and causing water to spill.
Solution:
- Unplug the refrigerator for safety.
- Remove the ice chute (consult your Frigidaire manual for model-specific instructions).
- Clear any ice or debris using warm water or a soft brush.
- Reassemble and test the ice maker by running a cycle.
Prevention Tip: Regularly clean the ice chute to prevent buildup, especially in humid environments.
2. Loose or Damaged Water Connections
Symptoms: Water drips from the back of the refrigerator or near the water line.
Cause: Loose fittings or damaged water lines can lead to leaks.
Solution:
- Pull the refrigerator away from the wall and turn off the water supply.
- Inspect all water line connections for looseness or damage.
- Tighten fittings with a wrench or replace damaged lines (e.g., Frigidaire Water Line, Part #5304433362, ~$15-$25).
- Turn the water supply back on and check for leaks.
Estimated Cost: $15-$25 for a replacement water line.
3. Clogged Defrost Drain
Symptoms: Water accumulates in the freezer or leaks onto the floor.
Cause: A blocked defrost drain prevents excess water from exiting during the defrost cycle, causing overflow.
Solution:
- Locate the defrost drain (typically behind the freezer’s back panel).
- Remove the plastic cover and check for ice or debris.
- Use a turkey baster with warm water or a hairdryer on low to clear the blockage.
- Ensure proper airflow in the freezer by avoiding overpacking.
Chart for defrost drain cleaning process:
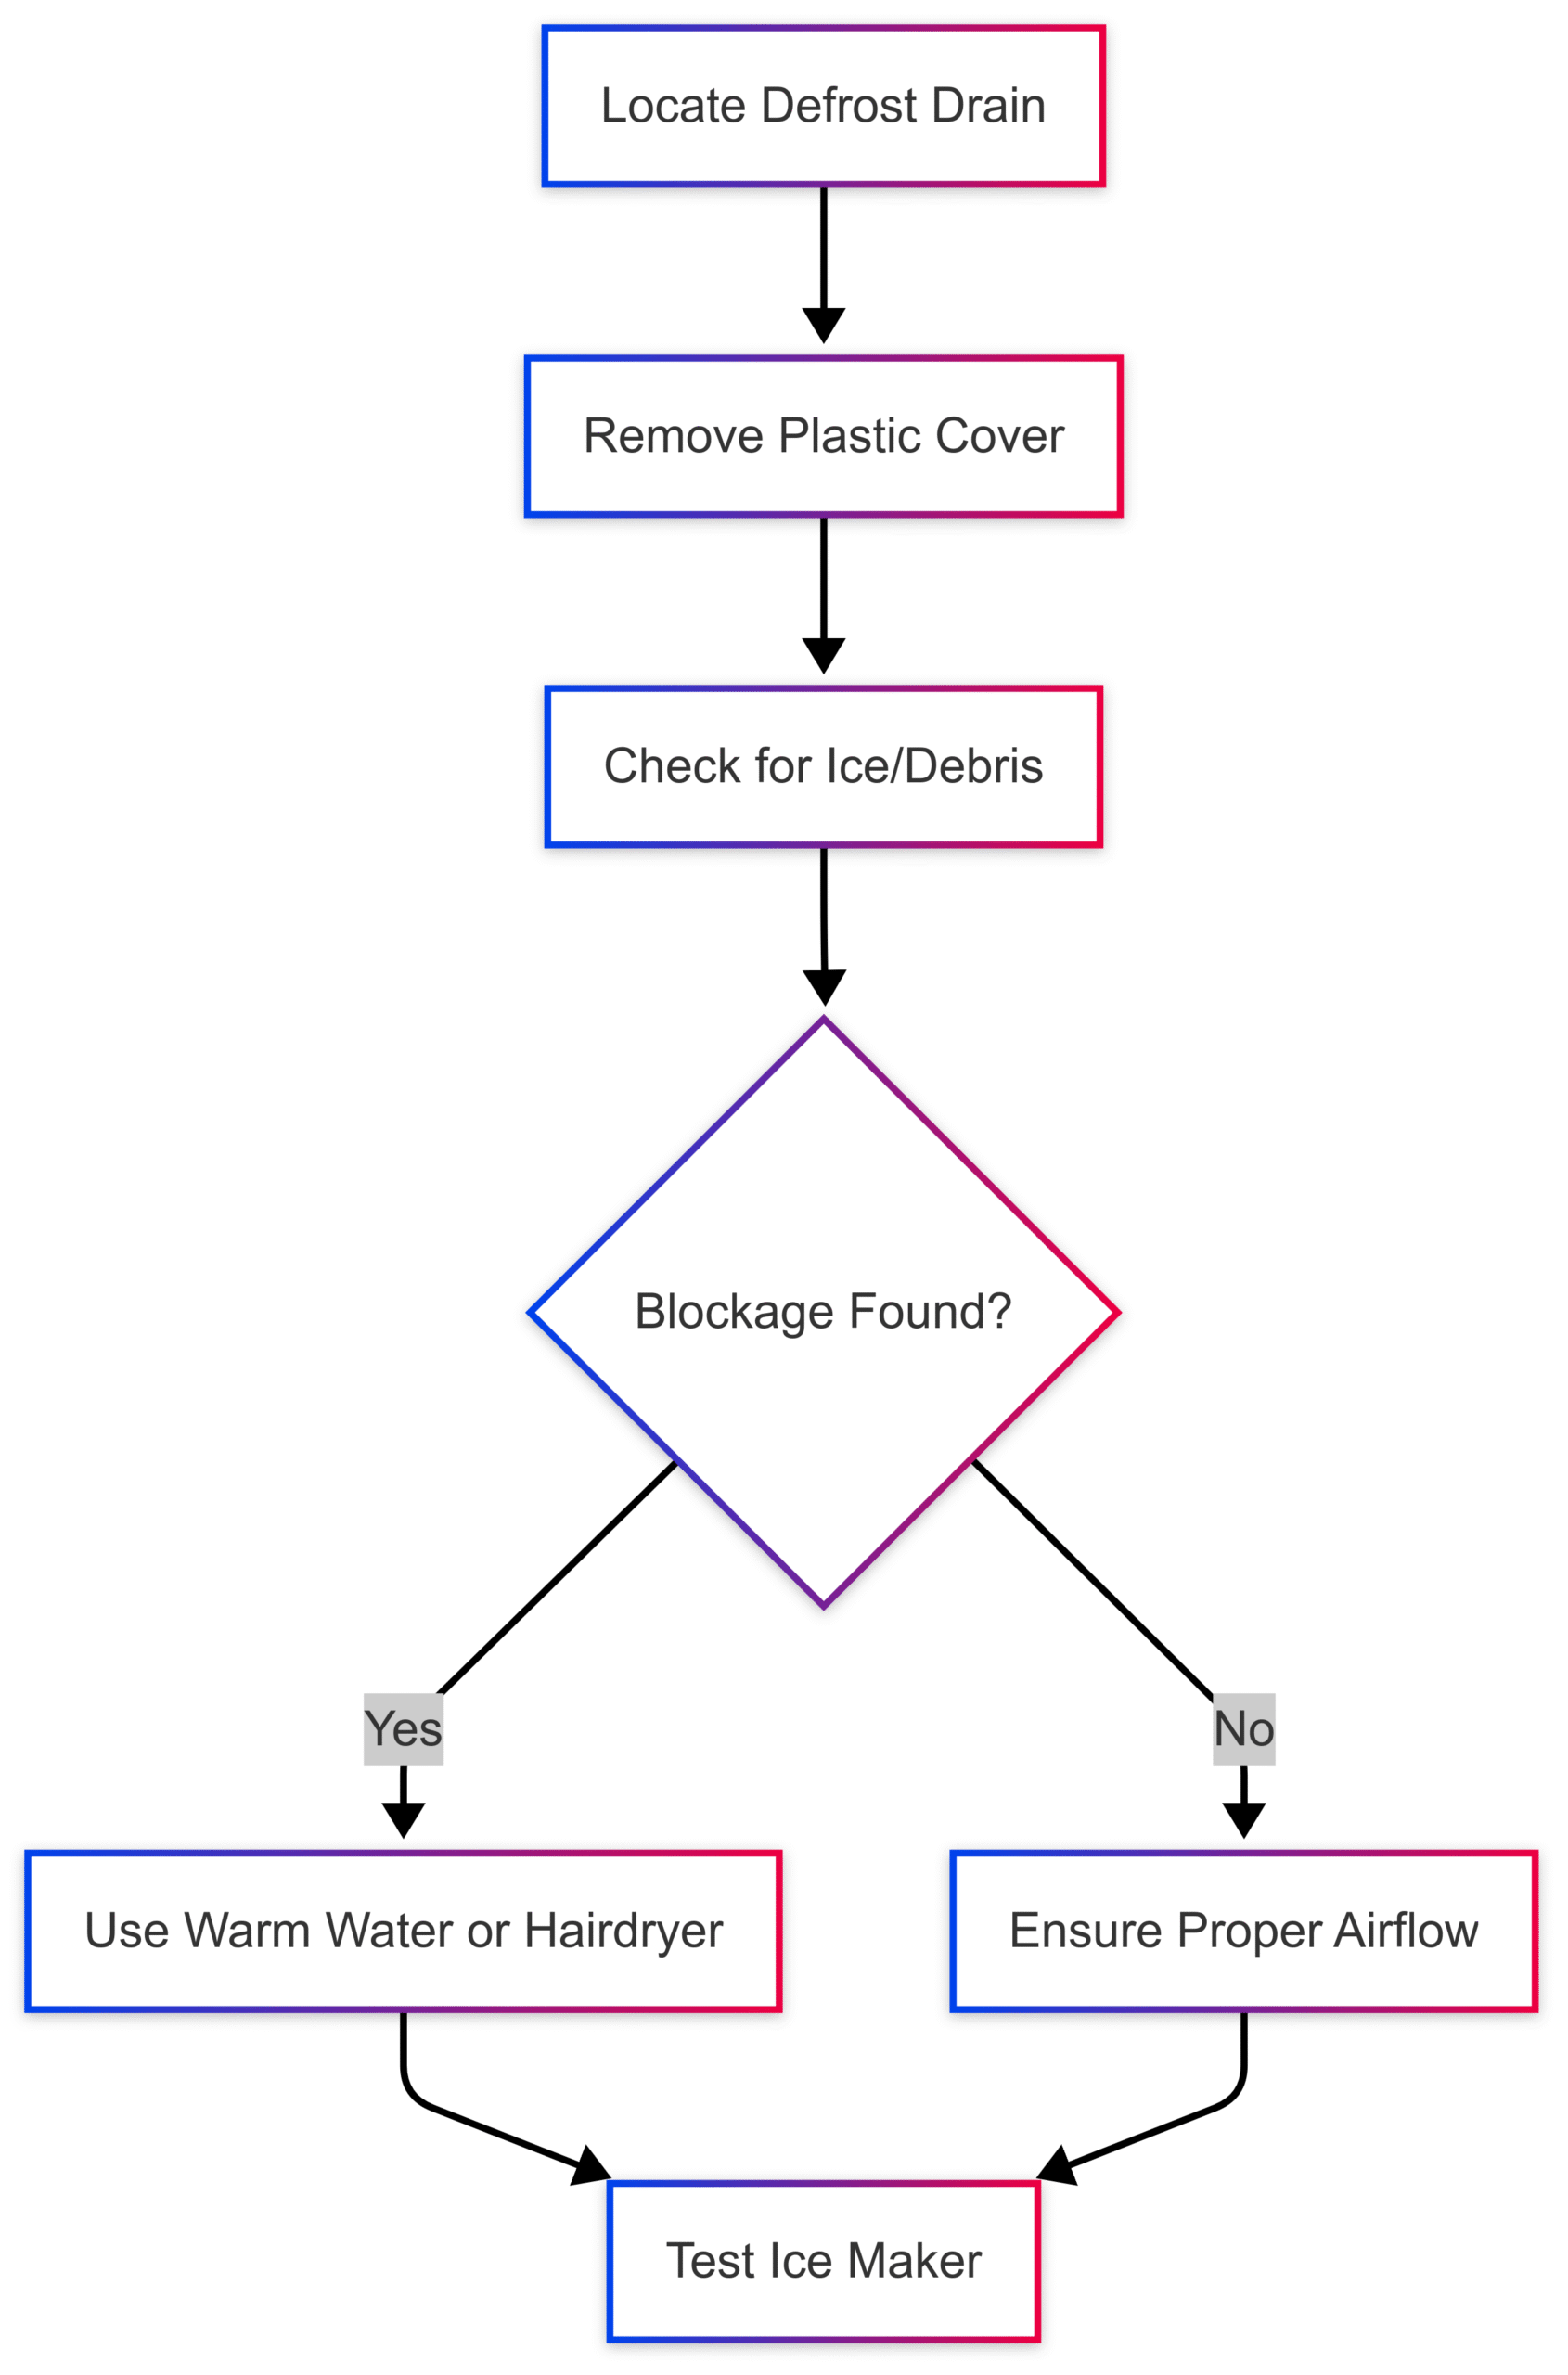
Prevention Tip: Check the defrost drain every 6 months to prevent clogs.
4. Frozen Fill Tube
Symptoms: Water backs up and leaks into the freezer, often causing ice buildup on the back wall.
Cause: The fill tube, which delivers water to the ice mold, can freeze, disrupting water flow.
Solution:
- Unplug the refrigerator.
- Locate the fill tube (usually at the back of the ice maker).
- Thaw it using a hairdryer on low or by wrapping it in a warm towel.
- Run a cycle to ensure proper water flow.
- If the issue persists, inspect the water inlet valve (see below).
Estimated Cost: $0 if thawed manually; $30-$50 for a replacement fill tube (e.g., Frigidaire Fill Tube, Part #WP2174755, ~$30).
5. Low Water Pressure
Symptoms: The ice maker fills slowly, leading to overflow and leaks.
Cause: Water pressure below 20 psi can cause improper valve operation, leading to overfilling.
Solution:
- Check your home’s water pressure using a pressure gauge (ideal range: 20-120 psi).
- If pressure is low, contact a plumber to adjust your home’s water system.
- Ensure the water line to the refrigerator is not kinked or restricted.
Estimated Cost: $10-$20 for a pressure gauge; plumber costs vary.
6. Faulty Water Inlet Valve
Symptoms: Continuous dripping or overfilling of the ice mold.
Cause: A stuck or worn water inlet valve fails to close properly, allowing water to leak.
Solution:
- Turn off the water supply and unplug the refrigerator.
- Locate the water inlet valve (at the back, below the unit).
- Test the valve for continuity using a multimeter (should read 500-1.5KΩ).
- If faulty, replace it (e.g., Frigidaire Water Inlet Valve, Part #242252702, ~$40-$60).
- Reconnect and test for leaks.
Estimated Cost: $40-$60 for a replacement valve.
How to Test a Water Inlet Valve:
- Disconnect the water supply and place the hose in a bucket.
- Turn on the water to check for adequate pressure (20+ psi).
- Use a multimeter to test for continuity.
- Replace if resistance is outside the 500-1.5KΩ range.
7. Damaged Ice Maker Tray
Symptoms: Water leaks from the ice mold, often visible as cracks or holes.
Cause: A cracked ice mold allows water to escape before freezing.
Solution:
- Unplug the refrigerator.
- Remove the ice maker assembly and inspect the tray for cracks using a flashlight or mirror.
- If damaged, replace the tray or entire assembly (e.g., Frigidaire Icemaker Assembly, Part #243297606, ~$80-$120).
Estimated Cost: $80-$120 for a replacement icemaker assembly.
8. Frozen Ice Chute
Symptoms: Ice buildup in the chute causes water to accumulate and leak.
Cause: A frozen chute prevents proper ice dispensing, leading to water overflow.
Solution:
- Unplug the refrigerator.
- Thaw the ice chute with a hairdryer on low or by soaking in warm water.
- Ensure the chute is dry before reassembling.
- Test the ice maker cycle.
Prevention Tip: Avoid storing items too close to the chute to maintain airflow.
9. Damaged Drain Pan
Symptoms: Water pools under the refrigerator.
Cause: A cracked drain pan fails to catch excess water from the defrost cycle.
Solution:
- Locate the drain pan (usually at the bottom of the refrigerator).
- Inspect for cracks or damage.
- Replace if necessary (e.g., Frigidaire Drain Pan, Part #240530811, ~$20-$40).
Estimated Cost: $20-$40 for a replacement drain pan.
10. Faulty Dispenser Switch
Symptoms: The ice maker runs continuously, causing water to overflow.
Cause: A malfunctioning dispenser switch fails to stop the ice maker cycle.
Solution:
- Test the switch with a multimeter for continuity.
- Replace if faulty (consult a technician for model-specific part numbers, ~$15-$30).
Estimated Cost: $15-$30 for a replacement switch.
Advanced Troubleshooting: When to Call a Professional
If the above steps don’t resolve the leak, the issue may involve complex components like the control board or wiring. These require professional diagnosis due to their complexity and the risk of damaging sensitive electronics. Signs you need a technician include:
- Persistent leaks after replacing the water valve or fill tube.
- Electrical issues, such as a faulty control board.
- Recurring ice buildup despite clearing clogs.
Estimated Cost for Professional Repair: $100-$300, depending on the issue and labor rates.
Table: Common Replacement Parts and Costs
| Component | Part Number | Estimated Cost |
|---|---|---|
| Water Line | 5304433362 | $15-$25 |
| Fill Tube | WP2174755 | $30-$50 |
| Water Inlet Valve | 242252702 | $40-$60 |
| Icemaker Assembly | 243297606 | $80-$120 |
| Drain Pan | 240530811 | $20-$40 |
| Dispenser Switch | Varies by model | $15-$30 |
Real-World Insights from Frigidaire Owners
User experiences on platforms like Reddit highlight common frustrations and DIY fixes. For example, one user with a Frigidaire model FRSS2623AS0 reported water leaking from the water chute, causing ice buildup. They resolved it by fitting a 5/8-inch tubing over the fill tube to prevent water from sloshing over, a fix inspired by advice for Whirlpool models (Part #WP2174755). Another user with a Frigidaire LFSS2312TF4 noted recurring ice buildup and used rigid Lexan tubing to address a similar issue. These anecdotes underscore the prevalence of fill tube and alignment problems in Frigidaire ice makers.
Preventing Future Leaks
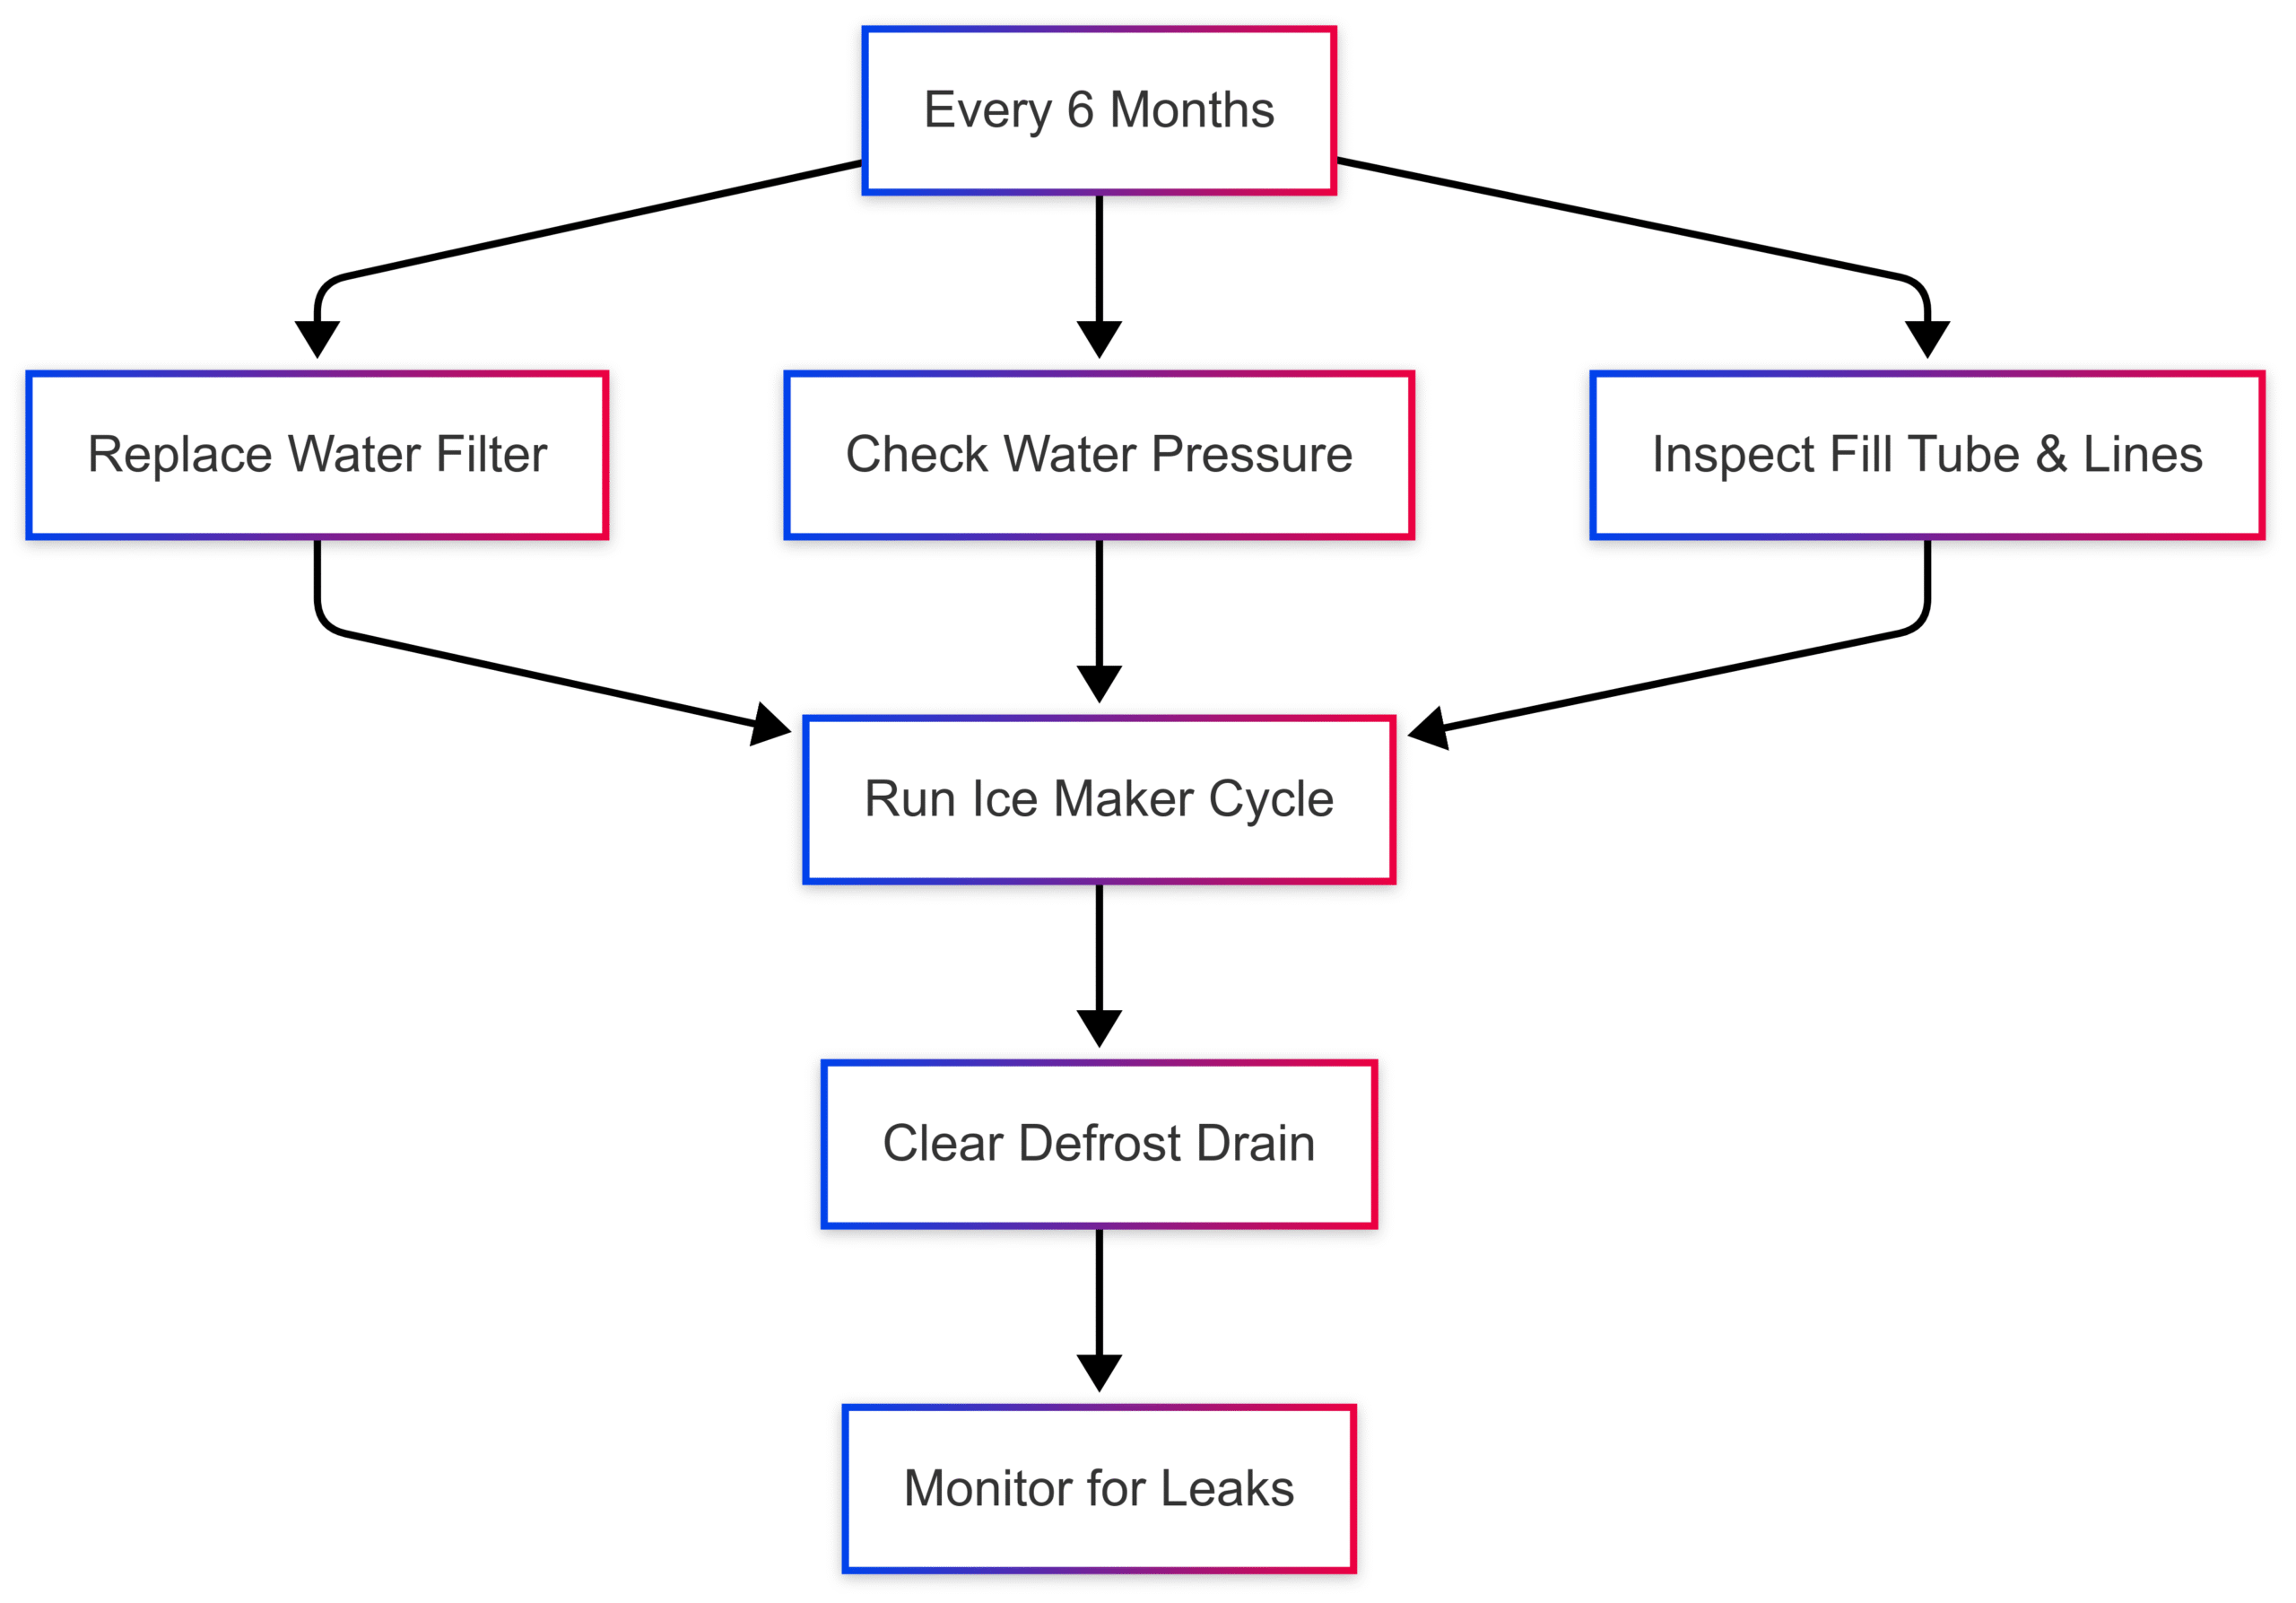
To keep your Frigidaire ice maker running smoothly, adopt these preventive measures:
- Replace the Water Filter Regularly: Change the filter every 6 months to avoid clogs or pressure issues (e.g., Frigidaire PureSource Ultra II Filter, ~$40-$50).
- Check Water Pressure: Ensure your home’s water pressure stays within 20-120 psi.
- Maintain Airflow: Avoid overpacking the freezer to prevent frost buildup.
- Inspect Components: Periodically check the fill tube, water lines, and drain pan for wear.
Chart for preventive maintenance schedule:
When to Replace Your Ice Maker
If troubleshooting doesn’t resolve the issue or the icemaker assembly is severely damaged, replacement may be the best option. A new Frigidaire icemaker assembly (Part #243297606) costs $80-$120, while professional installation can add $100-$150. Compare this to the cost of a new refrigerator ($800-$2,000) to decide if repair is worthwhile.
Conclusion
A leaking Frigidaire ice maker is a common but fixable problem. By systematically troubleshooting issues like clogged drains, frozen fill tubes, or faulty valves, you can restore your ice maker to full functionality. Regular maintenance, such as replacing filters and checking water pressure, can prevent future leaks. For complex issues or persistent leaks, professional help ensures accurate diagnosis and repair. With this guide, you’re equipped to tackle the problem head-on and keep your kitchen ice-ready.
Please share this Frigidaire Ice Maker Leaking – Troubleshooting your friends and do a comment below about your feedback.
We will meet you on next article.
Until you can read, Albert Hadley Designs 4K HD Ideas