Fixing Your Bathtub: DIY Crack, Chip, and Hole Repair
Learn how to fix bathtub cracks, chips, and holes with DIY solutions. Step-by-step guide, material tips, and repair kits for a lasting fix.
A cracked, chipped, or holed bathtub can be a homeowner’s nightmare, especially when professional repairs are delayed or costly. Whether you’re a landlord dealing with a tenant’s report of a bathtub crack or a homeowner looking to restore your bathroom’s functionality, DIY repair solutions can save time and money. This comprehensive guide walks you through identifying bathtub damage, choosing the right materials, and executing effective repairs for cracks, chips, and holes. With practical tips, product recommendations, and step-by-step instructions, you’ll be equipped to restore your bathtub to a functional and aesthetically pleasing state.
Understanding Bathtub Damage and Material Types
Before diving into repairs, it’s critical to assess the damage and identify your bathtub’s material. These initial steps ensure you select the appropriate repair method and materials for a durable fix.
Types of Bathtub Damage
Bathtub damage typically falls into three categories:
- Chips: Small, shallow areas where the surface has flaked off, often caused by dropping heavy objects.
- Cracks: Linear fractures that may extend partially or fully through the tub material, often due to stress, impact, or structural issues.
- Holes: Larger breaches that penetrate the tub, often resulting from severe cracks or impacts, leading to potential leaks.
Inspect the damage closely to determine its severity. A hairline crack may only require a surface fix, while a hole might need structural reinforcement. For instance, a landlord on a Reddit thread described a crack in a rental property’s bathtub, noting it had been present for “a while” and handymen were unavailable for 10 weeks. Such scenarios highlight the urgency of DIY solutions.
Identifying Bathtub Material
Bathtubs are commonly made of:
- Fiberglass: Lightweight, flexible, and prone to cracking. It produces a dull thud when tapped and may flex slightly when pressed.
- Acrylic: A type of plastic that’s smooth, warm to the touch, and slightly flexible. It’s less prone to cracking than fiberglass but can develop hairline cracks.
- Porcelain (or Enamel-Coated Steel): Heavy, rigid, and cold to the touch, often producing a metallic sound when tapped. Cracks in porcelain are rare and usually indicate severe structural issues.
- Cast Iron: Similar to porcelain but heavier, often coated with enamel. Cracks are uncommon but catastrophic if they occur.
To identify the material, try these methods:
- Tap Test: Tap the tub’s surface. Fiberglass sounds dull, while porcelain or cast iron sounds metallic.
- Flex Test: Gently press on the tub’s side. Fiberglass and acrylic may give slightly; porcelain and cast iron won’t.
- Magnet Test: If a magnet sticks to the tub, it’s likely steel with a porcelain enamel coating. Fiberglass and acrylic are non-magnetic.
- Visual Inspection: Look inside the crack. Fiberglass often shows a fibrous texture, while porcelain may reveal a metal base beneath the enamel.
For example, Reddit users suggested that a crack in a tub was likely fiberglass, as ceramic would typically chip rather than crack linearly. Understanding the material guides your choice of repair products, as each requires specific adhesives or fillers.
Preparing for the Repair
Proper preparation is the foundation of a successful bathtub repair. A clean, dry surface ensures strong adhesion and a seamless finish.
Tools and Materials Needed
Here’s a list of essential tools and materials:
- Cleaning Supplies: Sponges, mild detergent, rubbing alcohol, and rags to clean and degrease the area.
- Sandpaper: Fine-grit (320, 600, 1200, 2000) for smoothing surfaces and preparing for repair.
- Repair Kit: A tub-specific repair kit (e.g., Fortivo, 3M, or West System) suited for fiberglass, acrylic, or porcelain.
- Epoxy or Filler: Two-part epoxy, fiberglass resin, or silane-modified polymer sealant (e.g., 3M 4000 UV, 3M 5200).
- Fiberglass Mesh: For reinforcing holes or large cracks.
- Putty Knife: For applying and smoothing epoxy or filler.
- Paintbrush: For applying gel coat or repair paint.
- Protective Gear: Gloves, mask, and safety glasses for handling chemicals.
- Waterproof Tape: Optional for temporary fixes (e.g., Flex Tape).
- Spray Paint: Gloss white or tub-specific paint for finishing (e.g., marine-grade epoxy paint).
Preparation Steps
- Clean the Area: Scrub the damaged area with detergent to remove soap scum, grime, and oils. Rinse thoroughly and dry with a clean rag.
- Degrease: Wipe the area with rubbing alcohol to ensure no residue remains, as oils can weaken adhesion.
- Sand the Surface: Lightly sand around the damage with 320-grit sandpaper to create a rough surface for better bonding.
- Dry Completely: Ensure the area is bone-dry before applying any repair materials. If the tub is leaking, turn off the water supply and drain the system to prevent drips.
Reddit users emphasized cleaning thoroughly before applying any sealant or tape, as gunk buildup can reduce repair effectiveness. For instance, one user recommended pressure washing the crack to remove debris, while another suggested keeping the tub dry for days to ensure a strong bond.
DIY Repair Methods for Bathtub Damage
Depending on the type of damage—chip, crack, or hole—different techniques apply. Below are detailed steps for each, tailored to common bathtub materials.
Repairing Chips
Chips are the easiest to fix and typically involve surface-level damage.
Steps:
- Sand the Chip: Use 320-grit sandpaper to remove loose material and smooth the area.
- Mix Filler: Follow the repair kit’s instructions to mix the filler compound (e.g., Fortivo or 3M body filler). For porcelain, use a ceramic-specific filler.
- Apply Filler: Use a putty knife to apply the filler, leveling it with the tub’s surface. Avoid overfilling to minimize sanding.
- Cure and Sand: Let the filler cure (typically 24 hours, check kit instructions). Sand with 600-grit, then 1200-grit sandpaper for a smooth finish.
- Apply Gel Coat or Paint: Use a gel coat or tub-specific paint to match the tub’s color. Buff with 2000-grit sandpaper for a glossy finish.
Cost: A tub repair kit for chips costs $15–$30 (e.g., Fortivo Tub Repair Kit, ~$22 on Amazon).
Tips:
- Color matching can be challenging, as tubs fade over time. Test the gel coat on a small area first.
- For acrylic tubs, use an acrylic-specific filler to prevent cracking.
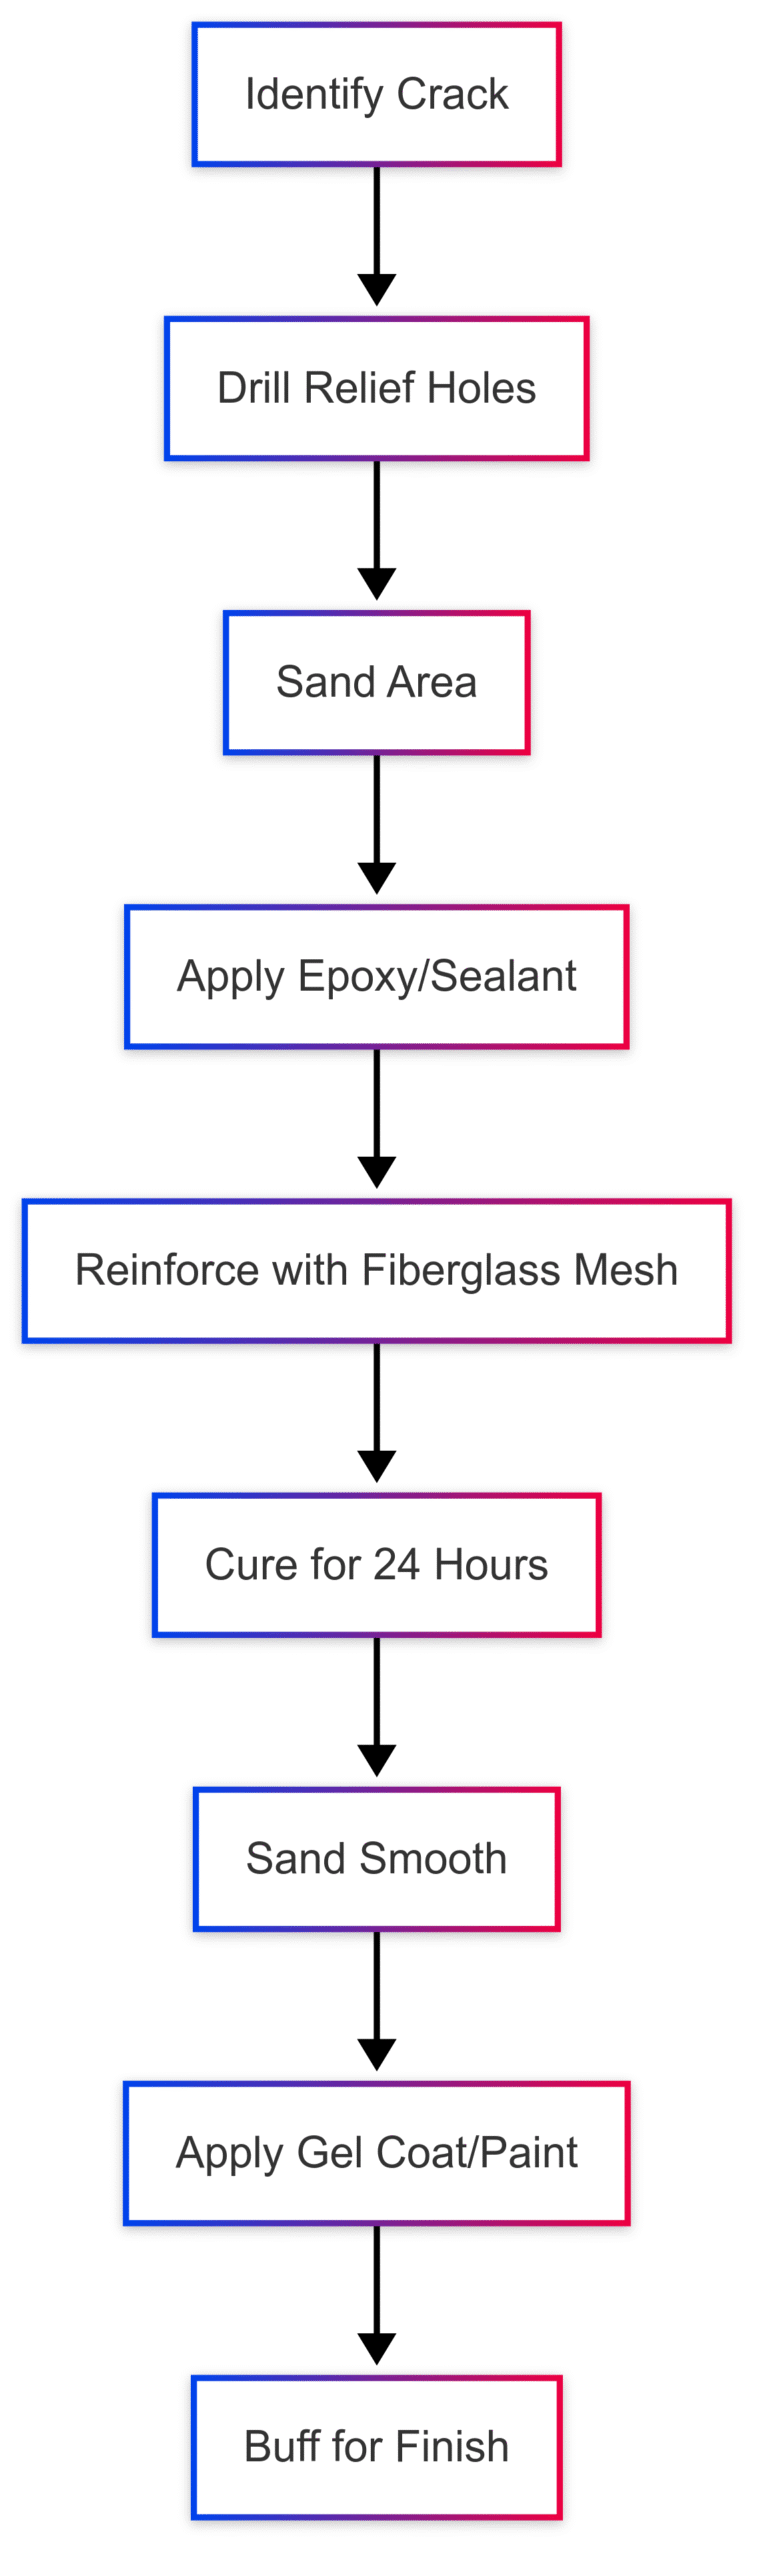
Repairing Cracks
Cracks require careful preparation to prevent further spreading, especially in fiberglass or acrylic tubs.
Steps:
- Drill Relief Holes: To prevent the crack from extending, drill small (1/8-inch) holes at each end of the crack. This is particularly important for fiberglass.
- Sand the Area: Sand around the crack with 320-grit sandpaper to smooth edges and improve adhesion.
- Apply Epoxy or Sealant: For temporary fixes, apply silicone caulk or 3M 4000 UV sealant into the crack, smoothing with a putty knife. For a stronger fix, use a two-part epoxy or fiberglass resin (e.g., West System).
- Reinforce if Needed: For deep cracks, apply a fiberglass mesh over the area before adding epoxy for added strength.
- Cure and Sand: Allow the epoxy to cure for 24 hours, then sand with 600-grit and 1200-grit sandpaper until smooth.
- Finish with Paint: Apply marine-grade epoxy paint or gel coat to blend the repair. Buff with 2000-grit sandpaper for a polished look.
Cost: Fiberglass repair kits cost $20–$50 (e.g., West System Fiberglass Repair Kit, ~$40). Silicone caulk or 3M sealants cost $8–$15 per tube.
Tips:
- Reddit users suggested filling the tub with water or standing in it during application to expand the crack, ensuring the epoxy fills the entire depth.
- For acrylic tubs, use a specialized acrylic repair kit to avoid chemical incompatibilities.
Chart: Crack Repair Process
Repairing Holes
Holes are the most challenging, often requiring structural reinforcement.
Steps:
- Assess Structural Damage: Check for underlying issues, such as rotted wood or inadequate support, which may have caused the hole. Drill small holes around the area to inspect and remove damaged material with a shop vac.
- Sand and Clean: Sand the area with 320-grit sandpaper and clean with alcohol.
- Apply Fiberglass Mesh: Cut a piece of fiberglass mesh to cover the hole and extend 2–3 inches beyond it. Apply epoxy resin to secure the mesh.
- Layer Epoxy: Apply multiple layers of epoxy, allowing 10–15 minutes between coats for tackiness. Smooth with a paintbrush.
- Cure and Sand: Let the repair cure for 24 hours, then sand with 600-grit and 1200-grit sandpaper.
- Finish with Paint: Apply gel coat or marine-grade epoxy paint. Buff with 2000-grit sandpaper for a seamless finish.
Cost: Fiberglass repair kits with mesh cost $30–$60. Marine-grade epoxy paint costs $15–$25.
Tips:
- Reddit users recommended marine-grade epoxy (e.g., 3M 5200) for a near-permanent fix, though it’s hard to remove for future repairs.
- Check for water damage beneath the tub, as leaks can cause rot, requiring additional structural repairs.
Material-Specific Repair Considerations
Each bathtub material has unique repair requirements:
- Fiberglass: Use fiberglass repair kits with resin and mesh. Sand thoroughly to ensure adhesion. 3M 4000 UV or West System kits are highly recommended.
- Acrylic: Use acrylic-specific repair kits to avoid chemical reactions. Hairline cracks can be sealed with thin epoxy (2:1 ratio).
- Porcelain/Enamel: Use ceramic-specific fillers or epoxy. Cracks are rare and may indicate the need for replacement due to structural failure.
- Cast Iron: Cracks are uncommon and usually require professional replacement. Surface chips can be repaired with porcelain-specific kits.
Reddit discussions highlighted that fiberglass is the most common material for modern tubs, with users like Mellotime66 recommending Fortivo kits for fiberglass repairs.
Temporary Fixes for Urgent Situations
When time is tight—such as the Reddit landlord’s case, with a wedding and honeymoon looming—temporary fixes can buy time until professional repairs are available.
Silicone Caulk
- Application: Clean the crack, apply silicone caulk, and smooth it flush. Wipe away excess with a rag.
- Durability: Lasts months, not years. Reddit users like Smokey_Katt suggested this as a quick fix.
- Cost: $5–$10 per tube.
Waterproof Tape
- Application: Clean and dry the area, then apply clear waterproof tape (e.g., Flex Tape) over the crack, extending 1–2 inches beyond it.
- Durability: Effective for months but may develop mold under edges over time, as noted by Ok-Owlcat on Reddit.
- Cost: $10–$15 per roll.
Combination Approach
Some users suggested combining silicone caulk with waterproof tape for added protection. However, silicone can complicate future repairs, as it’s difficult to remove completely.
Warning: Advise tenants to avoid baths and take shallow showers to minimize stress on the repair. Ensure the drain remains unclogged to prevent water buildup.
Post-Repair Care and Maintenance
To extend the life of your repair:
- Curing Time: Allow the repair to cure fully (24–48 hours, per product instructions) before using the tub.
- Cleaning: Use mild, non-abrasive cleaners to avoid damaging the repaired area.
- Avoid Stress: Prevent heavy objects from dropping in the tub and advise tenants to avoid stepping directly on the repaired area.
- Monitor: Check for signs of crack spreading or repair failure, and contact a professional if issues persist.
Common Mistakes to Avoid
Avoid these pitfalls to ensure a successful repair:
- Skipping Cleaning: Inadequate cleaning leads to poor adhesion and weak repairs.
- Using Wrong Materials: Mismatched repair kits (e.g., using fiberglass epoxy on porcelain) can damage the tub further.
- Rushing Curing: Premature use of the tub can crack the repair.
- Overfilling: Excess epoxy creates uneven surfaces that are hard to sand smooth.
- Ignoring Safety: Work in a ventilated area and wear protective gear to avoid chemical exposure.
- Neglecting Instructions: Follow the repair kit’s guidelines precisely for best results.
When to Consider Professional Help or Replacement
While DIY repairs are cost-effective, some situations warrant professional intervention or tub replacement:
- Severe Structural Damage: Cracks indicating underlying rot or poor support require professional assessment.
- Persistent Leaks: If water damage is suspected beneath the tub, a plumber or contractor should inspect.
- Ceramic/Porcelain Cracks: These often signal catastrophic failure, necessitating replacement.
- Aesthetic Concerns: DIY repairs may not perfectly match the tub’s color, especially for older tubs. Professional refinishing (e.g., Miracle Method) or tub liners may be better for long-term aesthetics.
Reddit users noted that in areas like Nova Scotia, plumbers and bath fitters may have long wait times (e.g., 10 weeks). In such cases, temporary DIY fixes are critical, but replacement should be planned within 12–18 months.
Cost of Replacement:
- Fiberglass/Acrylic Tub: $200–$500 (plus $1,000–$3,000 for installation).
- Porcelain/Cast Iron Tub: $500–$1,500 (plus $1,500–$4,000 for installation).
- Tub Liner: $1,000–$2,500, a quicker alternative to full replacement.
Product Recommendations and Specifications
| Product | Type | Material | Price | Features |
|---|---|---|---|---|
| Fortivo Tub Repair Kit | Epoxy/Filler Kit | Fiberglass, Acrylic | ~$22 | Two-part epoxy, color-matching gel coat, easy to apply |
| 3M 4000 UV Sealant | Adhesive Sealant | Fiberglass, Acrylic | ~$15 | UV-resistant, semi-permanent, available in white/black |
| 3M 5200 Sealant | Adhesive Sealant | Fiberglass, Acrylic | ~$18 | Permanent bond, marine-grade, difficult to remove |
| West System Fiberglass Kit | Fiberglass Repair Kit | Fiberglass | ~$40 | Includes resin, fiberglass mesh, and hardener for structural repairs |
| Flex Tape | Waterproof Tape | All Materials | ~$12 | Temporary fix, clear, easy to apply, may develop mold over time |
| Rust-Oleum Tub & Tile Paint | Epoxy Paint | All Materials | ~$25 | Marine-grade, glossy finish, suitable for post-repair refinishing |
Availability: Most products are available on Amazon, Home Depot, or marine supply stores. Check local availability, as some Reddit users reported limited stock in certain regions.
Home Warranty Considerations
For landlords or homeowners facing frequent plumbing issues, a home warranty can offset repair costs. First American Home Warranty, for example, offers plumbing coverage that may include bathtub-related repairs, though DIY disassembly could void coverage. Visit their website for a quote tailored to your needs.
Conclusion
Fixing a bathtub crack, chip, or hole is a manageable DIY project with the right tools and techniques. By identifying the damage, choosing material-appropriate repair kits, and following proper preparation and application steps, you can restore your bathtub’s functionality and appearance. Temporary fixes like silicone caulk or waterproof tape can buy time, but for lasting results, opt for epoxy or fiberglass repairs. Regular maintenance and careful use will prolong the repair’s life, but plan for professional help or replacement if structural issues persist. With this guide, you’re ready to tackle bathtub repairs confidently, ensuring a safe and comfortable bathroom for you or your tenants.
Please share this DIY Guide: Fixing Cracks, Chips & Holes in Your Bathtub your friends and do a comment below about your feedback.
We will meet you on next article.
Until you can read, Art Deco interior Images 4K HD Wallpapers