DISH Remote Not Working After Changing Batteries
Fix your DISH remote not working after changing batteries with our detailed troubleshooting guide. Learn step-by-step solutions to restore functionality.
A malfunctioning DISH remote can disrupt your TV viewing experience, especially when it stops working even after installing fresh batteries. This issue is common among DISH Network subscribers and can stem from various causes, including incorrect settings, hardware issues, or misconfigured connections. This comprehensive guide provides a step-by-step approach to troubleshoot and resolve the problem, ensuring your remote is back in action. Whether you’re dealing with a non-responsive remote or one that fails to control your receiver, we’ll cover all possible solutions, from basic checks to advanced reprogramming steps, along with practical tips to prevent future issues.
Understanding the DISH Remote Issue
When your DISH remote stops functioning after a battery change, the problem could be related to the remote itself, the receiver, or the connection between them. Common symptoms include:
- No response: Pressing buttons does nothing, and no lights appear on the remote.
- Intermittent functionality: The remote works sporadically or only for certain functions.
- Incorrect device control: The remote controls the wrong device or room’s receiver.
The DISH remote communicates with the receiver using infrared (IR) or radio frequency (RF) signals, depending on the model (e.g., 21.0, 40.0, 50.0, or 54.0). A battery change can sometimes disrupt the remote’s programming or signal alignment, requiring specific troubleshooting steps to restore functionality. Below, we outline a systematic approach to diagnose and fix the issue, based on expert advice and DISH’s official troubleshooting guidelines.
Step-by-Step Troubleshooting Guide
Step 1: Verify the Correct Remote
Before diving into technical fixes, ensure you’re using the correct remote for the receiver in the room. DISH systems often include multiple receivers (e.g., Hopper, Wally, or Joey), each paired with a specific remote. Using a remote from another room can cause it to malfunction.
- Check the remote’s label: Look for a sticker on the remote indicating the room or receiver it’s paired with (e.g., “Living Room” or “Bedroom”).
- Use the “Locate Remote” feature: Press the “LOCATE REMOTE” button on the front panel of your DISH receiver. If the remote beeps, it’s the correct one. If not, try another remote or press “LOCATE REMOTE” on other receivers to find the matching one.
Did this fix the issue? If yes, you’re set. If not, proceed to the next step.
Step 2: Check Battery Installation
Incorrectly installed or faulty batteries are a common cause of remote issues. Even if you’ve just installed fresh batteries, they could be defective or improperly inserted.
- Inspect battery orientation: Ensure all batteries (typically four AAA for DISH remotes) are inserted correctly, with the positive (+) and negative (-) ends matching the markings in the battery compartment.
- Replace with new batteries: If the batteries are older than six months or the on-screen battery indicator shows low power, replace them with high-quality, fresh AAA batteries.
- Clean battery contacts: Use a pencil eraser to gently clean the metal contacts in the battery compartment to remove any corrosion or residue.
Pro Tip: Always insert batteries with both rows facing the same direction, as shown in the diagram below:
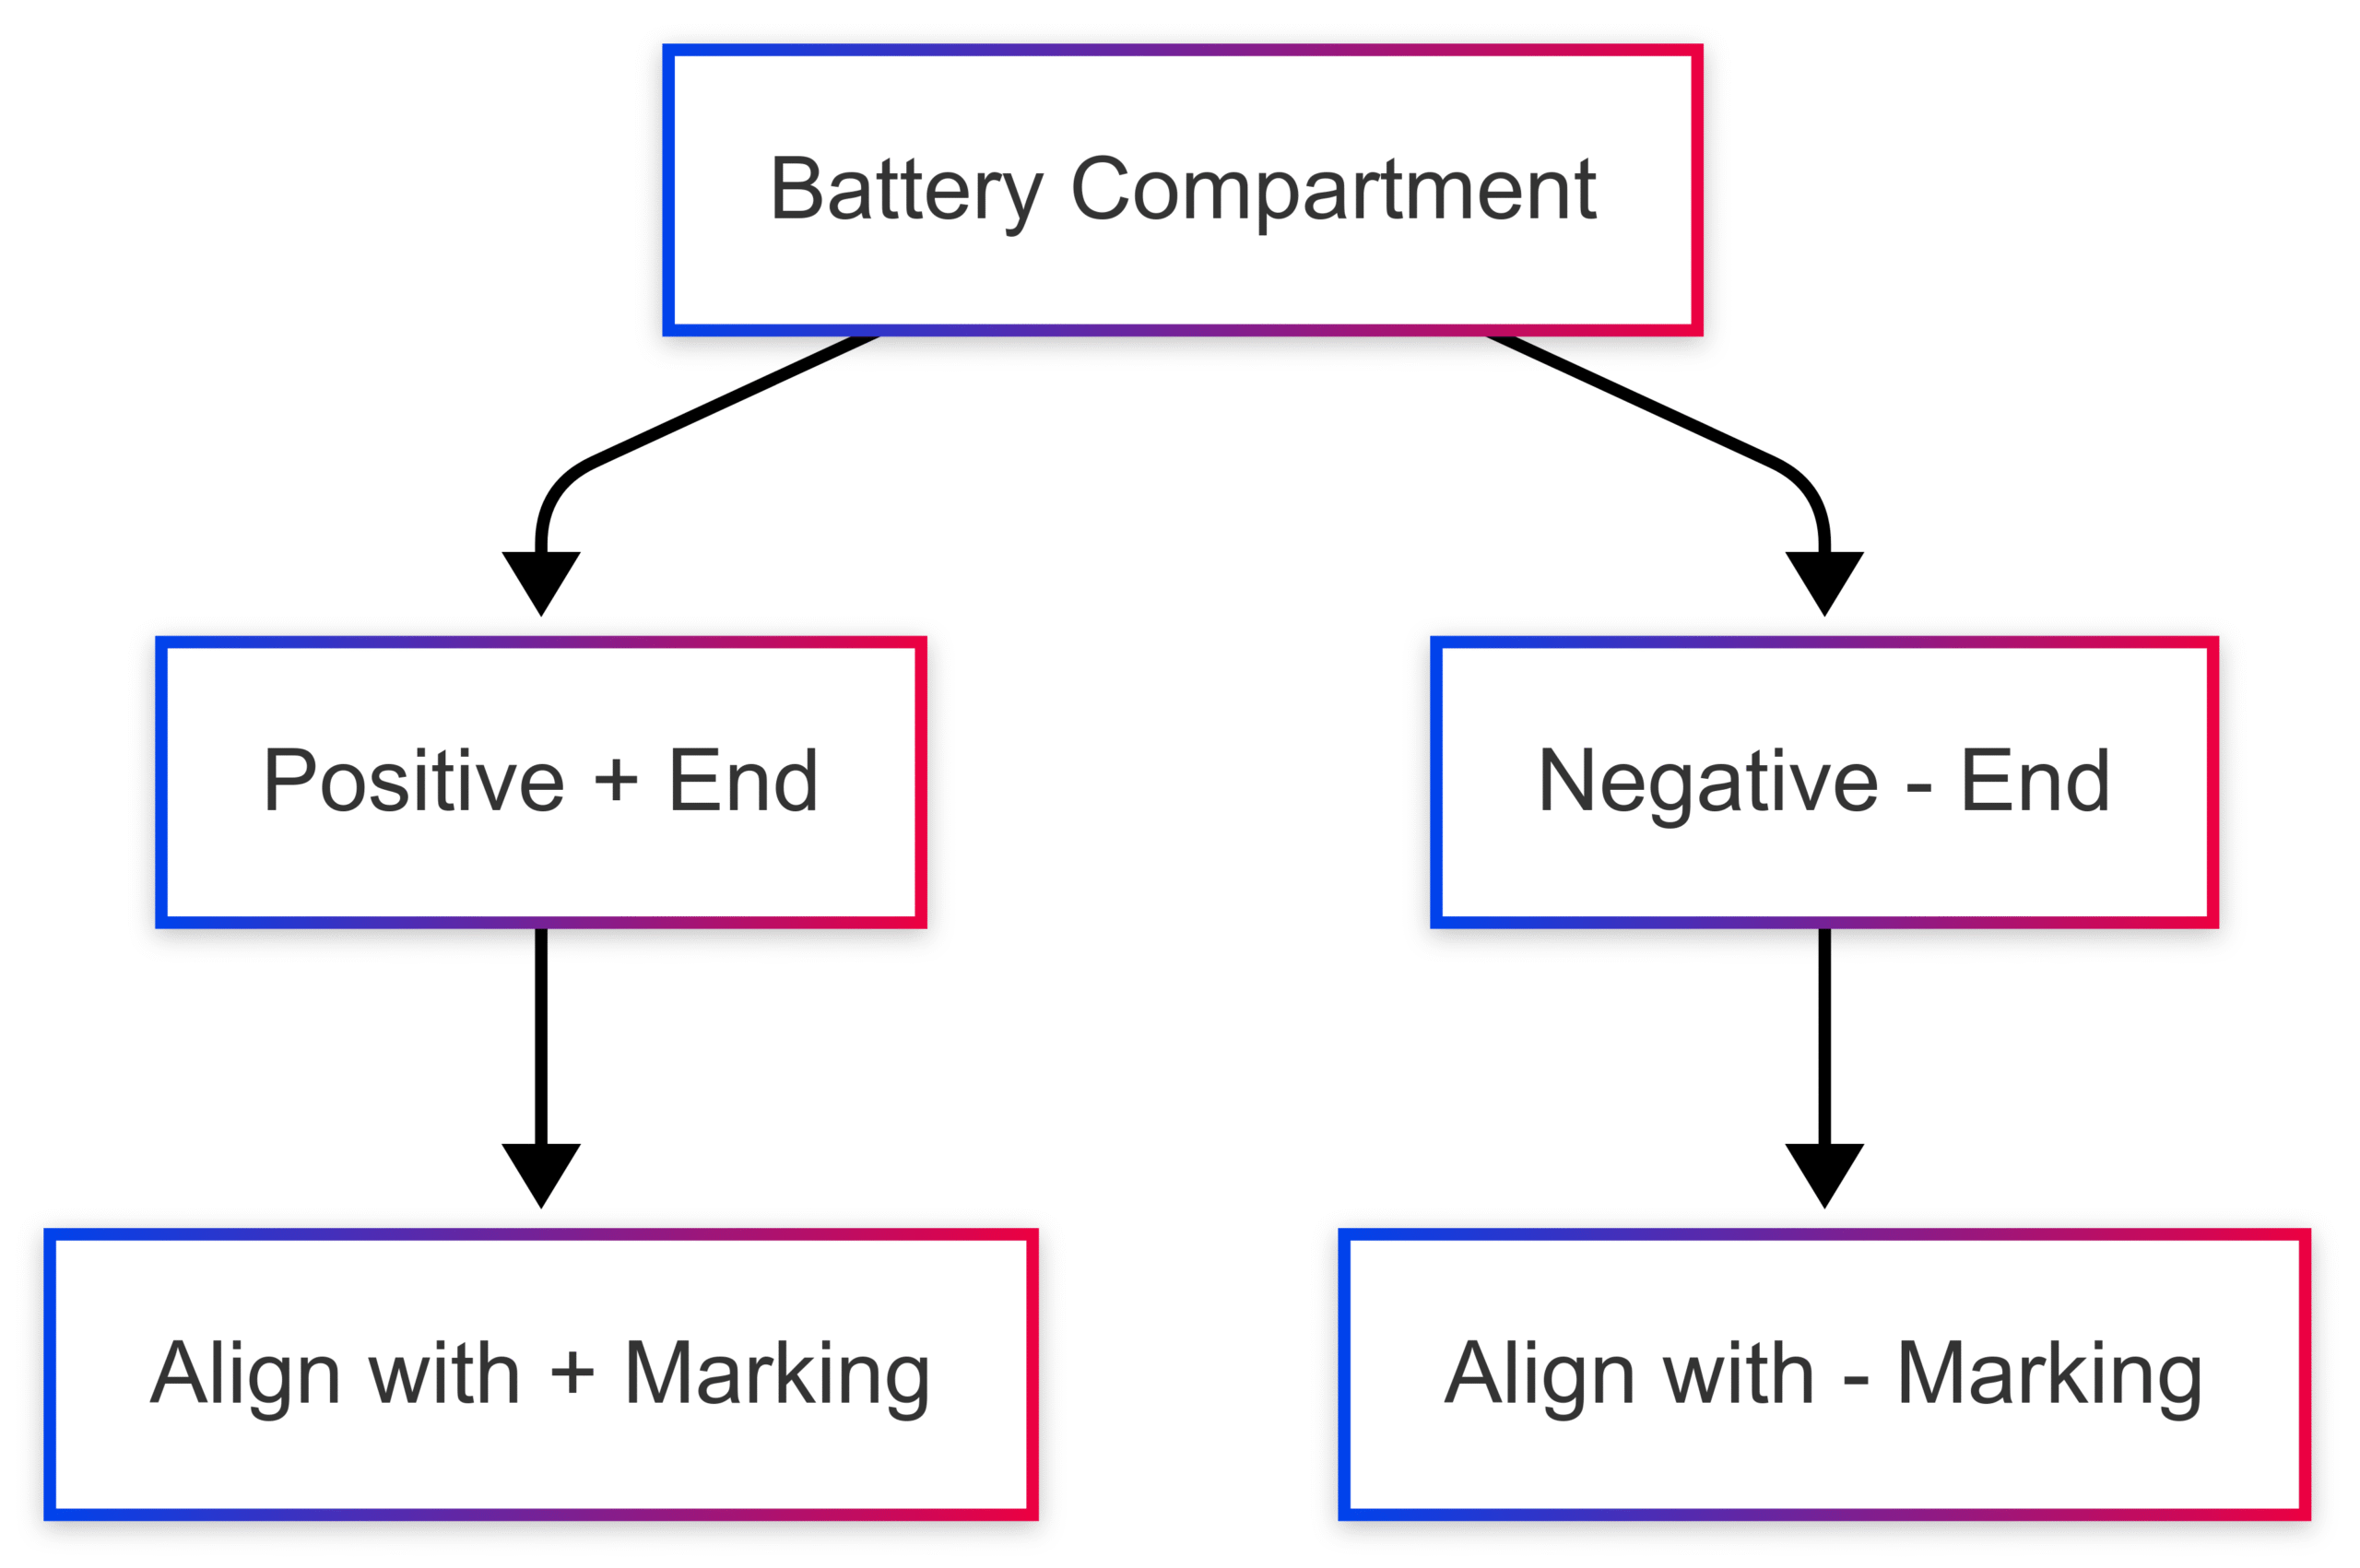
Did this fix the issue? If not, continue troubleshooting.
Step 3: Reset the Remote
A simple reset can often resolve remote issues by re-establishing the connection with the receiver.
- Remove and reinsert batteries: Take out the batteries, wait 10 seconds, and reinsert them correctly.
- Press the SAT button: Press and release the “SAT” button on the remote (do not hold it down). This sets the remote to satellite mode, ensuring it communicates with the DISH receiver.
Did this fix the issue? If the remote still doesn’t respond, move to the next step.
Step 4: Check the Remote Antenna
For RF-based DISH remotes (e.g., models 40.0, 50.0, or 54.0), the receiver’s remote antenna plays a critical role in signal transmission.
- Inspect the antenna: Ensure the antenna on the back of the receiver is upright and securely connected (hand-tight). Check for any obstructions, such as cables or electronic devices, that might interfere with the signal.
- Reposition if needed: Move any objects touching or near the antenna to ensure a clear signal path.
Note: If your receiver doesn’t have an antenna (common with some IR-based models), skip this step.
Did this fix the issue? If not, proceed to reprogramming the remote.
Step 5: Reprogram the Remote to the Receiver
A battery change can sometimes disrupt the remote’s programming, requiring it to be re-paired with the receiver. Follow these steps:
- Access System Info:
- Press the “SYSTEM INFO” button on the front panel of your DISH receiver.
- If there’s no “SYSTEM INFO” button, turn off the receiver using the “POWER” button, then press the “CHANNEL UP” button while the receiver is off.
- Program the remote:
- With the System Info screen displayed on your TV, press the “SAT” button on the remote, then press the “RECORD” button.
- Use the remote to select the “Done” button on the screen.
- If the “Done” button doesn’t respond, continue troubleshooting.
Did this fix the issue? If reprogramming fails, try the next step.
Step 6: Power Cycle the Receiver
A receiver error can prevent the remote from communicating properly. Power cycling the receiver can reset its internal settings.
- Unplug the receiver: Disconnect the power cord (often marked with a red tag) from the electrical outlet.
- Wait 10 seconds: Allow the receiver to fully power down.
- Plug it back in: Reconnect the power cord and wait up to 5 minutes for the receiver to restart.
Did this fix the issue? If not, repeat the reprogramming steps (Step 5) after the reset.
Step 7: Check for Physical Obstructions
For IR-based remotes (e.g., model 21.0), a clear line of sight between the remote and the receiver’s infrared sensor is essential.
- Inspect the sensor: Ensure the receiver’s front panel sensor isn’t blocked by objects like furniture, decorations, or dust.
- Test the remote: Point it directly at the receiver from a distance of 10–20 feet and press a button (e.g., “POWER” or “SAT”). If it works intermittently, the sensor may be dirty or partially obstructed.
Did this fix the issue? If not, move to the next step.
Step 8: Test the Receiver’s Front Panel
If the remote still doesn’t work, test whether the issue lies with the remote or the receiver.
- Use the front panel buttons: Press buttons like “POWER” or “CHANNEL UP” on the receiver’s front panel. If the receiver responds, the issue is likely with the remote.
- If the receiver doesn’t respond: The problem may be with the receiver itself, requiring further troubleshooting or professional assistance.
Did this fix the issue? If the receiver works but the remote doesn’t, proceed to the next step.
Step 9: Reprogram for Other Devices
If the remote controls the receiver but not other devices (e.g., TV or soundbar), it may need reprogramming for those devices.
- Select the device mode: Press the function button (e.g., “TV” or “AUX”) at the top of the remote. The button should light up briefly.
- Reprogram the device:
- Hold the function button (e.g., “TV”) until all function buttons light up and go dark.
- Enter the 3-digit code for your device (available from DISH’s remote code database or the original setup manual).
- Press the “#” (pound) key. If the function buttons flash, the code is accepted.
- Test by pressing the “POWER” button to see if the device responds.
Did this fix the issue? If not, the remote may be defective.
Step 10: Replace the Remote
If all steps fail, the remote may be damaged or defective. DISH remotes are generally non-repairable, so replacement is the next step.
- Contact DISH: Call DISH customer support at 800-333-3474 to request a free replacement remote if you rent your equipment.
- Purchase a replacement: If the remote is for a TV or another device, find the model number on the back of the device and search online for a compatible remote (e.g., “Samsung UN55NU6900 remote”). Prices typically range from $10–$50 depending on the model.
Table: Common DISH Remote Models and Specifications
| Model | Type | Battery Type | Range | Price (Replacement) |
|---|---|---|---|---|
| 21.0 | IR | 4x AAA | 20 ft | $15–$25 |
| 40.0 | RF | 4x AAA | 200 ft | $20–$30 |
| 50.0 | RF | 4x AAA | 200 ft | $25–$35 |
| 54.0 | RF/Voice | 4x AAA | 200 ft | $30–$50 |
Note: Prices are approximate and vary by retailer. Contact DISH for free replacements if you rent your equipment.
Common DISH Error Codes Related to Remote Issues
Sometimes, remote issues are accompanied by error codes displayed on your TV. Below is a table summarizing common DISH error codes and their solutions:
| Error Code | Problem | Solution |
|---|---|---|
| 005, 013, 014 | Programming not authorized | Reset receiver; contact DISH if issue persists. |
| 015, 015A–Z | Signal loss | Check cables, reset receiver, or use DISH Signal Protector to stream. |
| 311 | Hard drive failure | Reset receiver; contact DISH for replacement if issue persists. |
| 981 | Boot recovery error | Wait 4 hours; reset receiver if issue persists. |
| 1303, 1305 | Looking for Hopper | Check cables, reset receiver, or contact DISH. |
Did this fix the issue? If error codes persist, contact DISH support for advanced troubleshooting.
Preventing Future Remote Issues
To minimize future problems with your DISH remote:
- Use high-quality batteries: Opt for reputable brands like Duracell or Energizer to avoid power issues.
- Store remotes properly: Keep remotes away from liquids, extreme heat, or physical damage.
- Regularly update receiver firmware: Ensure your DISH receiver is updated to the latest software version to maintain compatibility with the remote.
- Check connections periodically: Inspect cables and the remote antenna monthly to ensure they’re secure and unobstructed.
Advanced Troubleshooting: DISH Signal Protector and App
If your remote issues are accompanied by signal loss, DISH’s Signal Protector feature can help maintain service by streaming channels over Wi-Fi.
- Enable Signal Protector:
- For error codes 015N or 015X, select “Internet Setup” on the Complete Signal Loss pop-up and follow the prompts to connect your Hopper to Wi-Fi.
- For code 015Y, choose “Stream Channel” and enable automatic streaming for future signal drops.
Alternatively, use the DISH Anywhere app to control your receiver and stream content. The app is available on iOS (4.5/5 rating, Apple App Store) and Android (4.6/5 rating, Google Play) and can serve as a temporary workaround if your remote is unresponsive.
Steps to Troubleshoot DISH Anywhere:
- Update the app to the latest version.
- Uninstall and reinstall if issues persist.
- Check parental control settings to ensure content isn’t blocked.
When to Contact DISH Support
If none of the above steps resolve the issue, it’s time to contact DISH customer service:
- Phone: 800-333-3474
- Online: Visit DISH’s support website for live chat or additional resources.
DISH’s technical experts can confirm the steps you’ve tried and provide advanced troubleshooting or a replacement remote/receiver if needed. If you rent your equipment, replacements are typically free.
Conclusion
A DISH remote not working after changing batteries can be frustrating, but most issues can be resolved with systematic troubleshooting. By verifying the correct remote, checking battery installation, reprogramming, and resetting the receiver, you can often restore functionality without professional help. If all else fails, DISH’s customer support is readily available to assist. Regular maintenance, such as using high-quality batteries and checking connections, can prevent future issues, ensuring uninterrupted access to your DISH services.
Please share this DISH Remote Not Working After Changing Batteries your friends and do a comment below about your feedback.
We will meet you on next article.
Until you can read, How to change sandpaper on Black Decker 7404 finish sander?