Directions For Using A Glass Percolator
Learn how to use a glass percolator for bold, aromatic coffee. Step-by-step guide, tips, and comparisons for perfect brews every time.
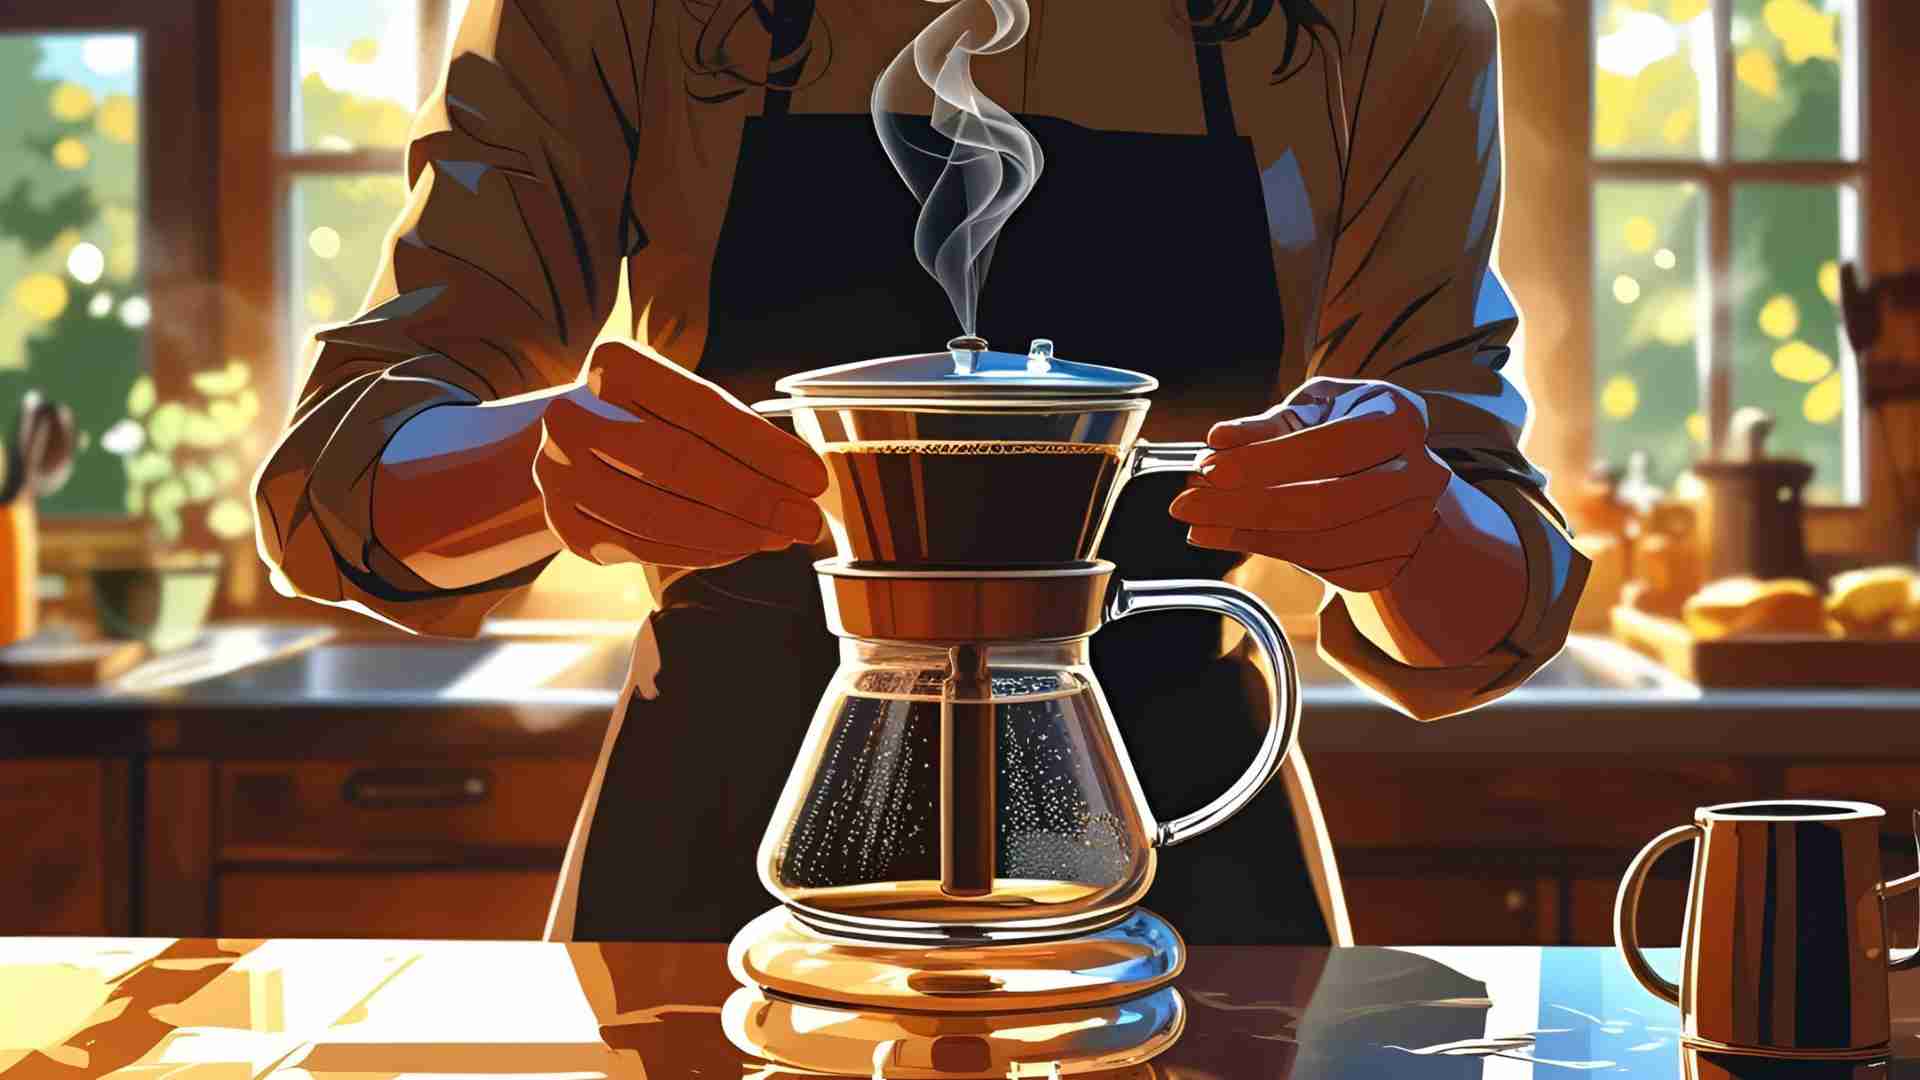
Coffee is more than a beverage; it’s a ritual, a morning necessity, and for many, a daily indulgence. Among the myriad ways to brew coffee—drip, pour-over, French press, or single-serve machines—the glass percolator stands out for its nostalgic charm and ability to produce a bold, aromatic cup. While percolators may seem old-fashioned, their revival in the modern coffee scene speaks to their unique ability to craft a robust brew with a hands-on experience. This comprehensive guide explores how to use a glass percolator, with a focus on Pyrex models, to achieve the perfect cup. From setup to brewing techniques, cleaning tips, and comparisons with other methods, we’ll cover everything you need to master percolator coffee.
What is a Glass Percolator?
A glass percolator is a coffee brewing device, typically made from heat-resistant glass like Pyrex, designed to cycle hot water through coffee grounds multiple times to extract a strong, flavorful brew. Unlike drip or pour-over methods that pass water through grounds once, percolators repeatedly circulate water, resulting in a richer, bolder coffee. Pyrex glass, originally developed for railroad lanterns due to its ability to withstand extreme temperature changes without cracking, is an ideal material for percolators. Its durability and transparency allow users to monitor the brewing process, adding both functionality and a retro aesthetic.
Percolators consist of several key components:
- Base: Holds the water to be heated.
- Coffee Grounds Basket: A perforated metal or glass container where coffee grounds are placed.
- Stem: A vertical tube that channels hot water from the base to the basket.
- Top: A lid, often with a glass knob, that disperses water over the grounds and allows visual monitoring.
Glass percolators, particularly Pyrex models, are popular for their transparency, which lets you observe the brewing process and gauge coffee strength by color. They’re versatile, suitable for stovetop or campfire use, and evoke a sense of nostalgia, making them a favorite for home brewers and outdoor enthusiasts alike.
How Does a Glass Percolator Work?
The percolator’s brewing mechanism is both simple and ingenious. Water in the base is heated, creating pressure that forces it up the stem. At the top, the water sprays over the coffee grounds in the basket, seeping through them to extract flavor before dripping back into the base. This cycle repeats, with the now-flavored water passing through the grounds multiple times, intensifying the coffee’s aroma and strength.
The key to percolator coffee is controlling the brewing time and temperature. Unlike drip or pour-over methods, which involve a single pass of water, percolation’s repeated cycling can lead to over-extraction if not monitored, resulting in a bitter taste. The transparency of a glass percolator, like those made by Pyrex, allows you to watch the coffee darken, helping you stop the process at the desired strength.
Here’s a simplified flow of the percolation process:
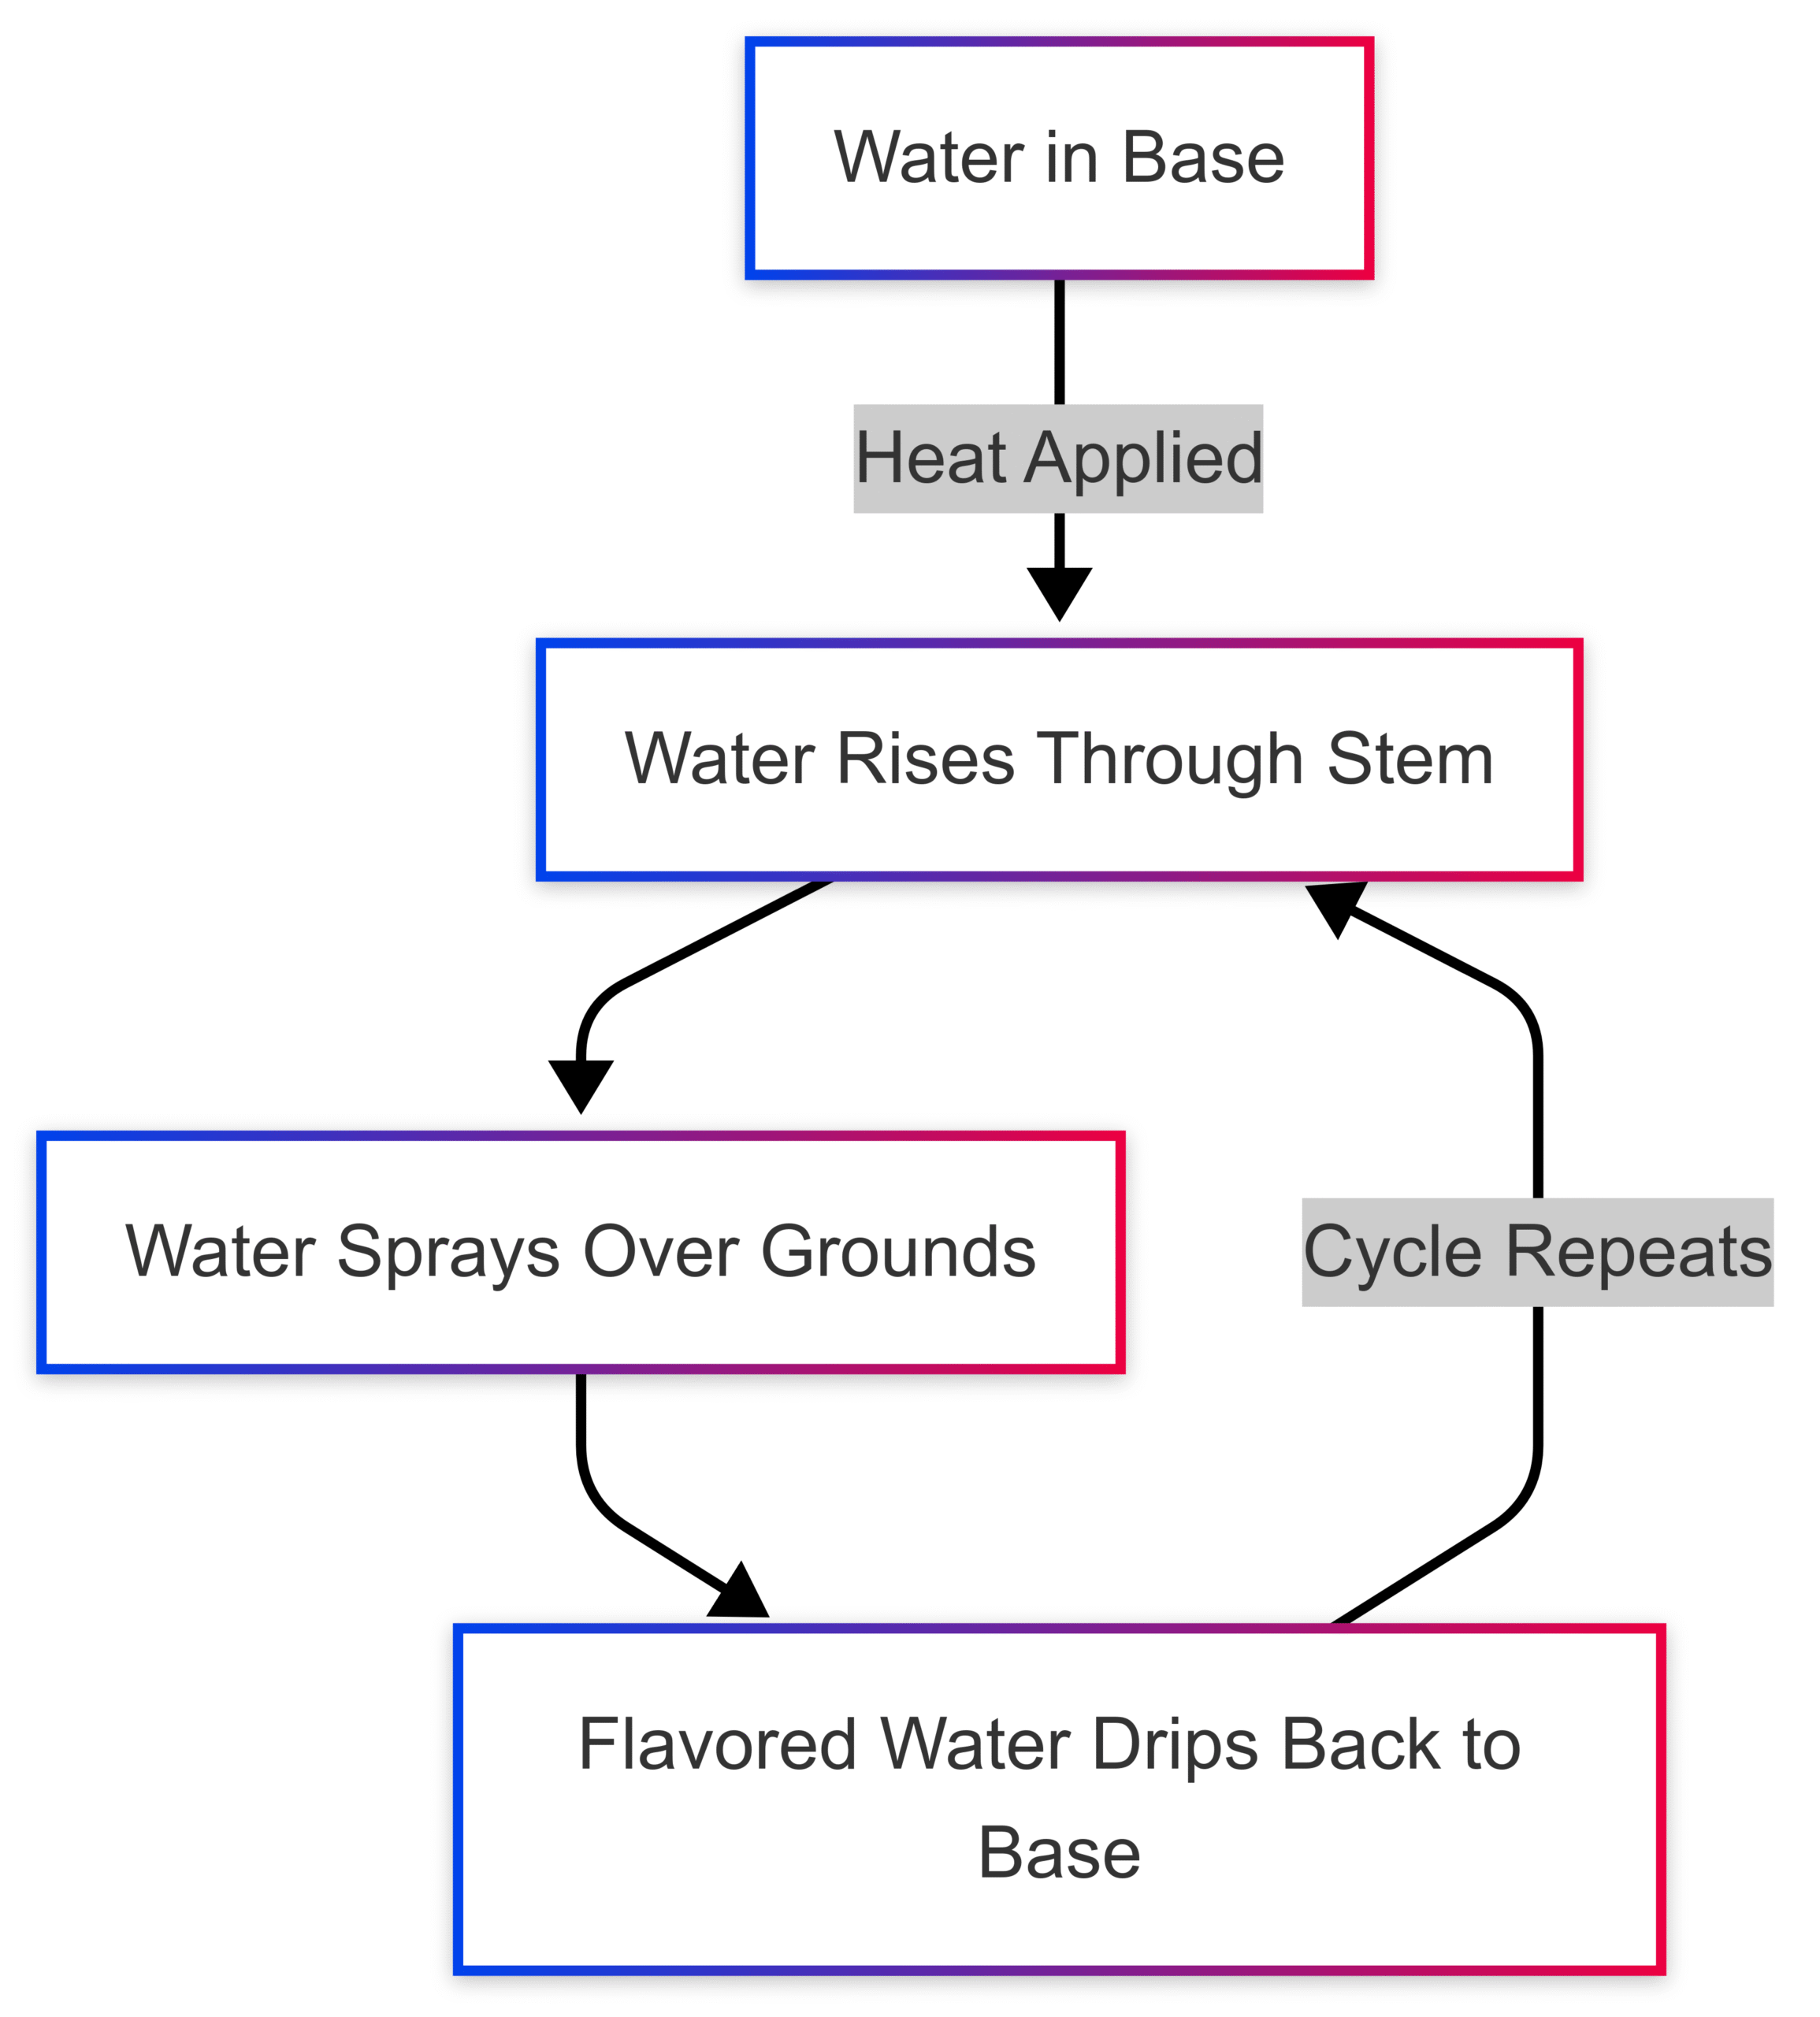
This cycle typically takes 7–10 minutes, depending on the desired strength, and requires careful heat management to avoid boiling, which can scorch the coffee.
Step-by-Step Guide to Brewing Coffee in a Glass Percolator
Brewing coffee with a glass percolator is a straightforward process, but attention to detail is crucial for optimal results. Follow these steps to craft a delicious cup:
Step 1: Prepare the Percolator
- Clean Thoroughly: Rinse all components—base, stem, basket, and lid—with warm, soapy water to remove any residual coffee oils or grounds from previous brews. Dry completely to avoid affecting flavor.
- Check Components: Ensure the stem and basket are intact and properly assembled. For Pyrex percolators, verify that the glass is free of cracks or chips.
Step 2: Measure and Add Water
- Fill the base with fresh, cold water, using the internal cup markings (if available) or a measuring cup. A standard ratio is 6 ounces of water per cup of coffee. For example, for 4 cups, add 24 ounces (approximately 700 ml) of water.
- Avoid overfilling; the water level should not touch the bottom of the coffee basket to prevent grounds from mixing with the brew.
Step 3: Add Coffee Grounds
- Use coarsely ground coffee to prevent grounds from slipping through the basket’s perforations. A coarse grind also slows extraction, reducing the risk of bitterness.
- Measure 1 tablespoon of coffee per 6 ounces of water for a strong brew, or 1 teaspoon per cup for a milder flavor. For 4 cups, use 4 tablespoons (approximately 24 grams) for strong coffee.
- Optionally, place a paper filter in the basket to reduce sediment and cholesterol compounds in the brew.
- Place the grounds in the basket, secure the lid, and insert the basket onto the stem, ensuring it’s firmly in place.
Step 4: Assemble and Heat
- Reassemble the percolator, ensuring the stem is seated in the base and the basket is secure. Screw or place the lid tightly on top.
- For stovetop models, place the percolator on a burner set to medium-low heat. For electric models, plug in and follow the manufacturer’s instructions.
- Use a heat spreader grid on electric ranges to prevent direct heat damage to the glass.
Step 5: Monitor the Brewing Process
- Watch for the water to begin percolating, indicated by bubbling in the glass knob or top. This typically starts within 3–5 minutes.
- Once percolation begins, reduce heat to maintain a gentle, consistent perk without boiling. Boiling water produces steam, which can over-extract the coffee, leading to bitterness.
- Brew for 7–10 minutes, depending on desired strength. Check the color through the glass; a rich brown indicates a balanced brew, while a very dark color suggests over-extraction.
Step 6: Remove from Heat and Rest
- Carefully remove the percolator from the heat source using oven mitts, as the glass and metal parts will be hot.
- Let the coffee rest for 30–60 seconds to allow any stray grounds to settle to the bottom.
Step 7: Serve
- Remove the basket and stem to prevent grounds from mixing with the coffee during pouring.
- Pour slowly into mugs to minimize sediment. Add cream, sugar, or other flavorings as desired.
Choosing the Best Coffee for a Glass Percolator
The coffee beans and grind size significantly impact the percolator’s performance. Here’s what to consider:
- Roast Type: Medium or light roasts are ideal for percolators, as dark roasts can become overpowering due to repeated brewing cycles. Medium roasts offer a balanced flavor, while light roasts highlight nuanced notes.
- Grind Size: Use a coarse grind, similar to sea salt, to prevent grounds from passing through the basket and to slow extraction. Finely ground coffee extracts too quickly, leading to bitterness. A burr grinder, like the Baratza Encore, set to a coarse setting (around 28–30) is recommended.
- Coffee-to-Water Ratio: A standard ratio is 1 tablespoon per 6 ounces of water. Adjust to taste; for example, 35 grams of coffee for 600 ml of water (approximately 4 cups) is a good starting point for a strong brew.
Top Glass Percolators: Models and Specifications
Below is a comparison of popular percolators, including glass and stainless steel models, with their specifications and prices (based on common retail platforms like Amazon):
| Model | Type | Capacity | Material | Price (USD) | Key Features |
|---|---|---|---|---|---|
| Pyrex Flameware Percolator | Stovetop | 6–9 cups | Borosilicate Glass | ~$50–$80 (vintage) | Transparent, retro design, durable |
| Farberware 12-Cup Percolator | Stovetop | 2–12 cups | Stainless Steel | $44.99 | Glass knob, economical, beginner-friendly |
| Presto 12-Cup Coffee Maker | Electric | 2–12 cups | Stainless Steel | $51.44 | Consistent brewing, reliable brand |
| Bialetti Moka Express 3-Cup | Stovetop (Moka) | 3 cups | Aluminum | $39.99 | Pressure-based, compact, single-brew cycle |
| Primula Aluminum Percolator | Stovetop | 9 cups | Aluminum | $27.99 | Lightweight, portable, minimalist design |
Recommended Models
- Pyrex Flameware Percolator: A vintage favorite, often found on secondary markets like eBay. Its borosilicate glass is heat-resistant and transparent, perfect for monitoring brewing. Ideal for purists who value aesthetics and functionality.
- Farberware 12-Cup Stovetop Percolator: A stainless steel alternative with a glass knob for visibility. It’s versatile for home or camping use and budget-friendly.
- Presto 12-Cup Electric Percolator: Reliable for consistent brewing, especially for larger groups. Its electric design simplifies temperature control.
- Primula 9-Cup Stovetop Percolator: Lightweight and affordable, ideal for travel or casual use.
Cleaning and Maintaining a Glass Percolator
Proper cleaning ensures your percolator delivers great-tasting coffee and lasts for years. Follow these steps:
- After Each Use: Wash the base, basket, stem, and lid with warm, soapy water. Use a soft sponge to avoid scratching the glass. Rinse thoroughly to remove soap residue.
- Deep Cleaning: For oil residue or stains, fill the base with water and add 2 tablespoons of baking soda or white vinegar. Heat for 10 minutes, then discard. For vinegar cleaning, run a cycle with clean water to remove any lingering odor.
- Avoid Harsh Abrasives: Steel wool or aggressive scrubbers can damage glass surfaces. Pyrex’s smooth glass resists odor and flavor absorption, making it easy to clean without harsh chemicals.
- Storage: Dry all components thoroughly before reassembling to prevent mold or mildew.
Percolator vs. Other Brewing Methods
How does a glass percolator compare to other brewing methods? Here’s a breakdown:
| Method | Flavor Profile | Brew Time | Ease of Use | Best For |
|---|---|---|---|---|
| Glass Percolator | Bold, robust, aromatic | 7–10 min | Moderate | Strong coffee, multiple cups |
| Drip Coffee | Light, nuanced | 4–6 min | Easy | Consistent, daily use |
| Pour-Over | Clean, customizable | 3–5 min | Moderate | Precision, single servings |
| French Press | Full-bodied, slightly bitter | 4–5 min | Moderate | Rich coffee, small batches |
| Moka Pot | Espresso-like, intense | 5–7 min | Moderate | Strong, single servings |
- Percolator: Produces a stronger, bolder brew due to multiple water cycles. Ideal for groups or those who enjoy a robust flavor. Requires monitoring to avoid over-extraction.
- Drip Coffee: Offers a lighter, cleaner taste with minimal effort. Best for convenience and consistency but lacks the percolator’s depth.
- Pour-Over: Allows precise control over flavor but is time-intensive for single servings. Suited for coffee enthusiasts who value nuance.
- French Press: Similar to percolators in producing a full-bodied brew but with a single extraction cycle. Better for smaller batches.
- Moka Pot: Uses pressure for an espresso-like brew, distinct from the percolator’s gravity-based method.
Tips for Perfect Percolator Coffee
To elevate your percolator coffee game, consider these expert tips:
- Use Fresh Beans: Freshly roasted beans enhance flavor. Store in an airtight container to maintain freshness.
- Experiment with Ratios: Adjust the coffee-to-water ratio (e.g., 1.5 tablespoons per cup for extra strength) to find your ideal brew.
- Control Heat: Maintain a gentle perk to avoid boiling. On a stovetop, use medium-low heat; for campfires, position the percolator away from direct flames.
- Monitor Color: Use the glass top to check the coffee’s color. Stop brewing when it reaches a rich brown to avoid bitterness.
- Rest Before Serving: Letting the coffee sit for 30–60 seconds reduces sediment in the cup.
- Try Medium Roasts: As shared by a user on r/Coffee, medium roasts often perform better than dark roasts, which can become overpowering.
- Use a Burr Grinder: Consistent coarse grinds improve extraction and reduce sediment. A setting of 28–30 on a Baratza Encore is a good starting point.
Pros and Cons of Glass Percolators
Pros
- Transparency: Allows visual monitoring of the brewing process, helping you gauge strength by color.
- Durability: Pyrex glass withstands high temperatures and resists cracking or chipping.
- Aesthetic Appeal: Retro design adds charm to kitchens or campsites.
- Versatility: Suitable for stovetop, campfire, or portable stoves like JetBoil.
Cons
- Requires Attention: Unlike electric percolators, glass models need constant monitoring to prevent over-extraction or damage.
- Fragility Risk: While durable, glass can break if mishandled or exposed to sudden temperature changes.
- Cleaning Effort: Grounds can stick to the basket, requiring thorough cleaning to avoid flavor contamination.
Troubleshooting Common Percolator Issues
- Bitter Coffee: Likely due to over-extraction. Reduce brewing time to 7–8 minutes or use a coarser grind.
- Weak Coffee: Increase the coffee-to-water ratio or brew for a full 10 minutes. Ensure the water is hot enough without boiling.
- Sediment in Coffee: Use a coarser grind or add a paper filter to the basket. Let the coffee rest before pouring.
- Burnt Taste: Lower the heat to prevent boiling. Use a heat spreader on electric stoves to distribute heat evenly.
Why Choose a Glass Percolator?
Glass percolators, particularly Pyrex models, offer a unique brewing experience that combines tradition with functionality. Their transparency allows precise control over the brewing process, while their durability ensures long-term use. The bold, aromatic coffee they produce is ideal for those who prefer a strong brew, and their versatility makes them perfect for home or outdoor settings. Whether you’re brewing for a crowd or savoring a solo cup, the glass percolator delivers a satisfying, hands-on coffee-making ritual.
Final Thoughts
Using a glass percolator is more than a brewing method—it’s a journey into coffee’s rich history. The process of watching water bubble through the stem, infusing grounds with flavor, is meditative and rewarding. With the right techniques—coarse grounds, medium roasts, careful heat control, and proper cleaning—you can master the art of percolator coffee. Whether you’re drawn to the retro charm of a Pyrex percolator or its ability to craft a bold brew, this method offers a timeless way to enjoy your daily cup. Experiment with ratios, monitor the process, and savor the robust, aromatic results.
Please share this Directions For Using A Glass Percolator your friends and do a comment below about your feedback.
We will meet you on next article.
Until you can read, How To Make Gorilla Glue Cure Faster