Applying Polymeric Sand to an Existing Patio or Walkway
Discover how to apply polymeric sand to an existing patio or walkway for a durable, weed-resistant, and low-maintenance surface. This comprehensive guide covers preparation, application, common mistakes, and expert tips to ensure long-lasting results. Learn why polymeric sand outperforms regular sand and how to achieve professional-grade paver joints.
Patios and walkways constructed with pavers enhance outdoor spaces with aesthetic appeal and functionality. However, over time, the jointing material between pavers can erode due to weathering, heavy foot traffic, or cleaning processes like pressure washing. This erosion leads to unstable pavers, weed growth, and an unkempt appearance. Applying polymeric sand to an existing patio or walkway is a proven solution to restore stability, deter weeds, and ensure a long-lasting, low-maintenance surface. Unlike regular sand, polymeric sand binds pavers together, resists washout, and enhances durability. This guide provides a detailed, step-by-step approach to applying polymeric sand, including preparation, application techniques, common mistakes to avoid, and expert maintenance tips.
Why Choose Polymeric Sand?
Polymeric sand is a specialized blend of fine sand and additives, such as silica and polymers, that activate when mixed with water to form a strong, cohesive bond. This binding action locks pavers in place, creating a durable and stable surface. Unlike regular sand, which is prone to erosion and weed infiltration, polymeric sand offers several advantages:
- Enhanced Durability: The binding agents in polymeric sand create a robust connection between pavers, reducing movement and ensuring long-term stability.
- Resistance to Washout: Heavy rain won’t easily dislodge polymeric sand, maintaining the integrity of the paver joints and the underlying base.
- Weed and Pest Prevention: The hardened sand creates an inhospitable environment for weed seeds and burrowing insects like ants, minimizing maintenance.
- Improved Aesthetics: Available in various colors (e.g., gray, beige, tan), polymeric sand complements paver designs and provides a polished, professional finish.
Polymeric Sand vs. Regular Sand
| Feature | Polymeric Sand | Regular Sand |
|---|---|---|
| Binding Capability | Binds pavers with polymers | No binding; loose and prone to shifting |
| Washout Resistance | High resistance to rain and erosion | Easily washes out with rain |
| Weed Prevention | Deters weed growth effectively | Prone to weed infiltration |
| Pest Resistance | Resists ant nesting | Allows pest activity |
| Cost | $20–$40 per 40-lb bag | $5–$10 per 50-lb bag |
| Application Time | Requires drying and careful watering | Quick but frequent reapplication |
Polymeric sand is more expensive and requires meticulous application, but its longevity and low maintenance make it a superior choice for paver joints.
When to Use Polymeric Sand
Polymeric sand is ideal for most paver patios and walkways but has specific requirements for optimal performance:
- Joint Size: Works best in joints between ¼ inch and 1.5 inches wide. Wider joints may require longer curing times and restricted traffic.
- Paver Condition: Suitable for patios in good condition with minimal cracking or severe settling. Severely damaged pavers may need replacement or re-leveling before applying polymeric sand.
- Joint Depth: Polymeric sand should fill the entire depth of the paver joint for maximum strength. Shallow or false joints (e.g., 3/8-inch deep) require specialized products like TechniSeal SmartSand.
If pavers are tightly interlocked with no gaps (e.g., notched pavers touching each other), polymeric sand may not be suitable due to insufficient joint space.
Materials and Tools Needed
Before starting, gather the following materials and tools. The exact requirements depend on the patio’s condition and size.
Materials
- Polymeric Sand: Choose a high-quality brand like TechniSeal NOCOSTORM or Alliance Gator Maxx G2. Estimate 5–10 lbs per 100 sq. ft. for 1-inch joints.
- Non-Selective Herbicide (optional): For heavy weed infestations (e.g., Roundup).
- Paver Sealer (optional): Water-based sealers like Sakrete Wet Look enhance appearance and protect pavers.
- White Vinegar (optional): For removing polymeric sand stains.
Tools
- Pressure Washer: To remove old sand and debris.
- Leaf Blower: For clearing excess sand and dust.
- Push Broom: To sweep sand into joints.
- Vibratory Plate Compactor (optional): To settle sand into joints (rentable for $50–$100/day).
- Garden Hose with Adjustable Nozzle: For watering the sand.
- Small Brush or Dustpan: For precise sand application near edges.
- Safety Gear: Goggles, gloves, and a face shield for pressure washing; dust mask for compacting.
Estimated Costs
| Item | Cost Range |
|---|---|
| Polymeric Sand (40-lb bag) | $20–$40 |
| Pressure Washer Rental | $30–$70/day |
| Vibratory Plate Compactor Rental | $50–$100/day |
| Paver Sealer (1 gallon) | $25–$50 |
| Herbicide (1 quart) | $10–$20 |
| Total for 100 sq. ft. | $40–$60 (excluding rentals) |
Step-by-Step Guide to Applying Polymeric Sand
Applying polymeric sand requires careful preparation and attention to detail to avoid common pitfalls like staining or improper curing. Follow these steps for professional results.
Step 1: Assess the Patio Condition
Before applying polymeric sand, ensure the patio is structurally sound. Check for:
- Loose or Wobbly Pavers: Lift and re-level any unstable pavers with a sand or gravel base.
- Cracked or Broken Pavers: Replace damaged pavers to maintain a uniform surface.
- Severe Settling: If the patio is uneven or hazardous, consider a full re-leveling project.
If the patio is in good condition, proceed with preparation.
Step 2: Remove Existing Sand and Debris
Polymeric sand must fill the entire joint depth, so all old sand, dirt, and debris must be removed. Use one of these methods:
- Pressure Washer: Set to medium pressure (1500–2000 PSI) to blast out old sand. Work systematically to avoid missing spots. Wear goggles and a face shield to protect against flying debris.
- Manual Tools: For small areas, use a screwdriver, wire brush, or shop vac to scrape and vacuum out debris. This is slower but effective for precise cleaning.
Tip: If using a pressure washer, allow 1–2 days for the pavers to dry completely, as moisture can cause polymeric sand to stain or fail to set.
Step 3: Address Weeds
Weeds with deep roots (e.g., Bermuda grass) can persist even after sand removal. To eliminate them:
- Apply a non-selective herbicide to the joints and let it sit for 2–3 days to kill roots.
- For severe infestations, lift a few pavers to inspect for weed mats. If present, remove the weed layer or consider professional landscaping solutions.
Regular sand removal often eliminates most weeds, but herbicide ensures long-term prevention in high-infestation areas.
Step 4: Spread Polymeric Sand
Once the pavers are clean and dry, apply the polymeric sand:
- Pour small heaps of sand across the patio surface. Avoid overfilling to minimize waste.
- Use a push broom to sweep the sand into the joints, working in multiple directions to ensure all cracks are filled.
- For edges or tight spaces, use a small brush or dustpan to guide sand into joints without spilling into landscaping areas.
- Aim to fill joints to within 1/8 inch of the paver top (or the bottom of any bevel) to avoid sand exposure to foot traffic.
Step 5: Compact the Sand
Compacting ensures the sand settles deeply into the joints:
- Manual Tamping: Tap pavers with a broom handle or mallet to consolidate the sand. Sweep additional sand into joints as needed.
- Vibratory Plate Compactor: For large areas, rent a compactor and run it over the patio 1–2 times in different directions. This ensures uniform settling and fills any gaps.
Note: Check the polymeric sand manufacturer’s instructions, as some brands require compacting while others do not.
Step 6: Clear Excess Sand
Excess sand on the paver surface can harden and cause staining when wet. Remove it carefully:
- Use a push broom to sweep off loose sand.
- Set a leaf blower to low power and hold it at a 30-degree angle to blow away remaining dust. Avoid directing the blower straight down, as this can dislodge sand from joints.
Tip: For false joints (shallow, zigzag joints), use a fine brush to remove excess sand to prevent accidental removal from the joint.
Step 7: Water the Sand
Watering activates the polymers, causing the sand to harden. This step requires precision to avoid under- or overwatering:
- Set the hose nozzle to a gentle “shower” setting.
- Spray water over a small section (e.g., 10’ x 10’) for a few seconds, then pause to observe. Continue spraying until the joints no longer absorb water but stop before polymers float out (visible as a white, milky residue).
- Work in small sections to ensure even watering. Avoid pooling water, as it can weaken the bond.
- For false joints, use less water, as they saturate faster than full-depth joints.
Warning: Insufficient watering hardens only the top layer, leaving loose sand below that can collapse. Overwatering washes out polymers, reducing bond strength.
Step 8: Protect the Patio
After watering, protect the patio during the curing process:
- Restrict Traffic: Keep pedestrians off for 24 hours and vehicles off for 72 hours. Hot, dry weather speeds curing, while cool or humid conditions may extend drying time.
- Shield from Rain: Light rain is generally safe, but heavy downpours within 24–48 hours can dislodge sand. Cover the patio with a tarp if heavy rain is forecast.
- Redirect Water Flow: Ensure downspouts or runoff do not pour directly onto the patio during curing.
Step 9: Apply a Paver Sealer (Optional)
Sealing enhances the patio’s appearance and protects against UV fading and stains. Wait 2–3 days for the polymeric sand to harden, then:
- Choose a water-based sealer (e.g., Sakrete Wet Look, $25–$50/gallon).
- Apply with a roller or sprayer in thin, even coats, following manufacturer instructions.
- Allow 24 hours to dry before resuming foot traffic.
Sealing is optional but recommended for high-traffic areas or to maintain vibrant paver colors.
Step 10: Clean Stains (If Needed)
If polymeric sand residue hardens on paver surfaces, remove it promptly:
- Spray white vinegar over the stained area and let it sit for 1 hour.
- Scrub with a soft brush and rinse with soap and water.
- For stubborn stains, consult a professional to avoid damaging pavers.
Note: Polymeric sand stains red clay bricks easily, so test on a small area first or avoid using it on such surfaces.
Common Mistakes and How to Avoid Them
Proper application is critical to avoid issues that compromise the patio’s appearance or durability. Here are common mistakes and preventive measures:
- Not Removing Excess Sand:
- Issue: Leftover sand on paver surfaces hardens when wet, causing discoloration.
- Solution: Thoroughly sweep and blow off all excess sand before watering.
- Poor Drainage During Curing:
- Issue: Trapped water prevents proper curing, weakening the sand.
- Solution: Ensure proper patio slope and consider adding 2-inch weeping holes every few feet for large projects (fill with gravel after curing).
- Over- or Under-Filling Joints:
- Issue: Overfilled joints create a messy appearance; underfilled joints weaken stability.
- Solution: Fill to 1/8 inch below the paver top and compact carefully. Use light pressure when sweeping to avoid removing joint sand.
- Improper Watering:
- Issue: Too little water leaves loose sand; too much water washes out polymers.
- Solution: Water in small sections, stopping when joints are saturated but before polymers float out.
- Unsecured Pavers:
- Issue: Loose pavers shift and crack the sand.
- Solution: Re-level and secure pavers before applying sand. Polymeric sand can handle minor movements but not significant shifts.
Maintaining Your Patio with Polymeric Sand
Polymeric sand typically lasts 5–15 years, depending on climate, traffic, and maintenance. To maximize its lifespan:
- Inspect Joints Annually: Top up with polymeric sand if joints appear low or eroded.
- Clean Regularly: Sweep debris and use a pressure washer (low setting) to remove dirt without dislodging sand.
- Reapply Sealer: Re-seal every 2–3 years to protect pavers and enhance appearance.
- Control Weeds: Spot-treat any weed growth with herbicide to prevent root damage.
Polymeric Sand Product Comparison
| Brand/Product | Joint Width | Coverage (40-lb bag) | Price (USD) | Key Features |
|---|---|---|---|---|
| TechniSeal NOCOSTORM | 1/8–1.5 in | 50–100 sq. ft. | $30–$40 | High weed resistance, fast curing |
| Alliance Gator Maxx G2 | 1/4–1.5 in | 60–120 sq. ft. | $35–$45 | Dust-free, haze-free formula |
| Joint-It Simple | 1/8–1 in | 40–80 sq. ft. | $25–$35 | Easy application, water-activated |
| Joint-It Elite | 1/16–1/2 in | 30–60 sq. ft. | $30–$40 | Smooth finish for porcelain pavers |
Note: Coverage varies based on joint width and depth. Always check manufacturer guidelines.
Chart: Polymeric Sand Application Process
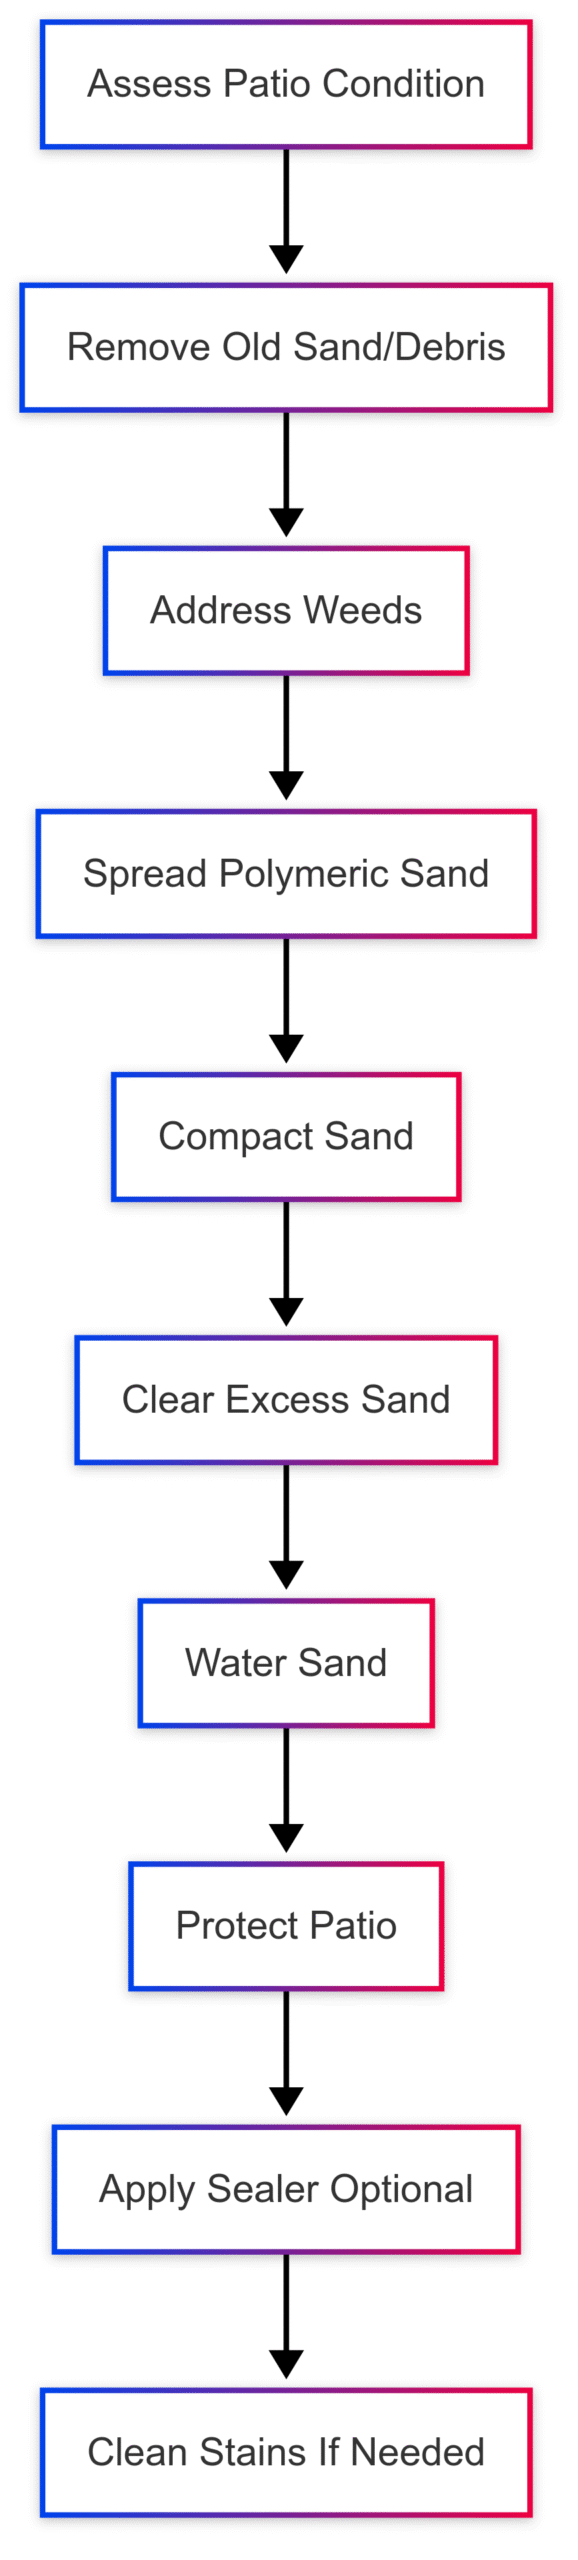
This flowchart outlines the sequential steps for applying polymeric sand, ensuring a clear and efficient process.
When to Call a Professional
While applying polymeric sand is a manageable DIY project for small patios, larger or complex projects may benefit from professional expertise. Consider hiring a landscaper if:
- The patio exceeds 500 sq. ft., requiring extensive leveling or drainage solutions.
- Pavers are severely damaged or require replacement.
- You lack access to tools like a vibratory plate compactor or pressure washer.
- Precise drainage (e.g., weeping holes) is needed for proper curing.
Professional services cost $2–$5 per sq. ft., depending on the project scope.
Conclusion
Applying polymeric sand to an existing patio or walkway is a transformative maintenance task that enhances durability, prevents weeds, and restores aesthetic appeal. By following the detailed steps outlined—assessing the patio, removing old sand, applying and compacting polymeric sand, and watering carefully—you can achieve professional-grade results. Avoiding common mistakes like improper watering or leaving excess sand ensures a flawless finish. With proper maintenance, polymeric sand can keep your paver joints stable and attractive for up to 15 years. Whether you’re a DIY enthusiast or seeking professional help, this guide equips you with the knowledge to create a long-lasting, low-maintenance outdoor space.
For additional resources or to explore polymeric sand products, contact local suppliers like Western Interlock or Joint-It, or visit home improvement stores for trusted brands like TechniSeal and Alliance Gator.
Please share this Applying Polymeric Sand to an Existing Patio or Walkway your friends and do a comment below about your feedback.
We will meet you on next article.
Until you can read, Shark Cordless Vacuum Troubleshooting – Guide